Lesson 1
What is a Program?

Computers can do nearly anything you could imagine. They can play video games, play songs and movies, browse the internet, let you talk to people around the world, and even send people into space!
You might think that computers are very smart, but actually they aren’t. In fact, a computer on it’s own can’t do anything. It needs a program to tell it what to do.
What does a program look like?
You can touch a computer and pick it up, but programs aren’t things you can touch and hold. Instead, they are instructions that are written down and saved inside the computer as files.
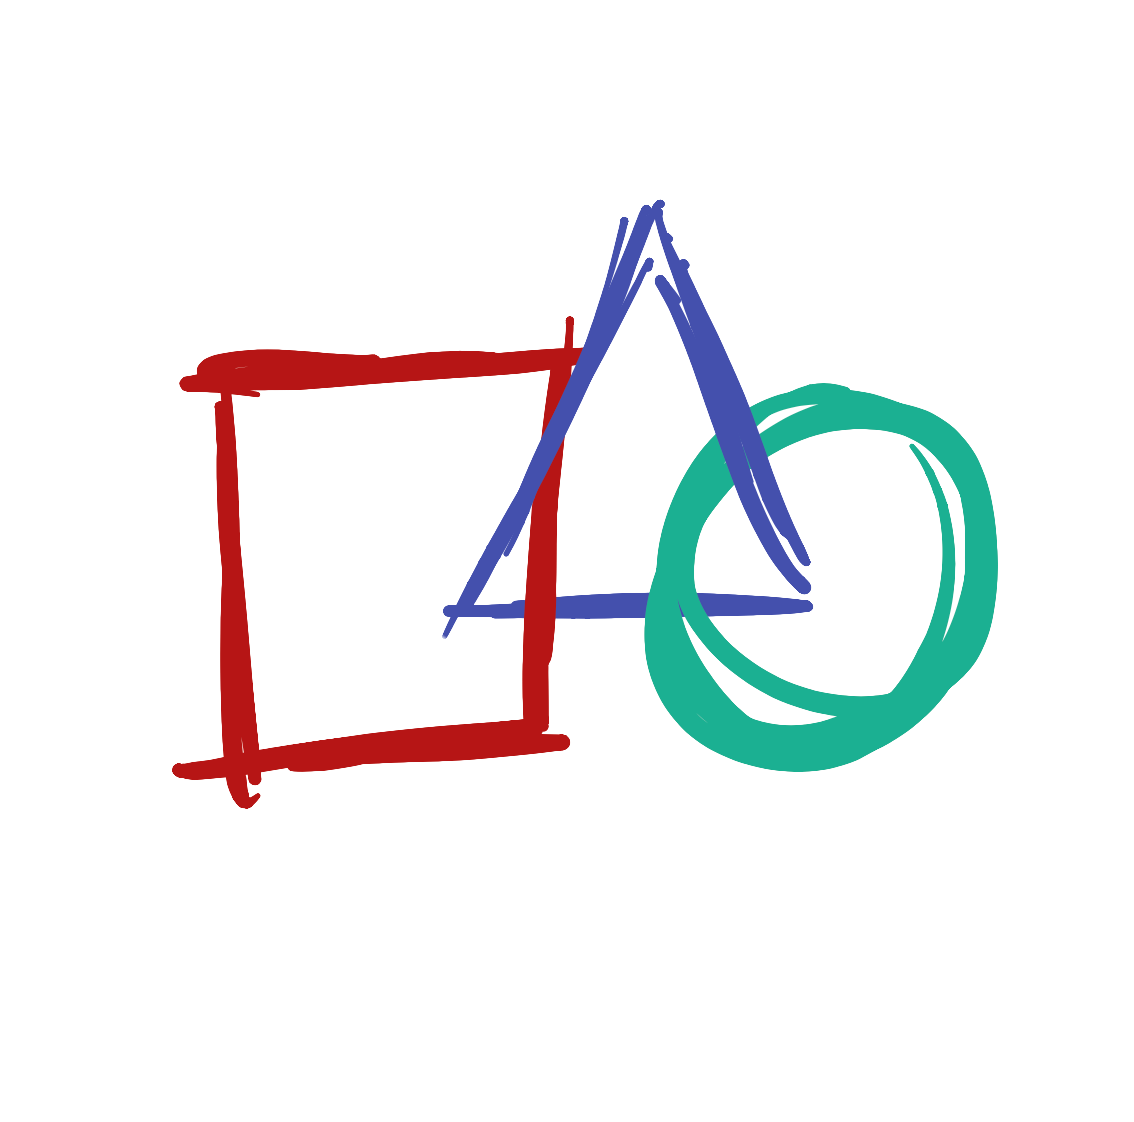
Programs are made up of instructions that are written in a way the computer can understand, and are written in English. It’s a weird kind of English, though… it might look a little like this:
This is what a programming language looks like. Don’t worry if that makes no sense right now! We will figure out what it means very soon.
Why should we learn to program?
There are so many programs out there, so why would we want to make our own?
There are many reasons to learn programming, but the main reason is that programmers can use computers to do whatever they want. Computers are really powerful!
Let’s say you have an idea for a game that you’ve never seen before. If you know how to write a program you can make it! Want to build a robot pet that follows you around? You will need to write a program to make that! Programming can also help you do amazing things with art, music, math, history, science, and more.
Programming is also a really cool job. Most programmers can work anywhere in the world, and a lot of companies are looking for people that can help them make their programs.
Think of something you would like to make a program for. It could be a game, something to help you talk to friends, a program that helps you do your homework, a website for your favorite hobby, or anything else!
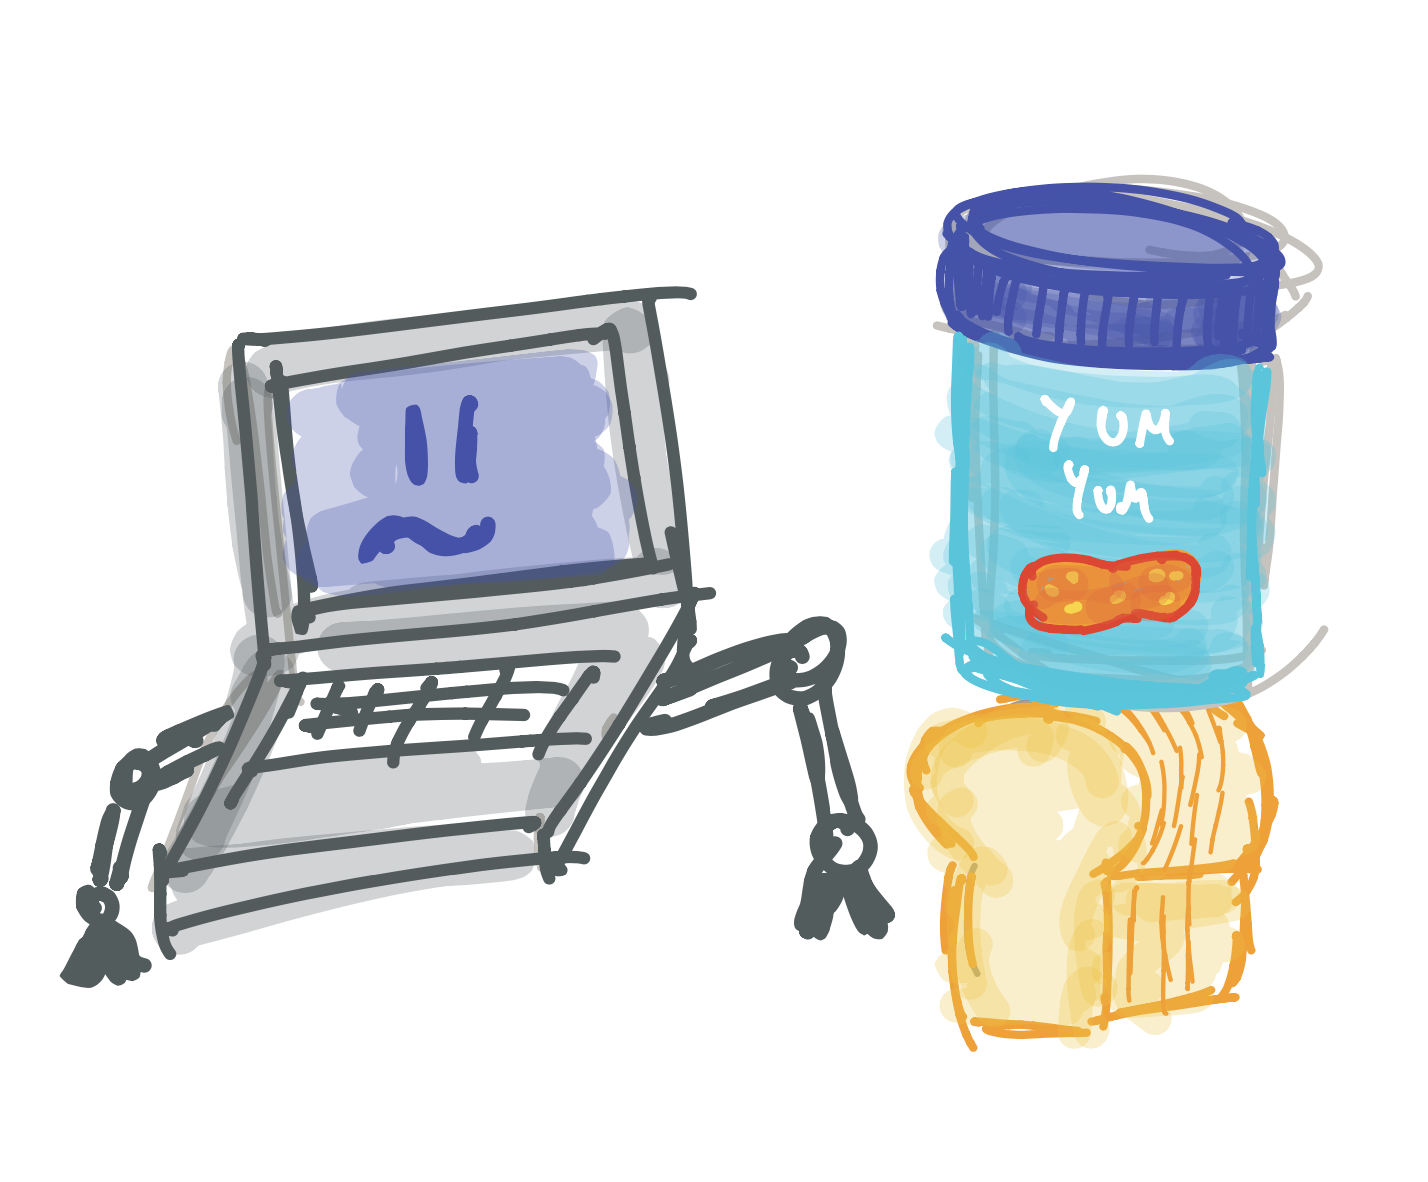
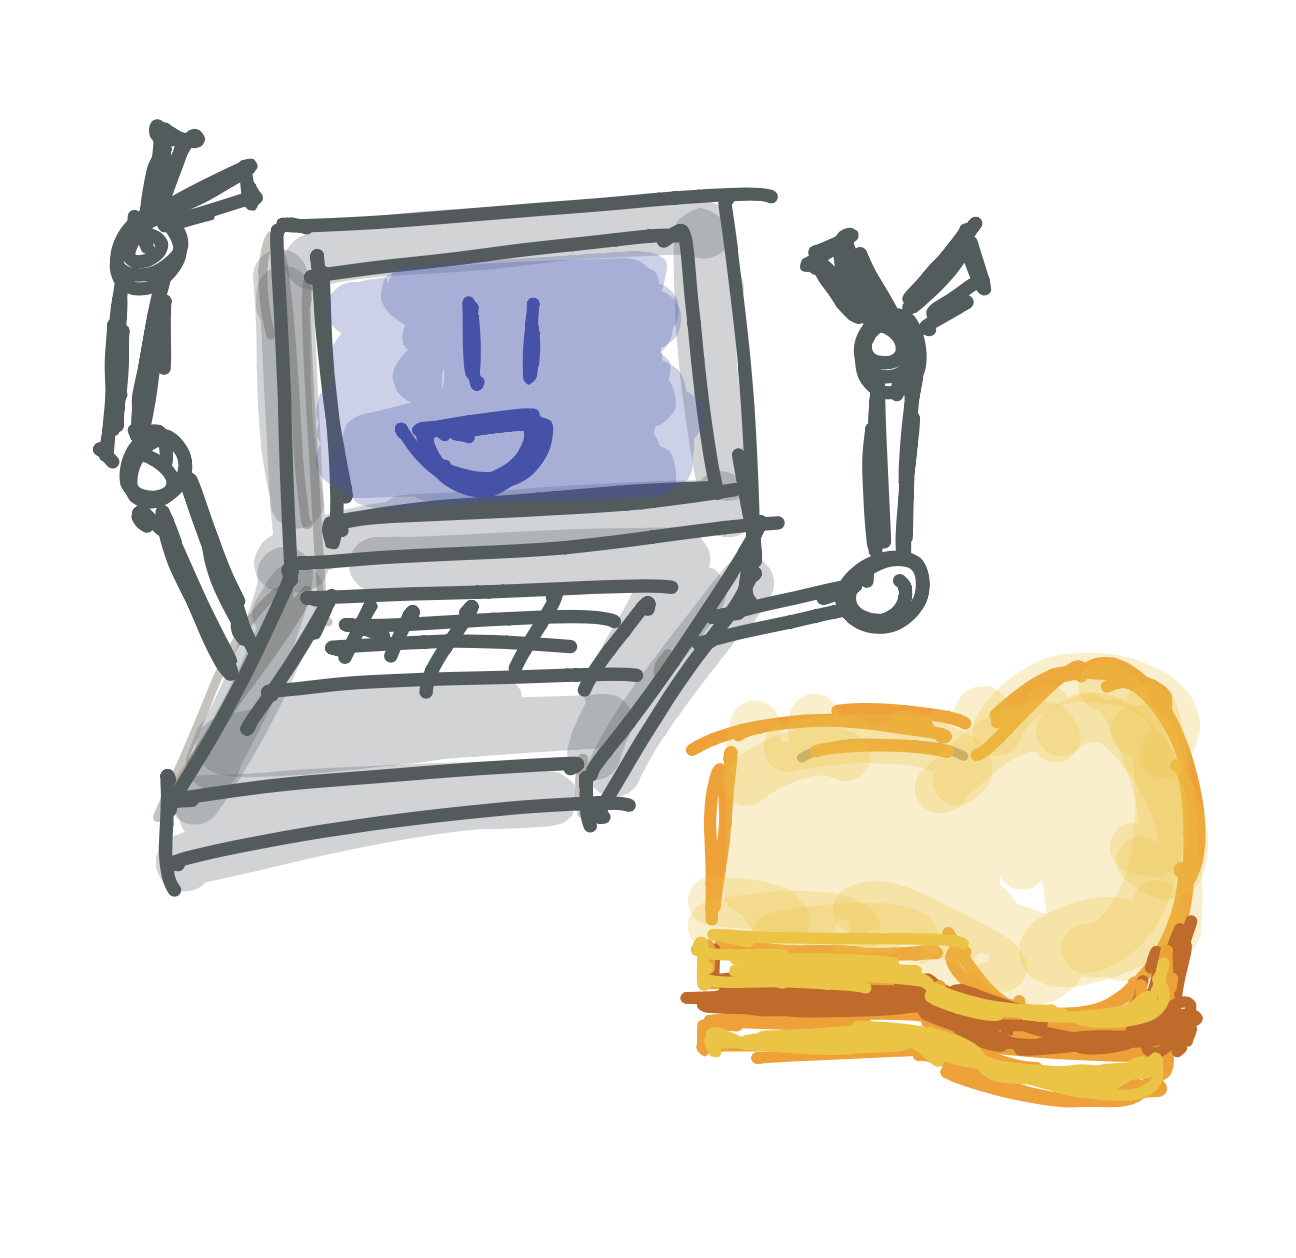
Making a peanut butter sandwich
Every program is made up of a bunch of instructions that the computer reads and follows. Computers need step-by-step instructions, and we need to be very careful with how we write them. Unlike humans, computers can’t guess what we mean, so we must be very clear.
Let’s pretend we want to write a program that tells the computer how to make a peanut butter sandwich.
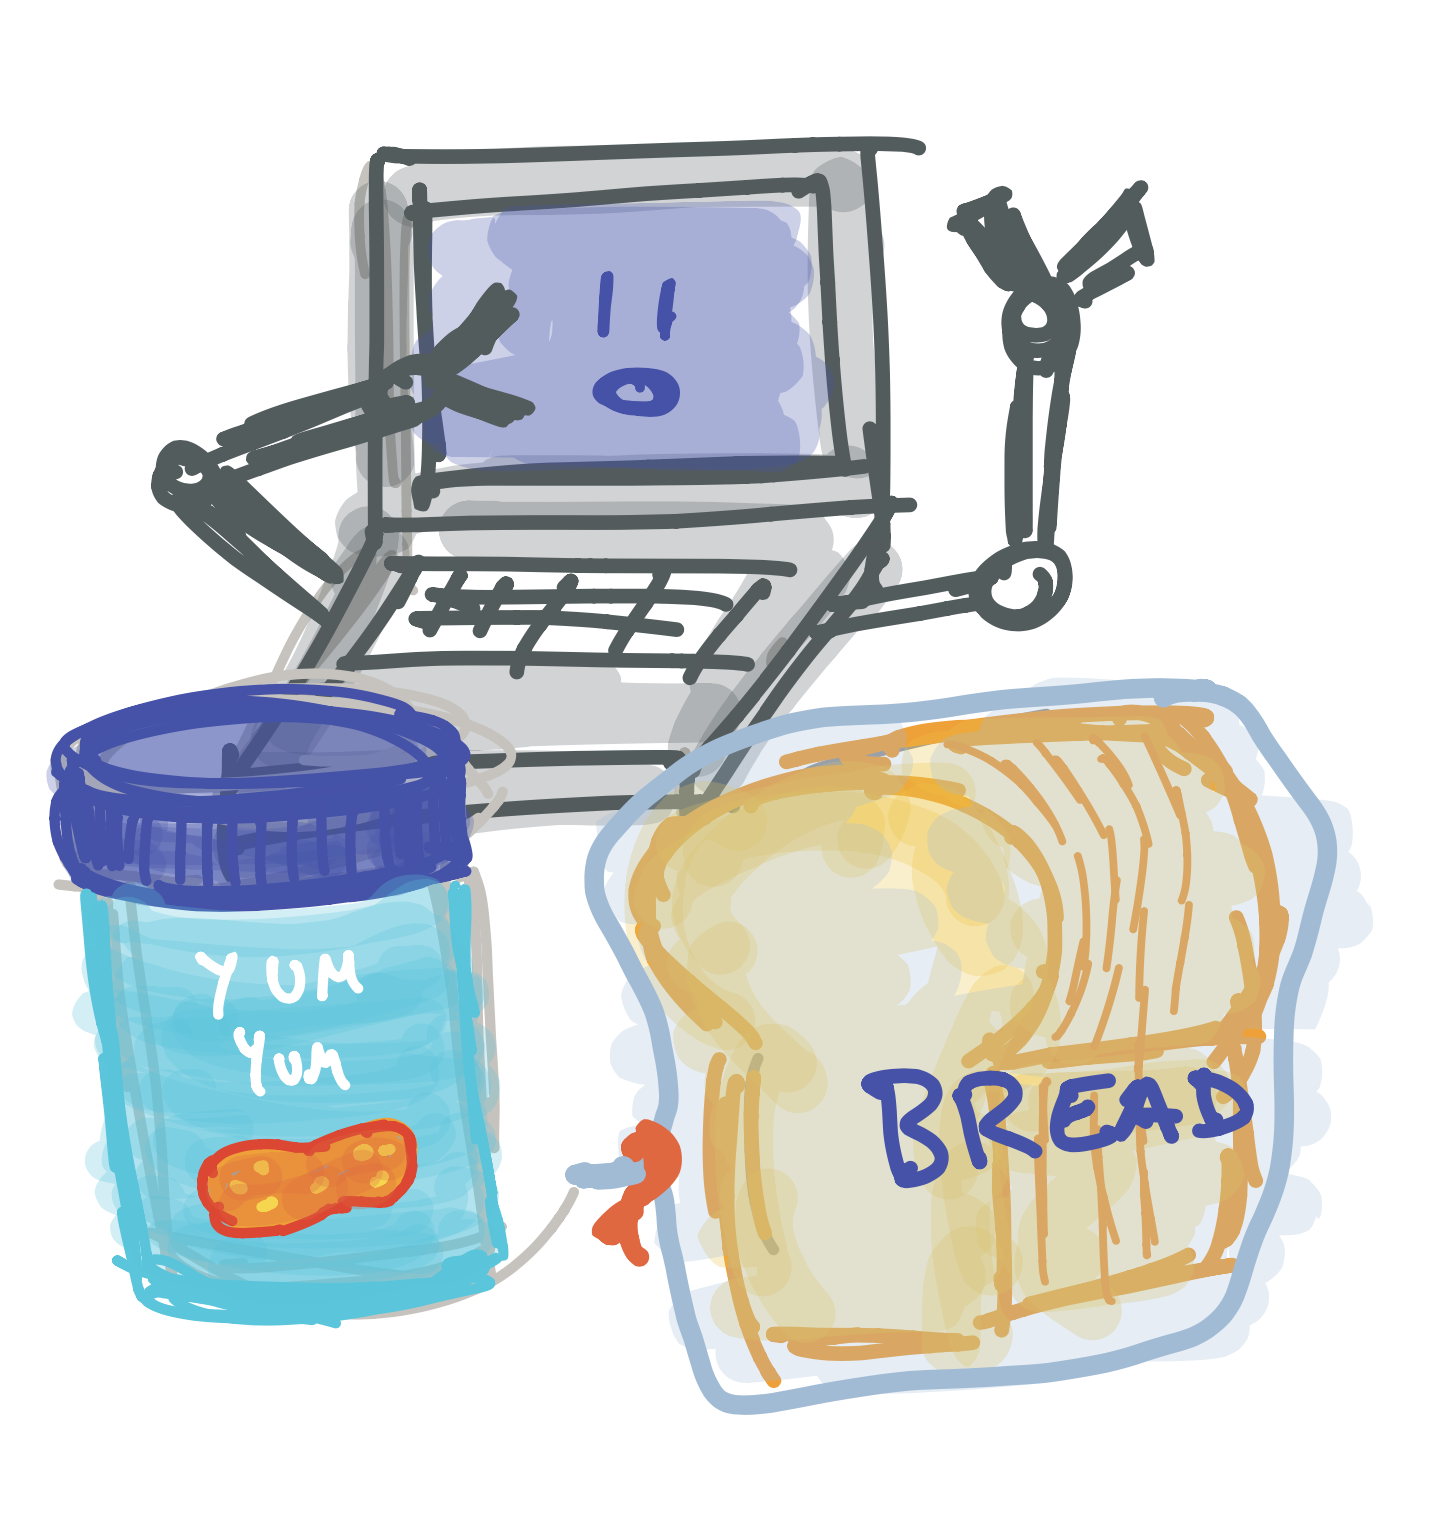
Pretend your computer has hands. What instructions would you give the computer to make a peanut butter sandwich?
Let’s say you asked your friend to make you a peanut butter sandwich but they don’t know how to make one. You might tell them something like this: “Take some bread and put peanut butter on it”.
If your friend hears this, they could probably understand what to do, but a computer won’t. Instead, it would look like this:
When we write a computer program, we need to be way more clear. Our program might look something like this:
- Take two pieces of bread out of the bag
- Open the peanut butter container
- Pick up a knife, put it in the peanut butter
- Spread the peanut butter on the bread slices
- Put the knife away
- Put the two pieces of bread together
As you can see, our programming instructions need to be very clear. This can be a little hard to get used to at first, but don’t worry! Our first programs will be very simple.
Enough chit-chat, let’s try to write a program!
Lesson 2
Opening Processing
We will be using a program called Processing to create our programs. Before we can make anything, we need to open Processing.
Wait, we’re using a program to write our program? Believe it or not, every program is made using another program. Makes you wonder how the very first programs were made!
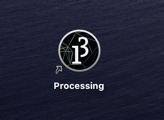
Look for the “Processing” icon on the desktop. It should look like this:
Double click on the icon to open Processing. Once it has loaded, you should see the Processing text editor on your screen:
We use Processing to write our own programs. To write a program, we click on the white area and type our instructions. Once we have finished writing our program, we click on the Play button to run it:

We are now ready to start making our first program!
Lesson 3
Writing our first program
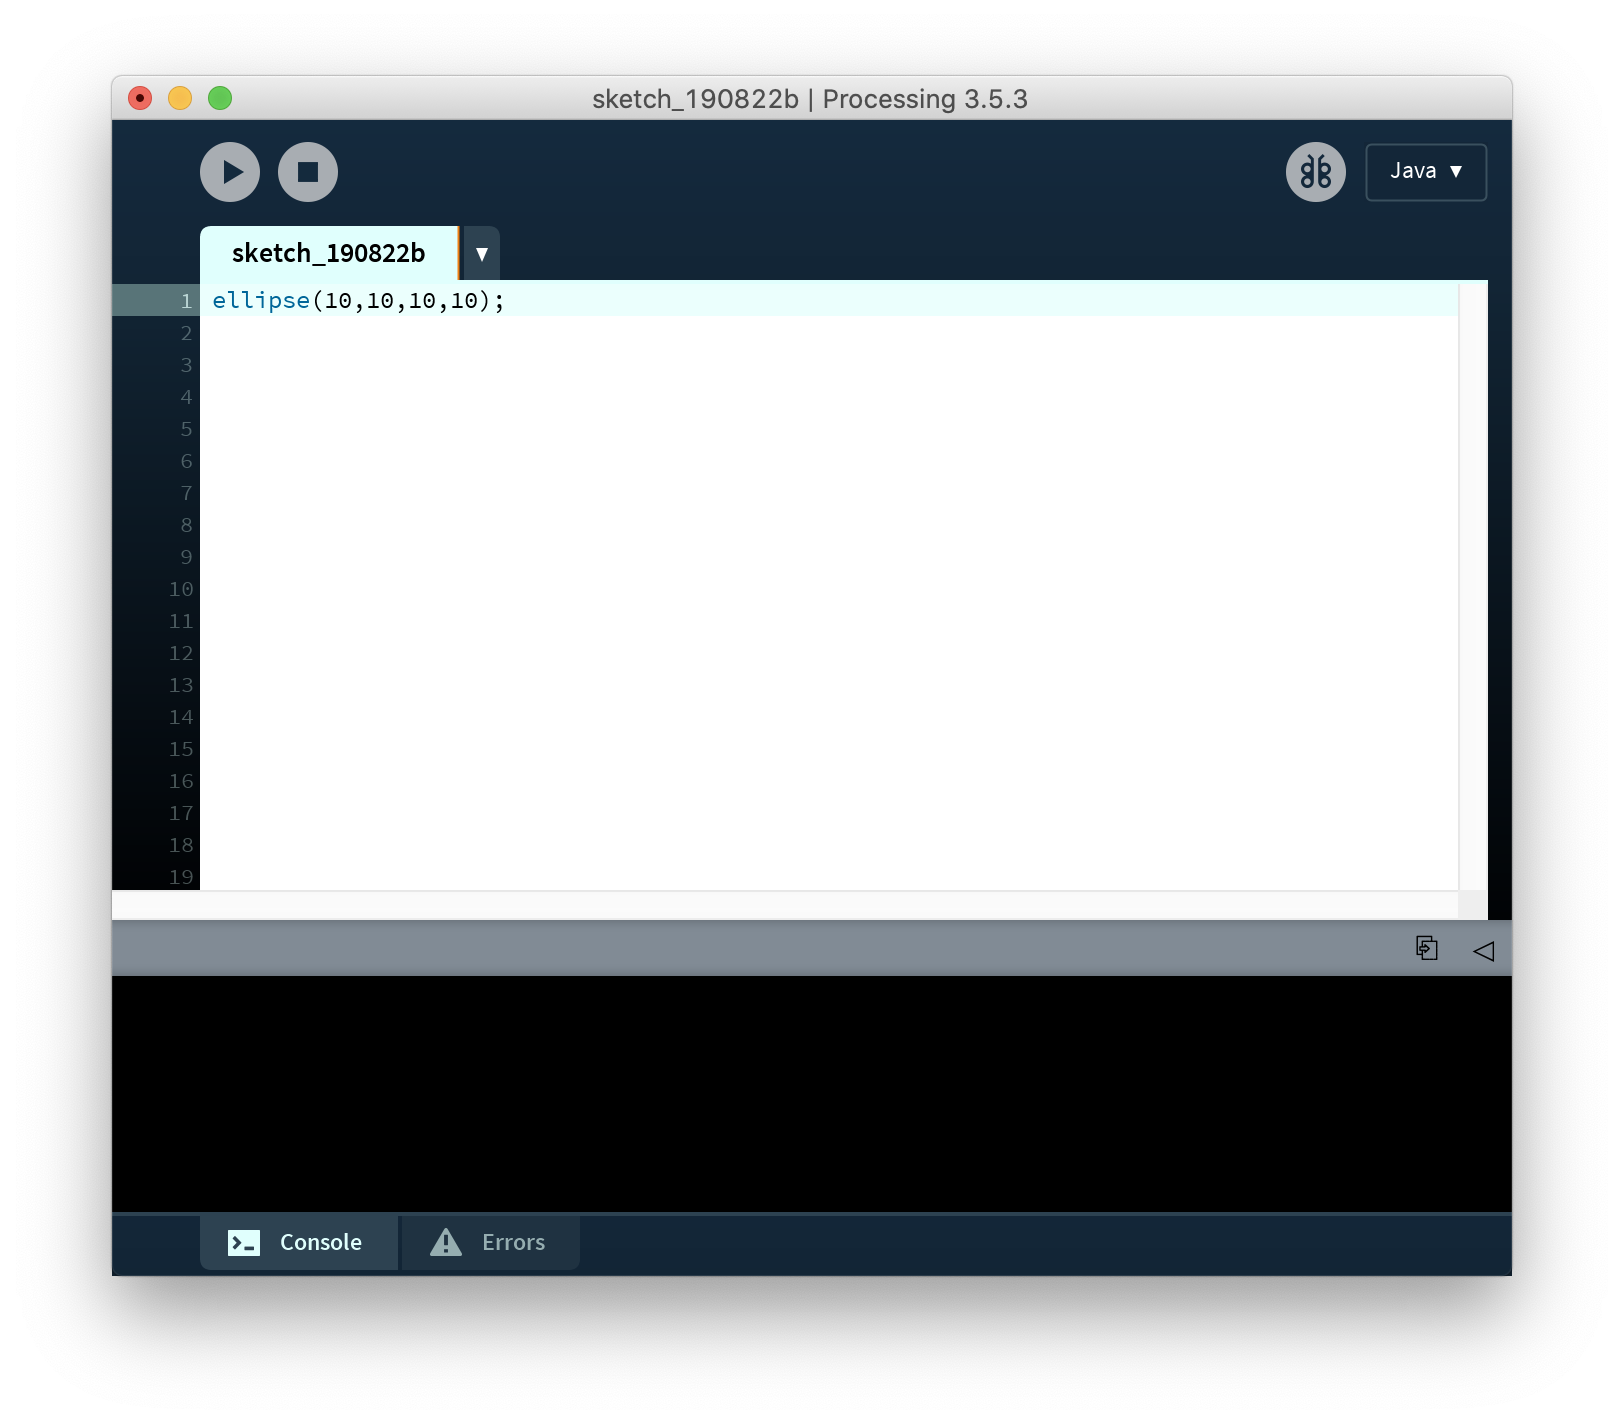
Let’s write our first program! Type the line below into the Processing text editor:
You should see this on your screen:
If you are typing and nothing shows up, make sure the text editor is focused by clicking your cursor anywhere on the white part (this is the text editor) to select it. You should now be able to type into it.
Let’s run your program! Click on the Play icon on the top of the Processing window:

You should see a new window with a circle in it:
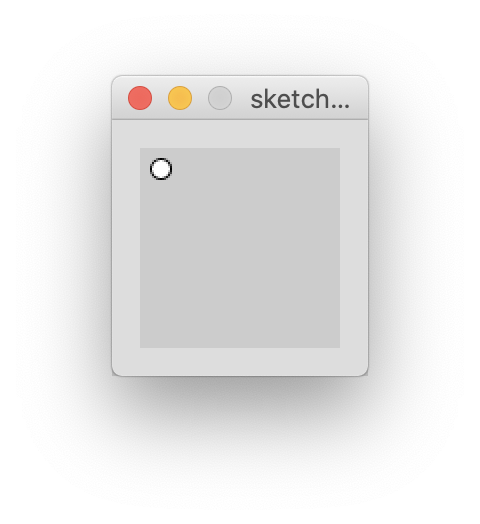
Congratulations! You just wrote your first program.
Lesson 4
Parts of an instruction
Our simple program…
…may not make any sense to us right now, but let’s try to figure out what we just wrote.
The computer does not know what we want to do unless we give it instructions. The line we just typed is an instruction that tells it to draw an ellipse (ellipses are round shapes like circles or ovals).
Great! Now the computer knows we want to draw an ellipse, but we still need to give it more instructions! If we didn’t, it wouldn’t know how big to make our circle or where to put it. Computers don’t like guessing!
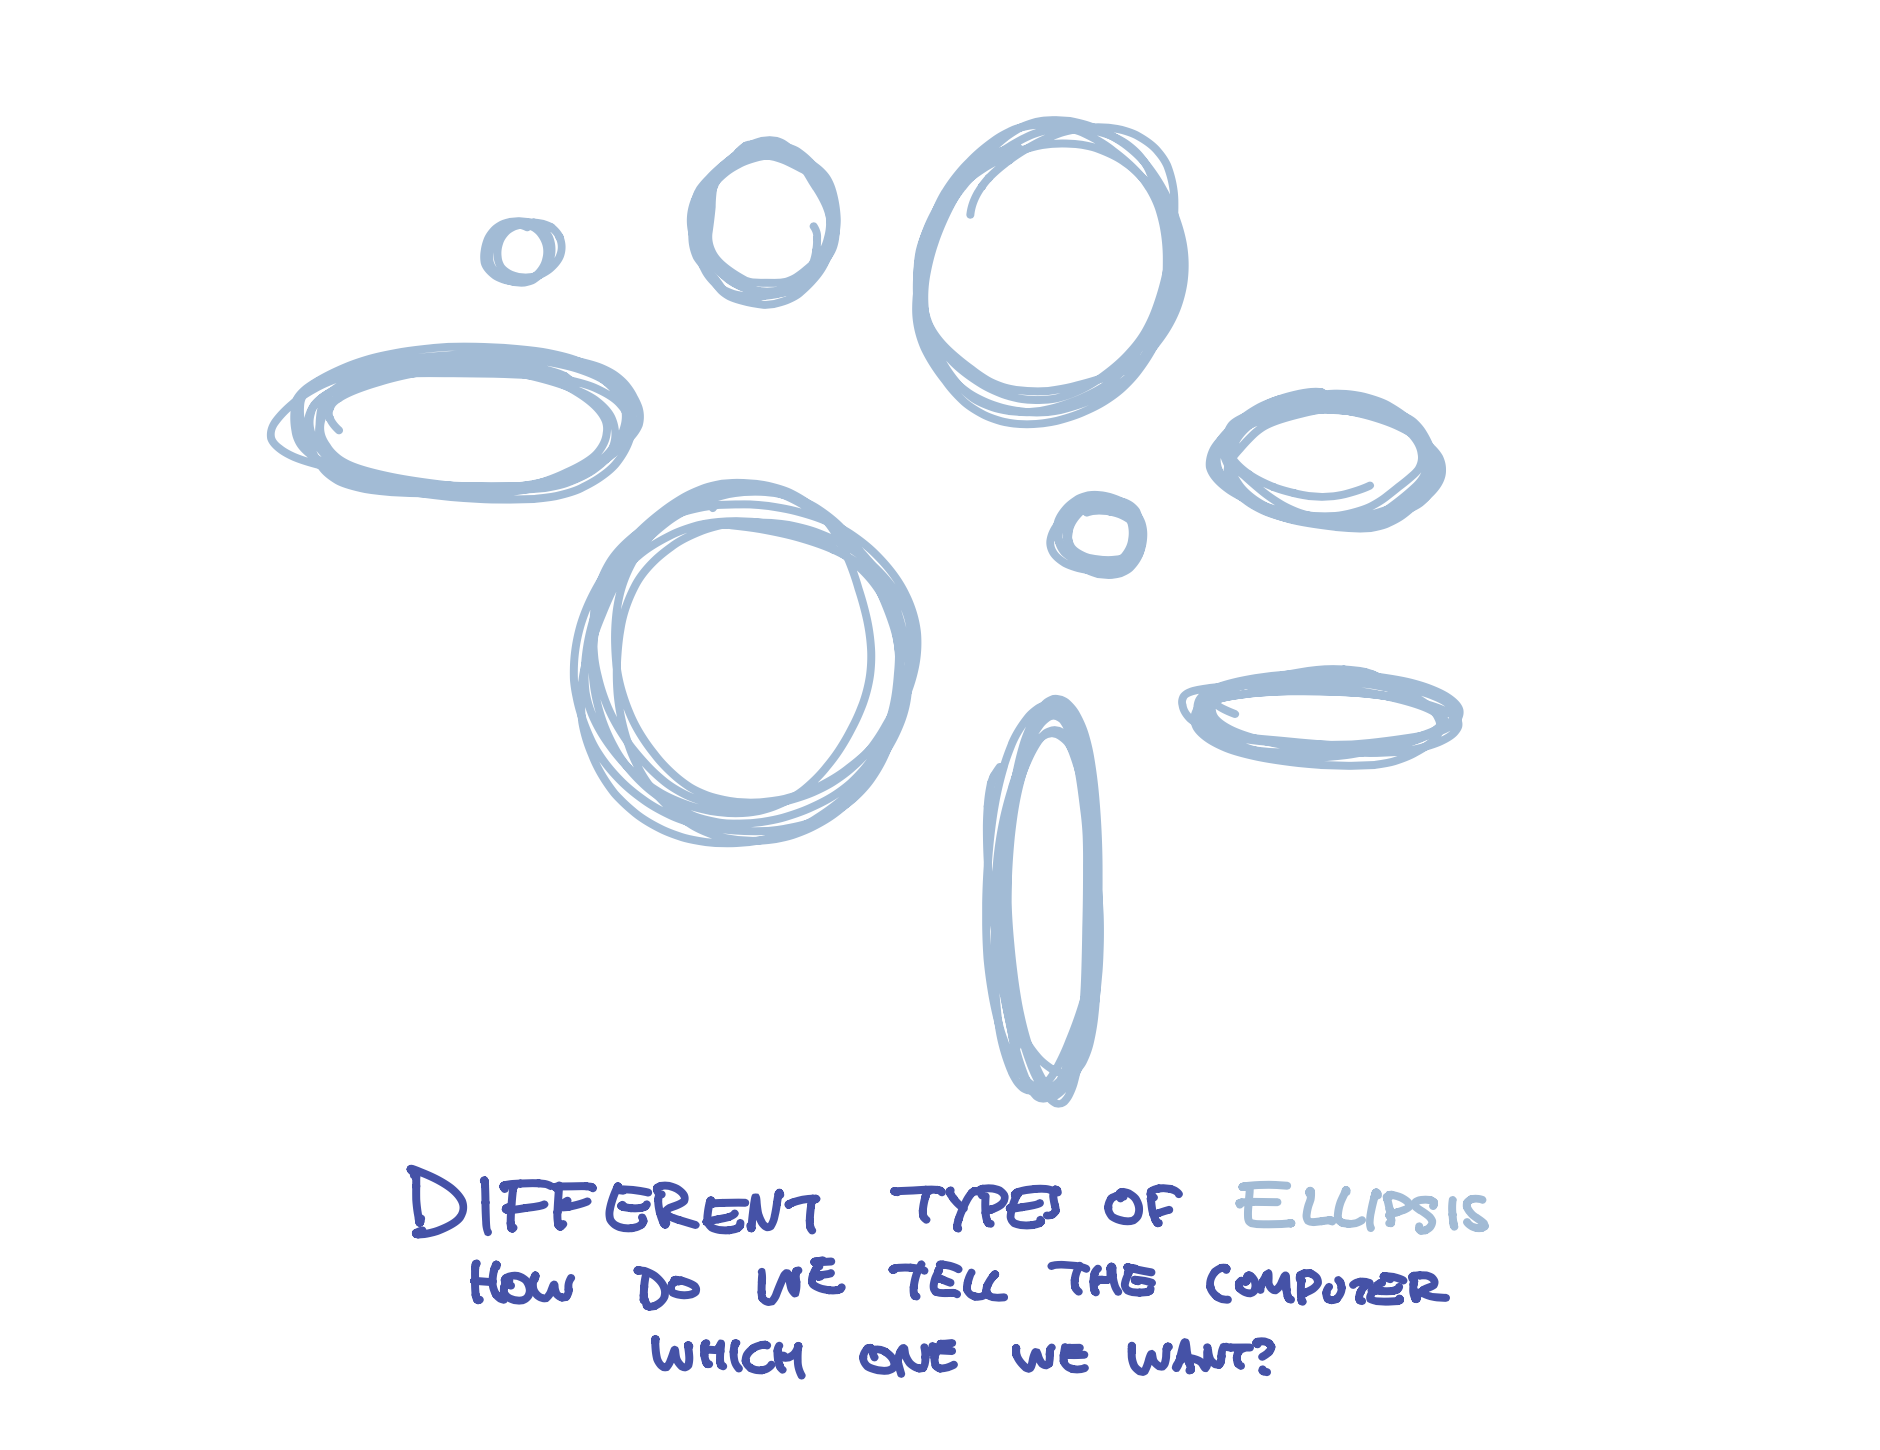
That’s where the second part of our instruction comes in - the numbers that look like (10,10,10,10). In programming, we call these arguments, but they are just part of the instruction that tells the program where to put the circle and how big to make it.
Finally, we need to tell the program that we are finished giving it an instruction. You might use a period when you are writing a sentence, but computers use a different letter - the semicolon: ;. It’s a weird letter, but that’s what we use to tell programs we are finished with our instructions.
So, what did we do when we wrote this line? We gave the program a function (draw an ellipse), a bunch of arguments (10,10,10,10), and then told it we are finished with our instruction ;
We don’t know what the numbers do yet, but let’s try changing them! Change the numbers to something different (but keep each number under 100 for now), then click the Play button. What happens to your circle?
Try changing the numbers to something else like (30,25,32,48), then click Play. What happens to your cicle? Try changing the number a few times!
Lesson 5
Drawing more shapes
We just drew a circle with the ellipse function, but there are so many other types of shapes we can draw.
Rectangles and Squares
Let’s make a square! Press the ‘Backspace’ key until all of your code is removed, and then type the line below:
rect(10,10,50,50);
Now press the Play button. You should see this on your screen:
This program looks a lot like our first program, but we replaced the ellipse function with the rect function. We have now told the computer we want to draw a rectangle instead of a circle.
Lines
Let’s try a different function. Replace the rect function with line.
Your program should look like this:
line(10,10,50,50);
Now press the Play button. You should see this on your screen:
Triangles
Let’s try drawing a triangle! Press the ‘Enter’ key, then type the line below:
Your program should look like this:
line(10,10,50,50);
triangle(50,50,20,90,80,90);
Now press the Play button. You should see this on your screen:
We just did a couple of interesting new things! All of the functions we have written until now have four numbers, but the triangle function has six! Some functions - like triangle - need more information than others.
The other thing we just did is we wrote a program that has two instructions. When we run the program, the computer will first create a line and then create a triangle. This is why we need to type the ; semicolon at the end of each instruction, so the computer knows when to start the next instruction. You would think it could figure this out every time you type a new line, but computers aren’t very smart.
We’ve tried a bunch of functions, but each one of them has these weird numbers like (10,10,10,10) next to it. What do those mean? Let’s look at that next.
Lesson 6
Placing things on the screen
So far, we’ve written a number of functions - like ellipse - with a bunch of numeric arguments - such as (10,10,10,10) - that tell the program where to put the shapes and how big to make them. But what do these numbers mean?
The screen you see in front of you is made up of millions of teeny, tiny lights. When we write a program, we tell the computer what to do with these lights. But in order to do this, we need a way to tell the computer which lights we want to control.
If you hold a magnifying glass in front of a screen, you will see that it looks a little bit like this:
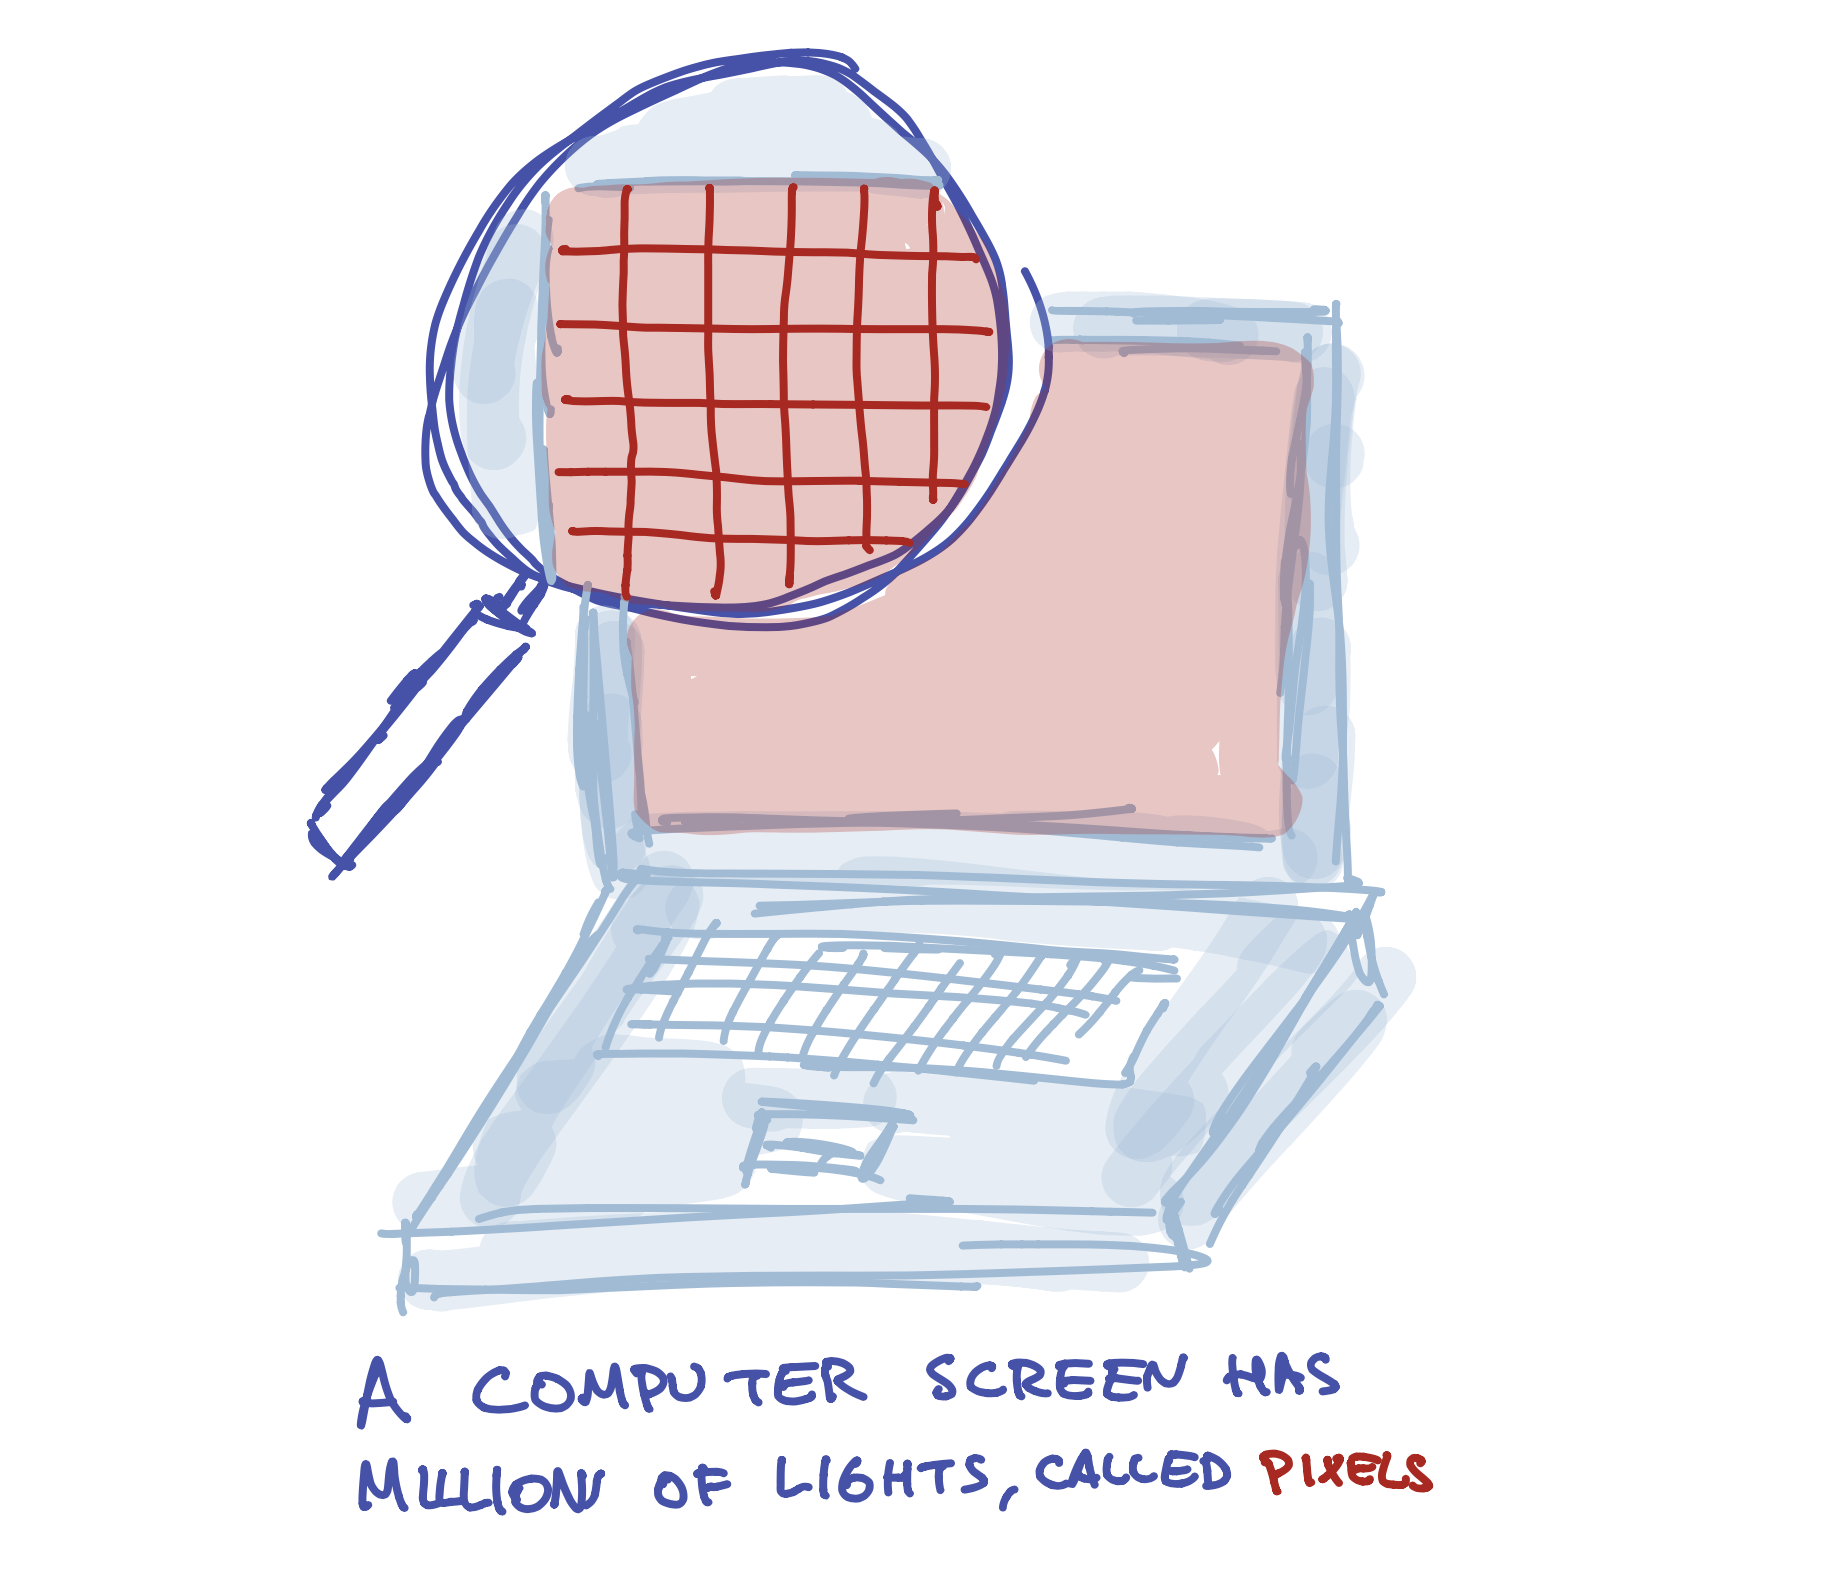
One way to think of a screen is like a graph paper:

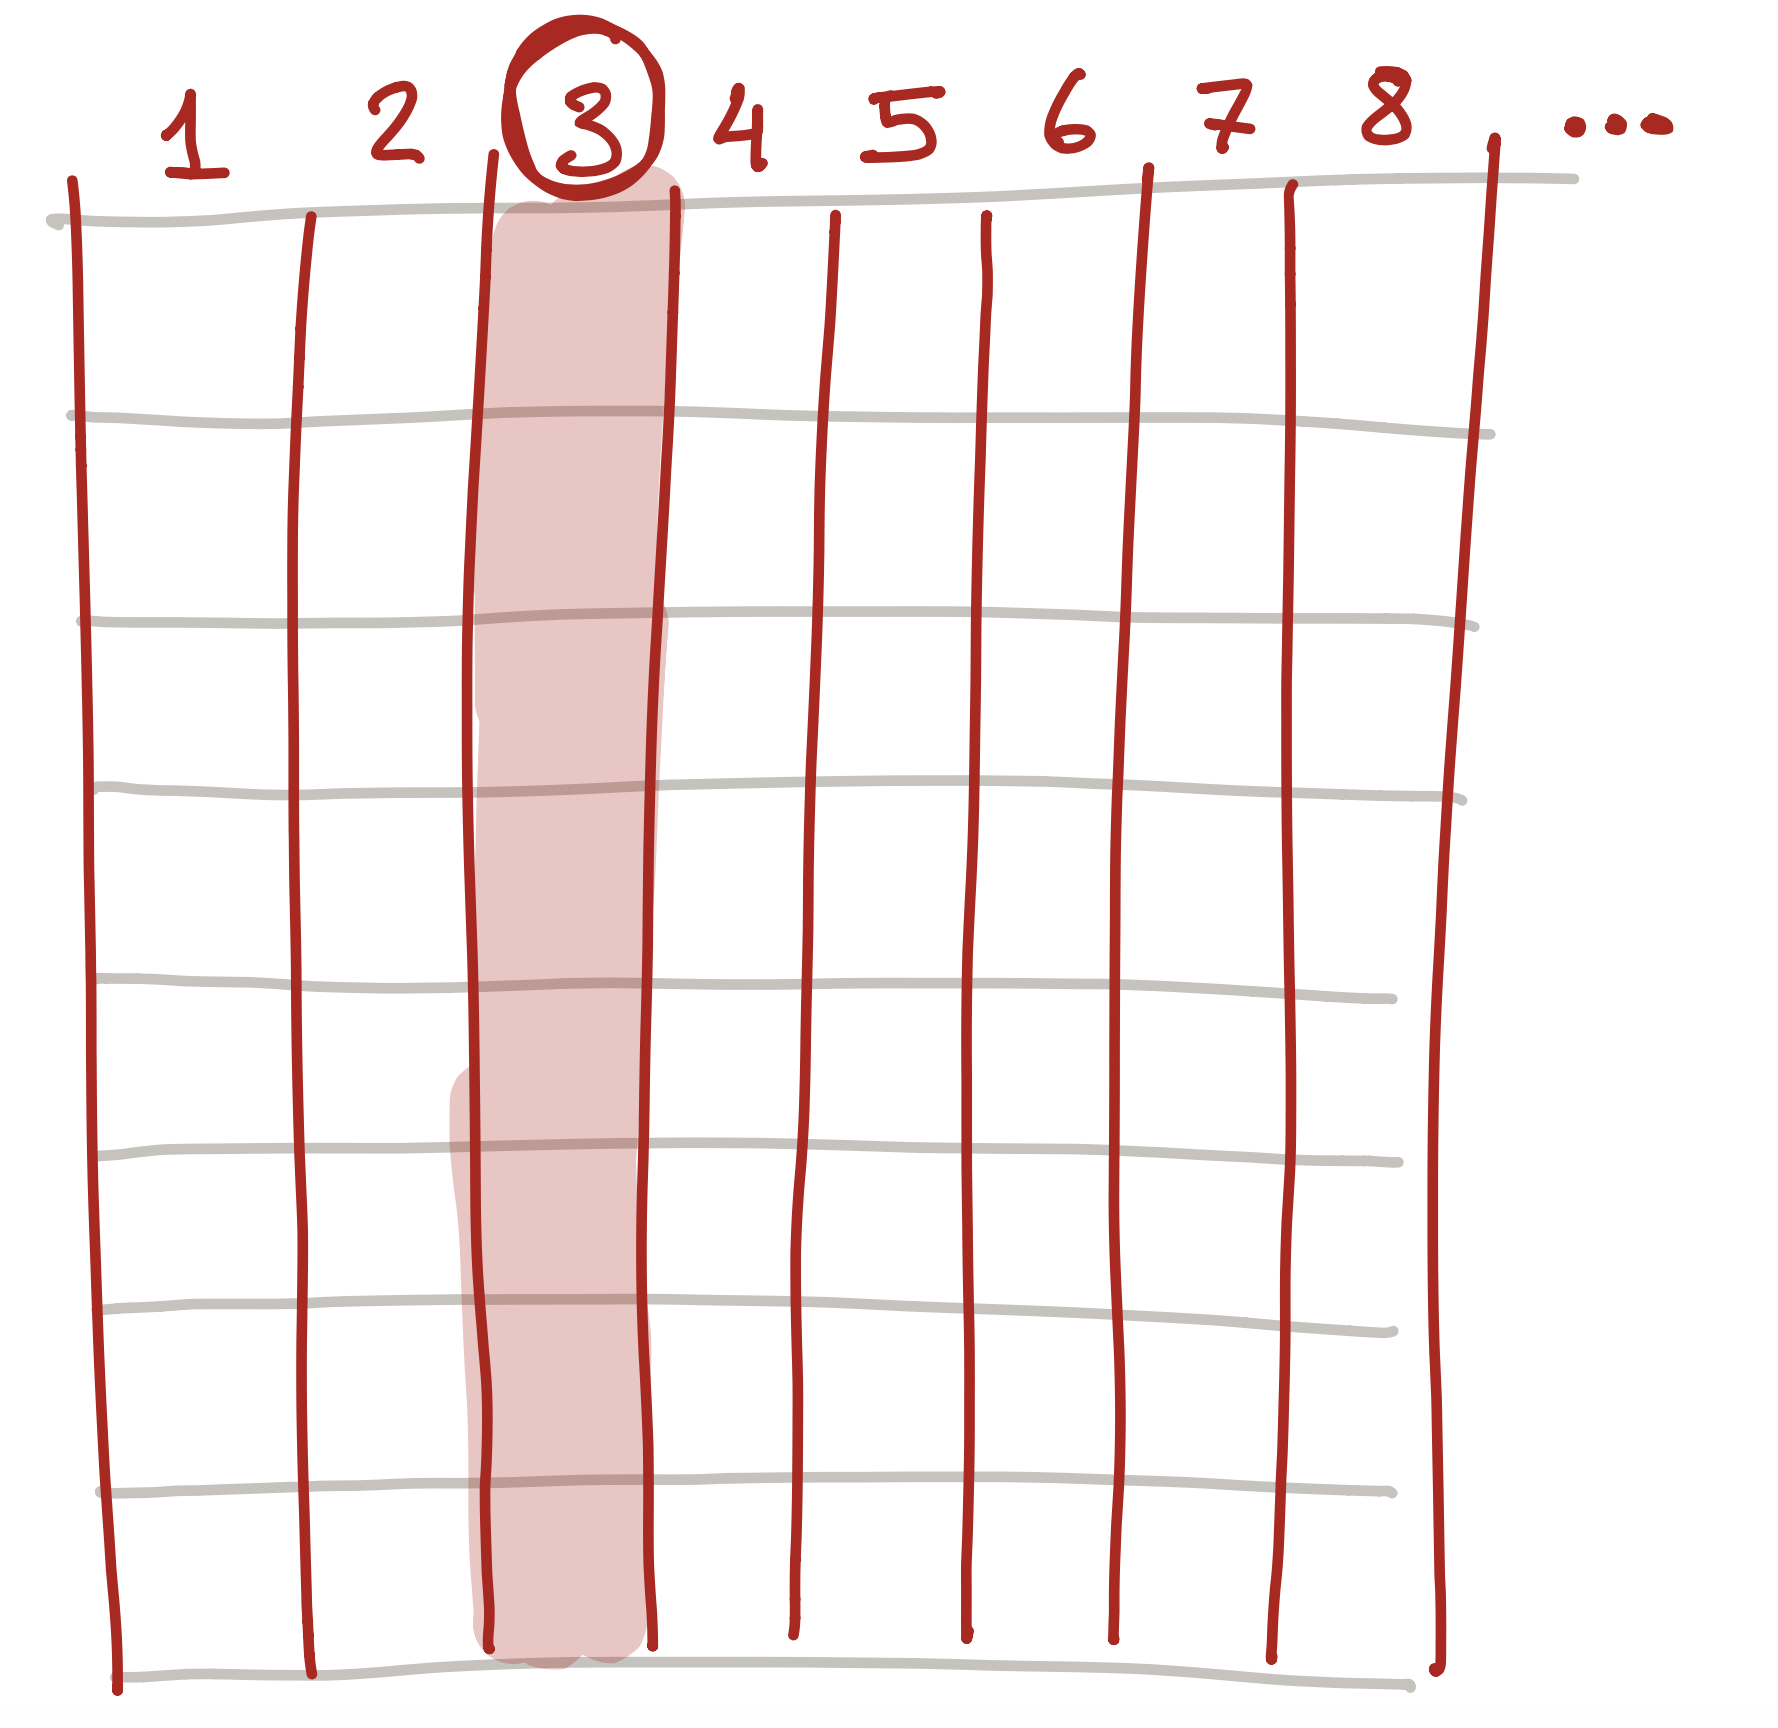
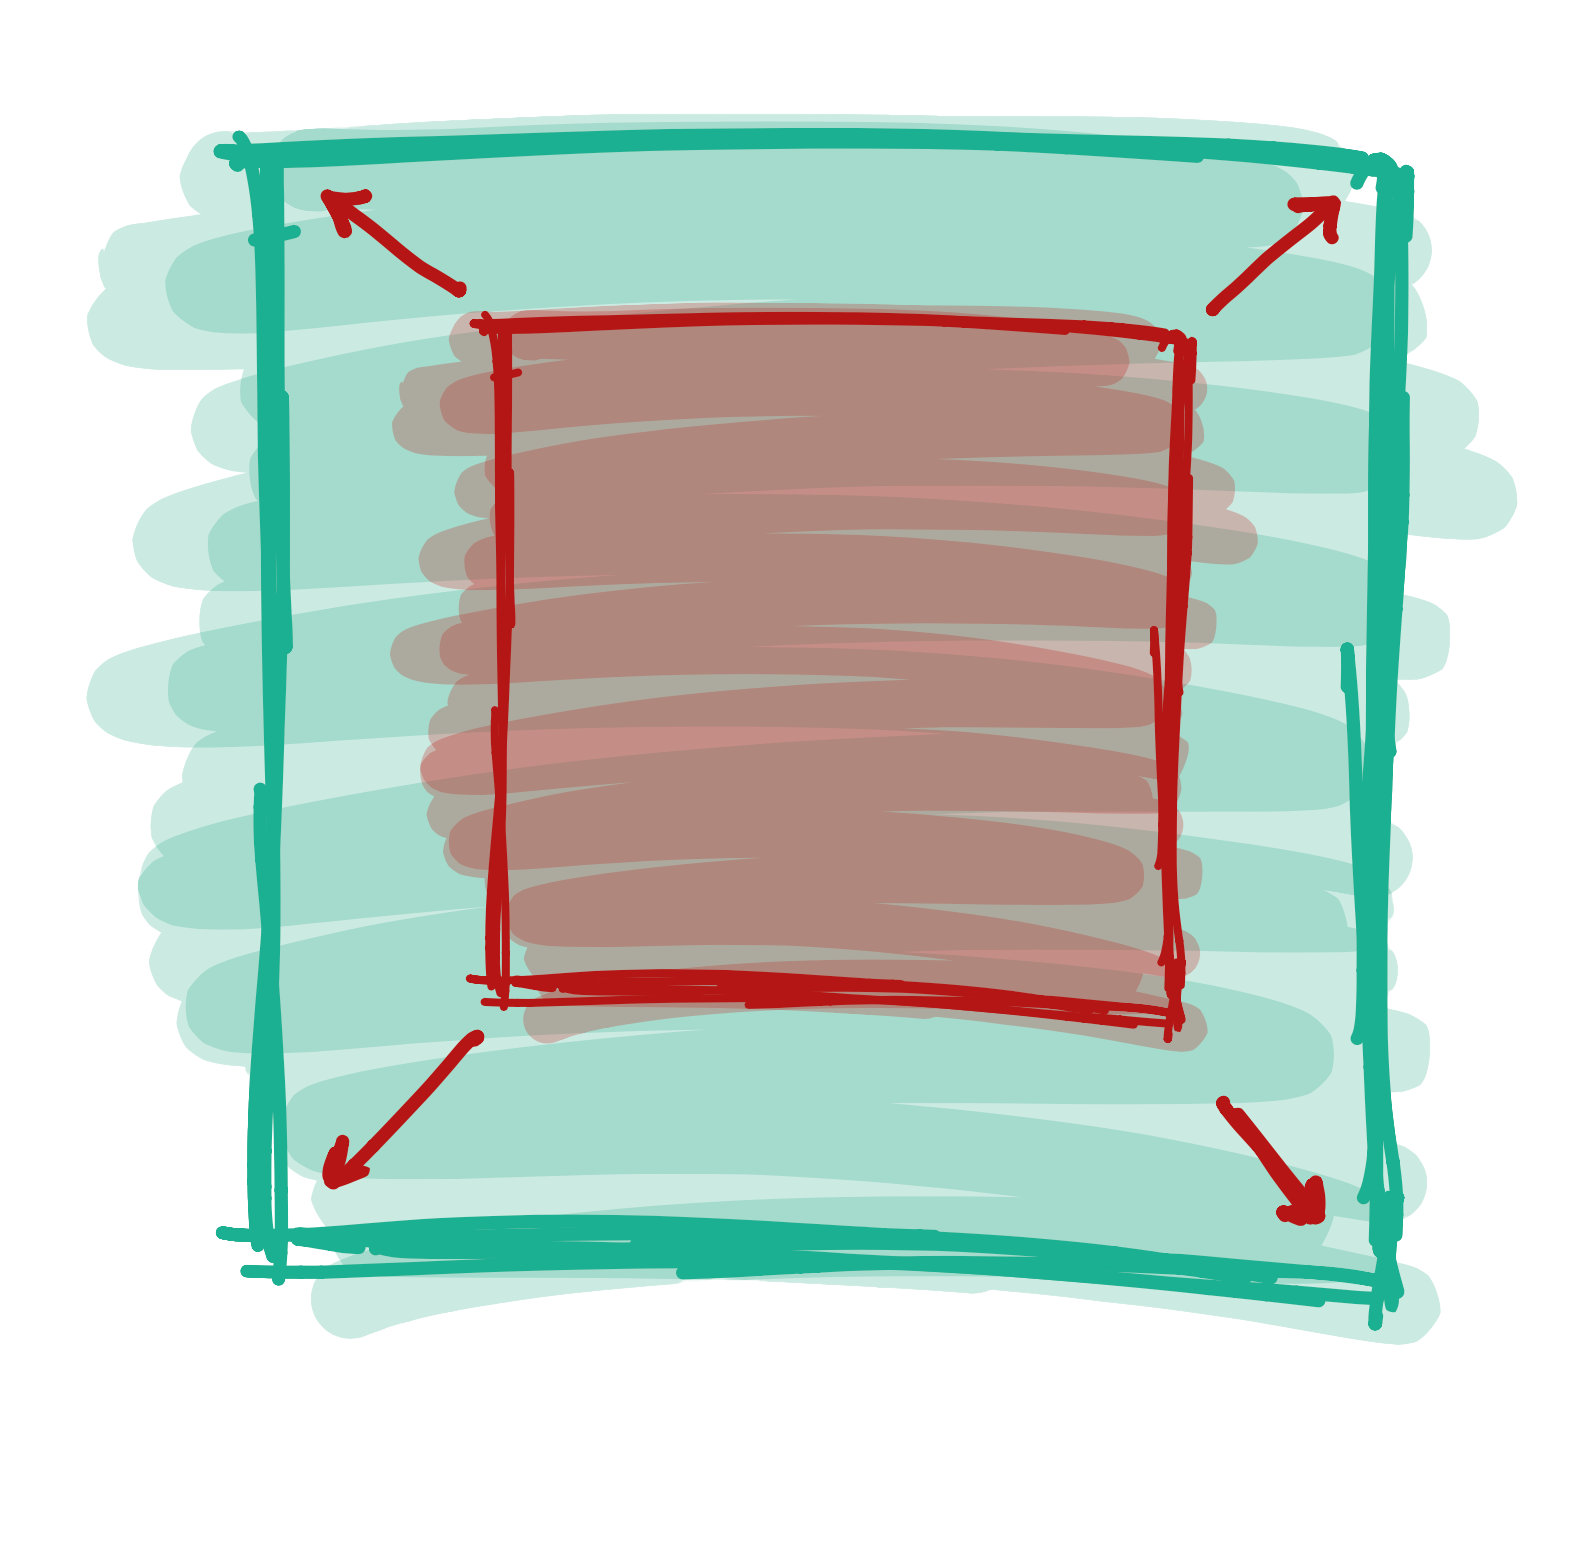
We need to pick a number for each light. The easiest way to do this (and the way programs do it) is by starting from the left side of the screen and giving the first column the number 1. We give the second column the number 2. The third is 3, and so on. So it looks a bit like this:
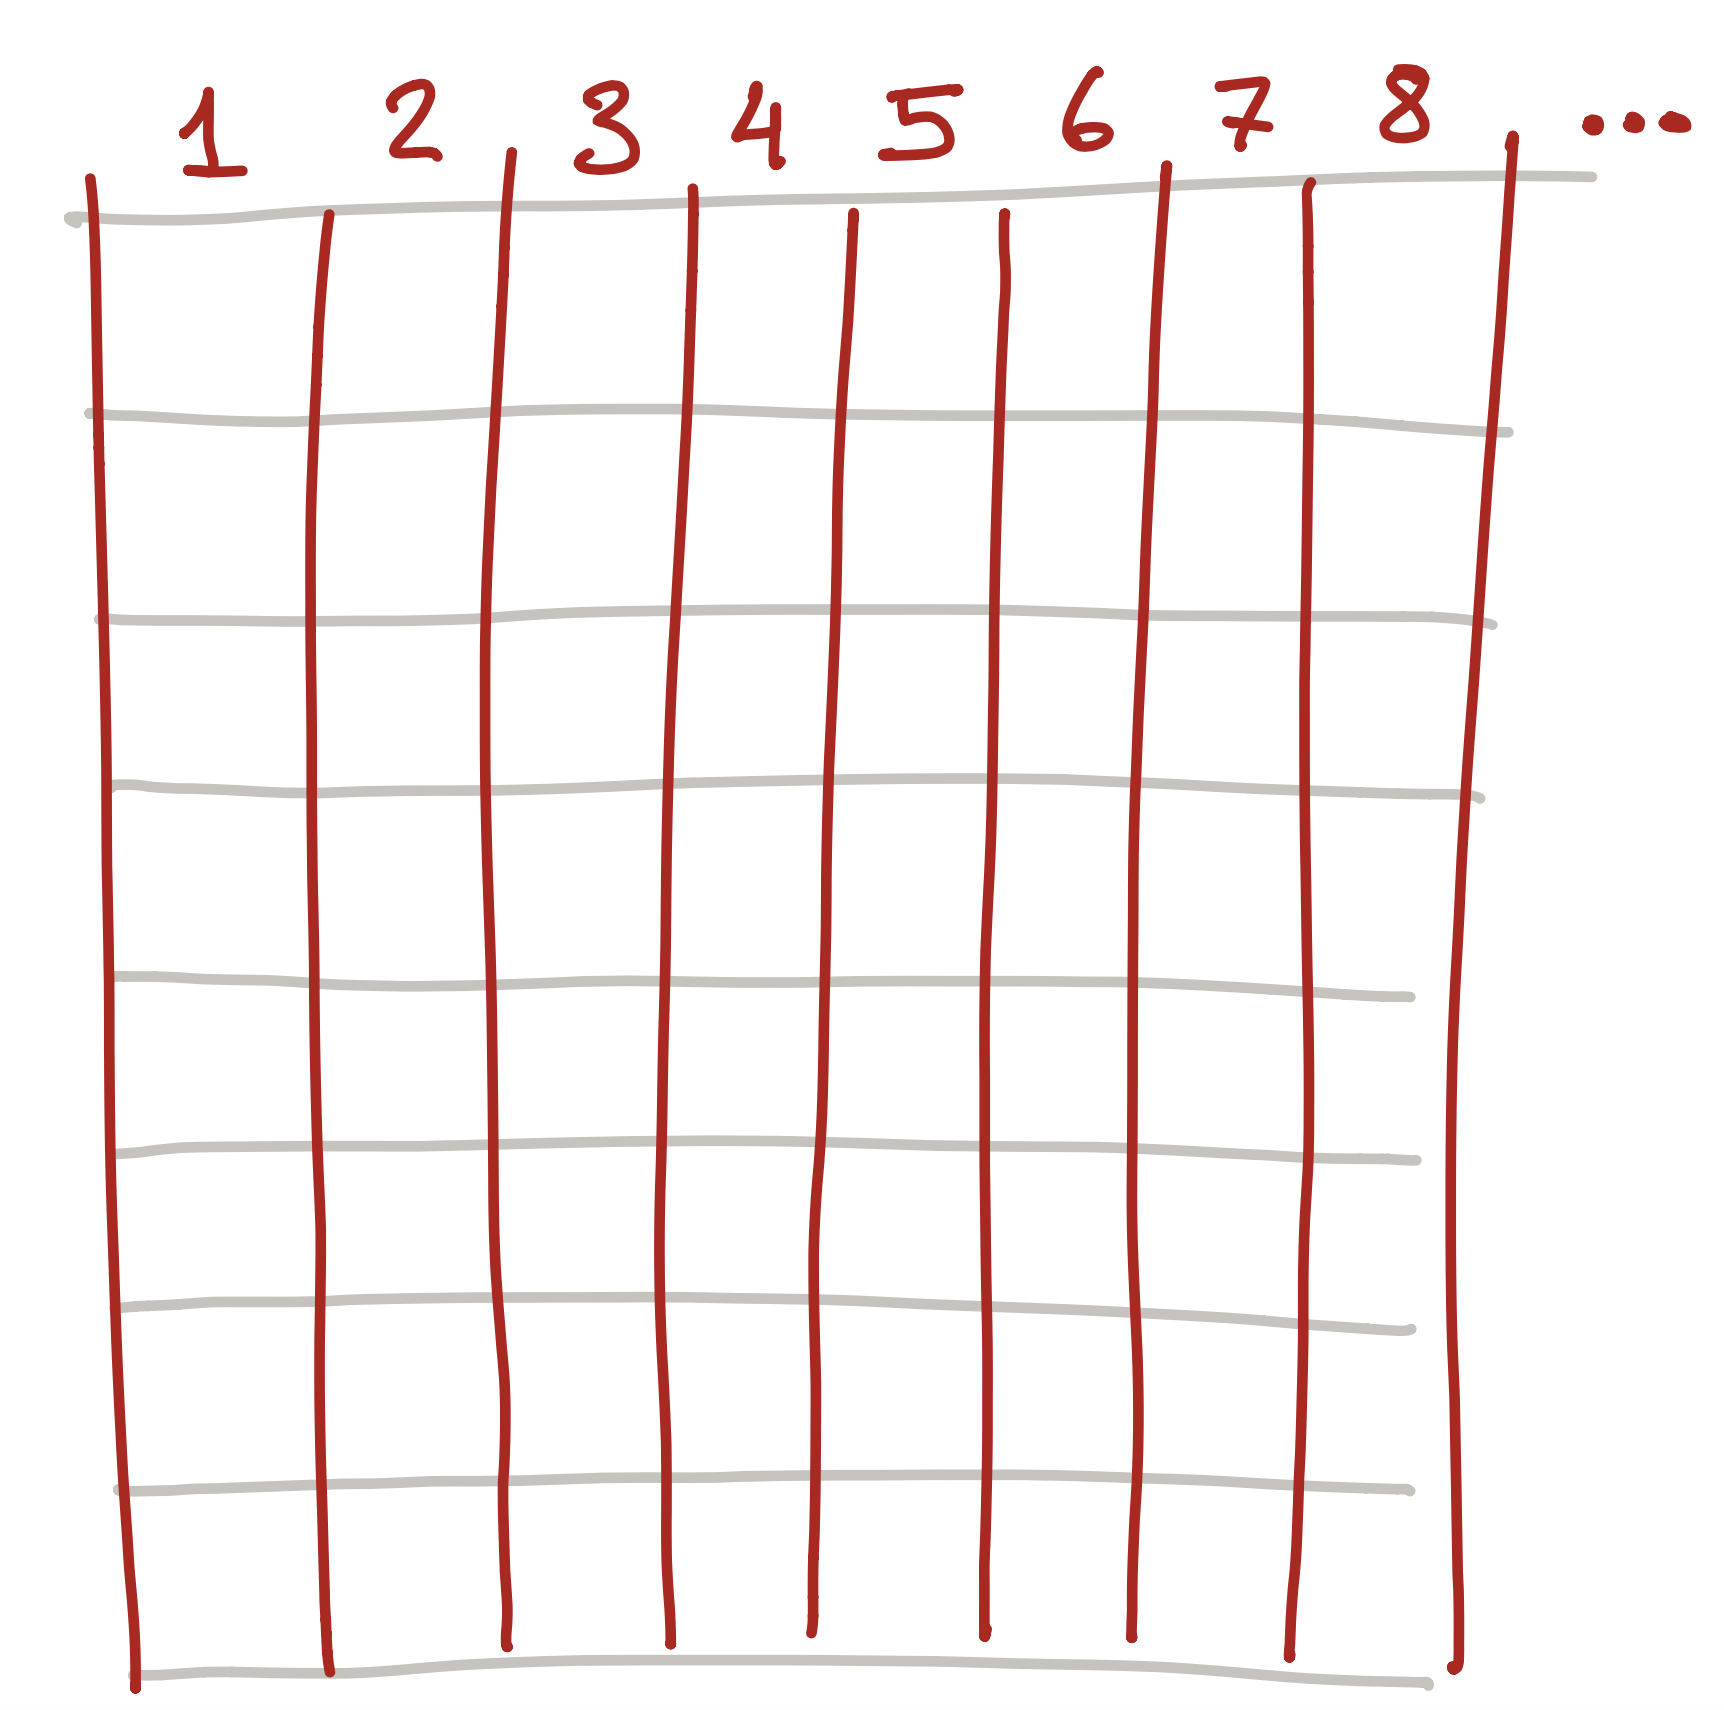
But this isn’t quite good enough! We can pick the column we want to control, such as column 3:
But what if we want to control a specific light? To do this, we also number each row starting from the top:
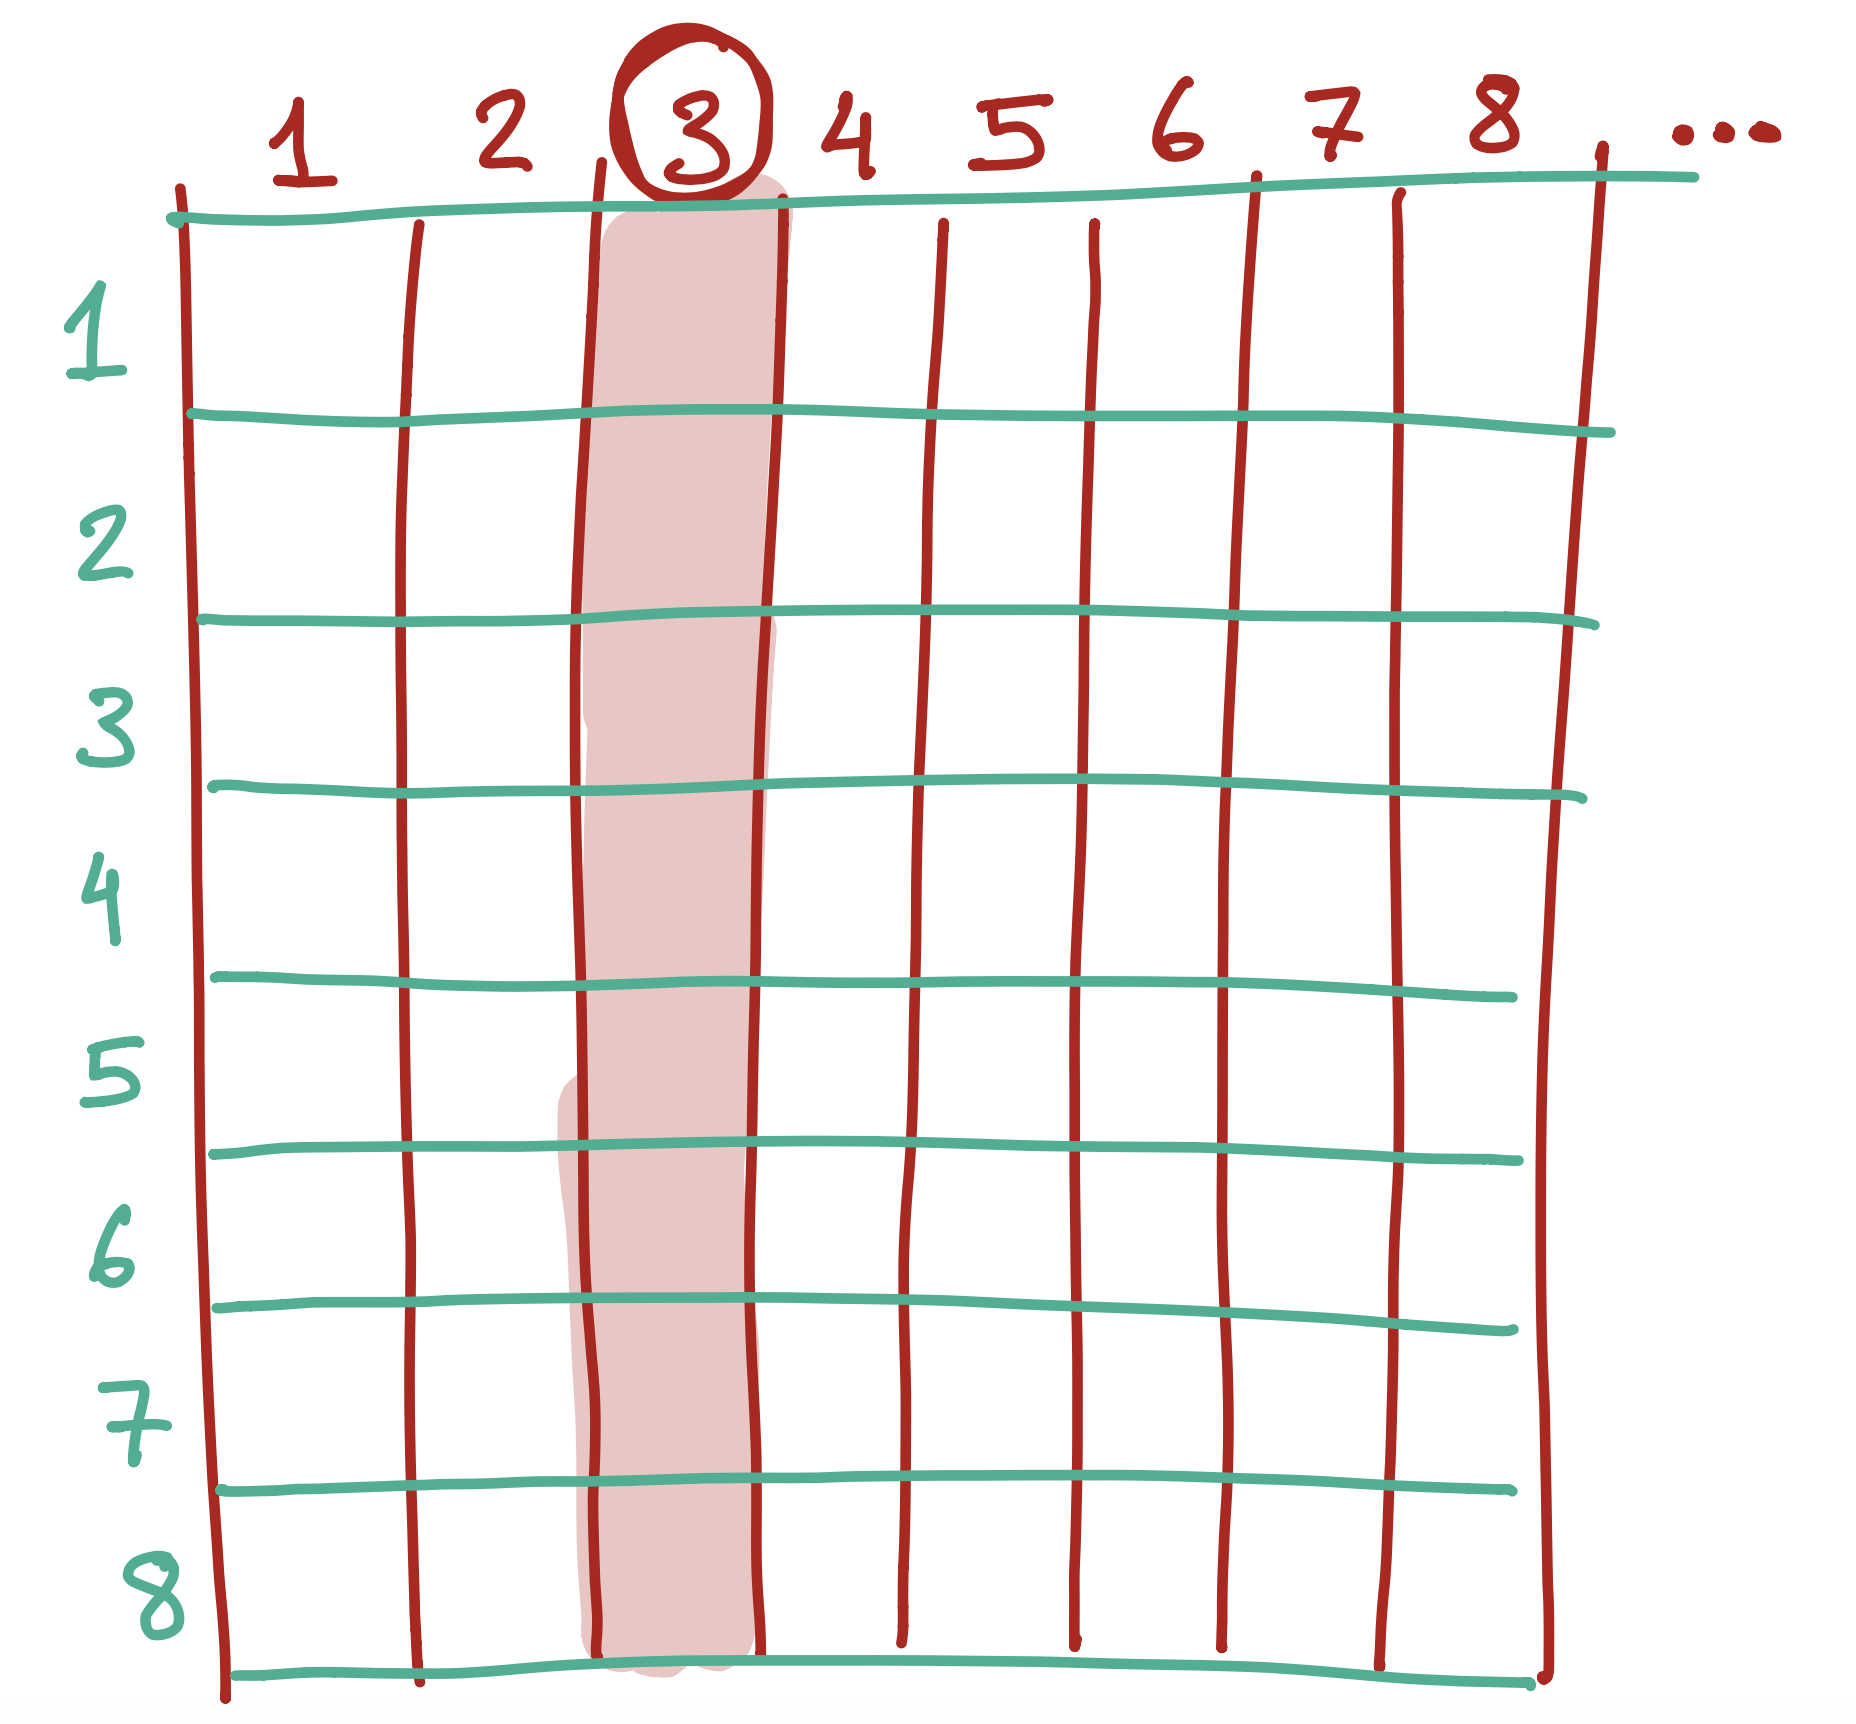
So each light actually has two numbers - the column and the row. So, the number in black below…
..is in the 3rd colummn from the left, and the 2nd column from the top.
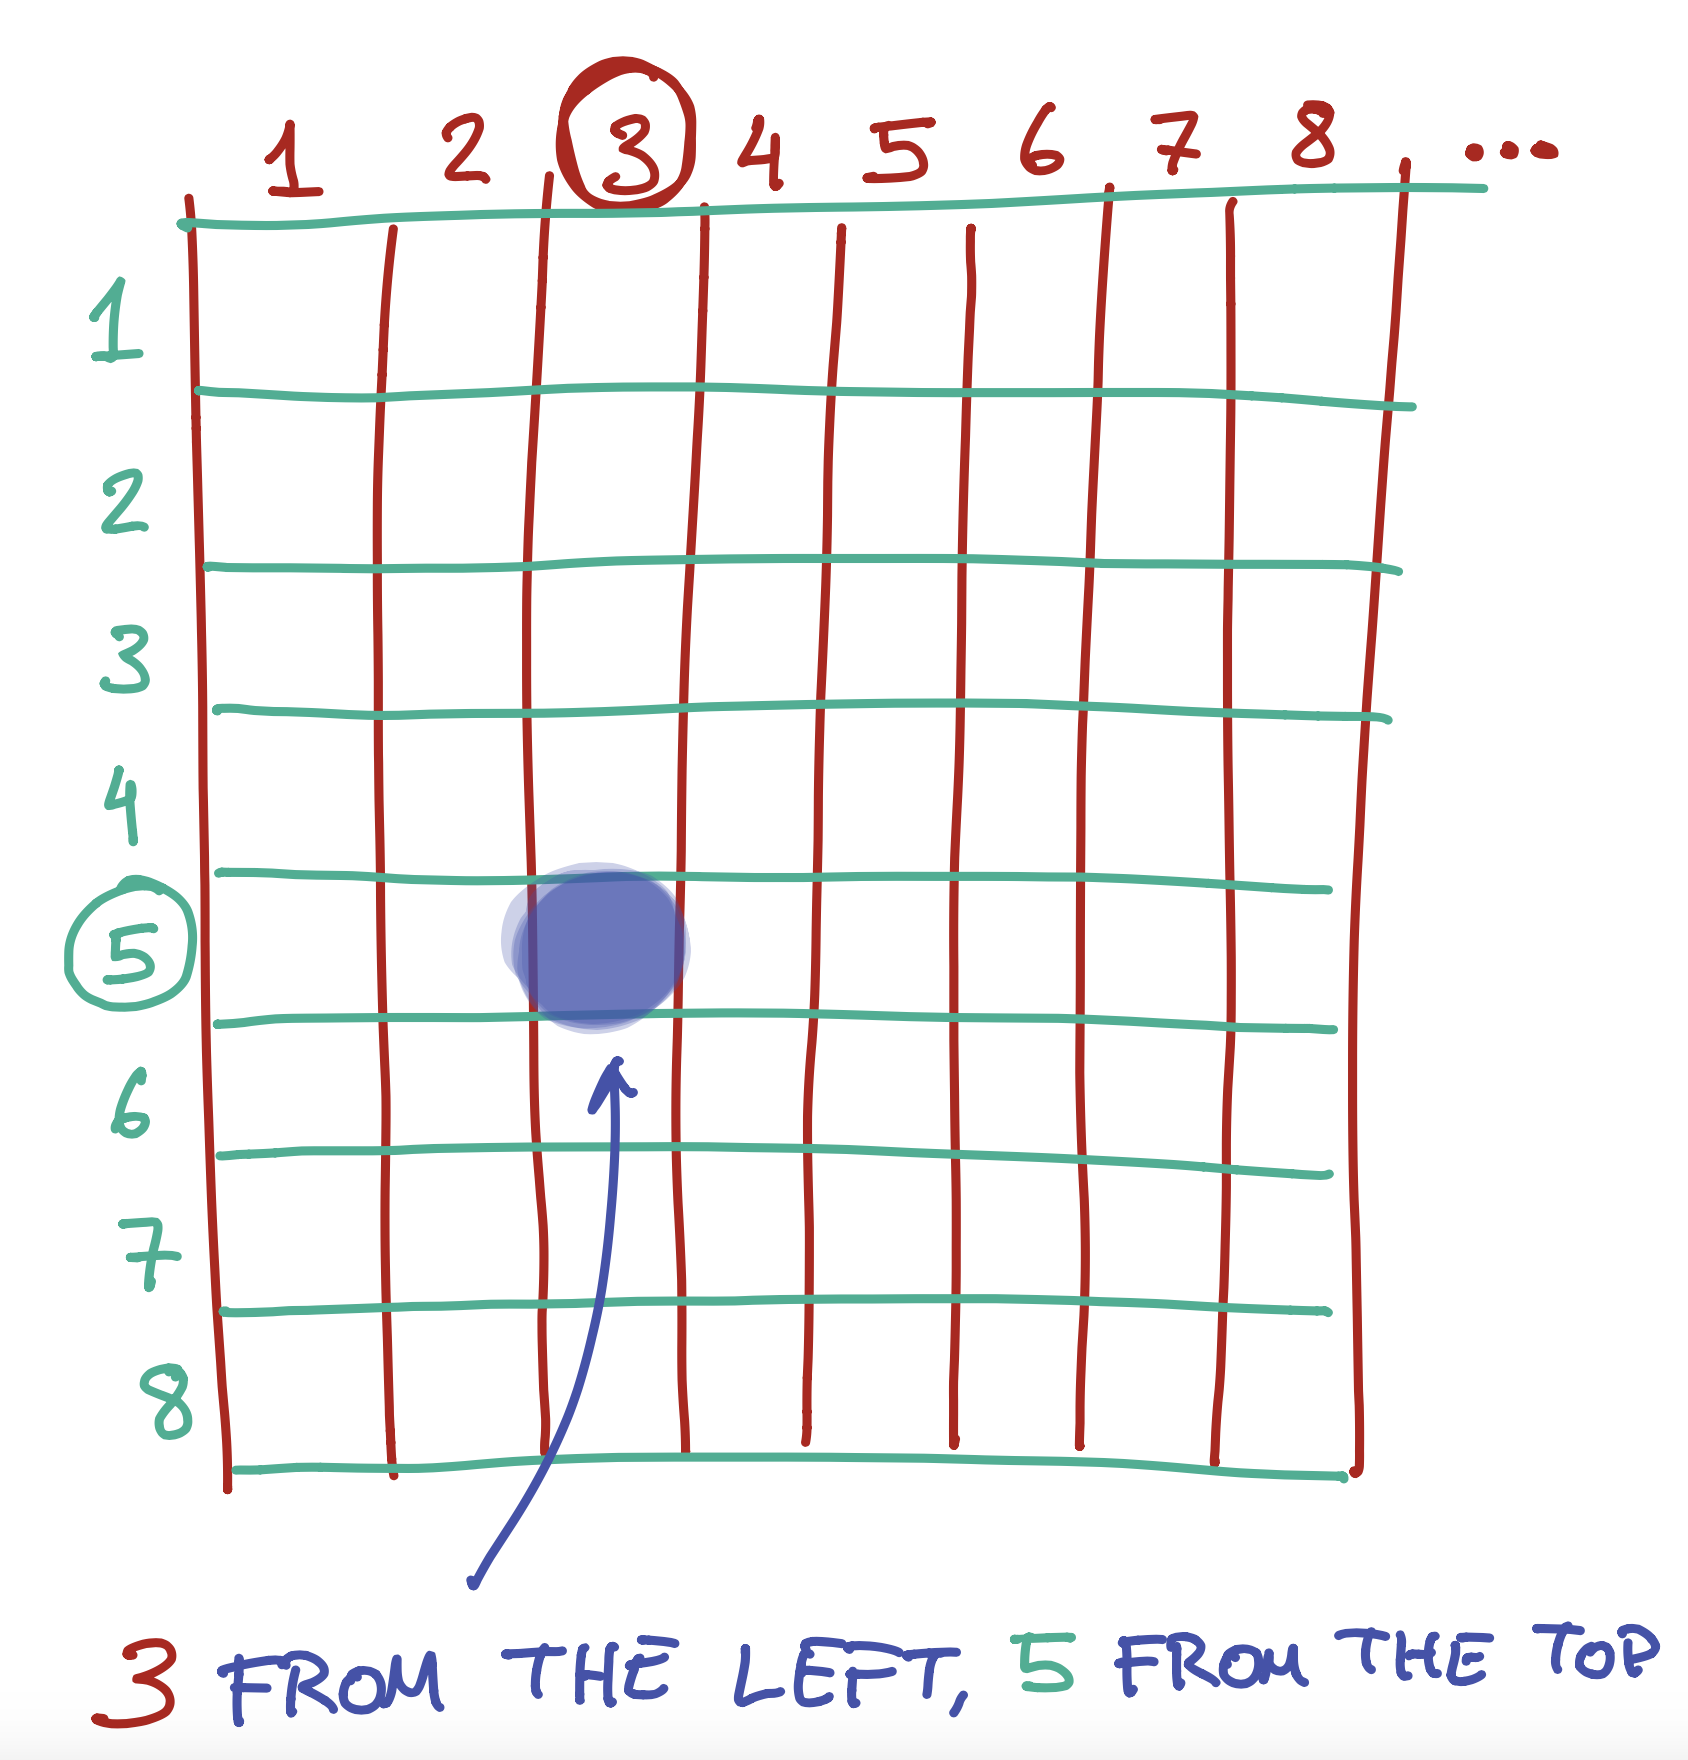
To do this, we give each light a number. Actually, we give it two - a number from the left, and a number from the top.
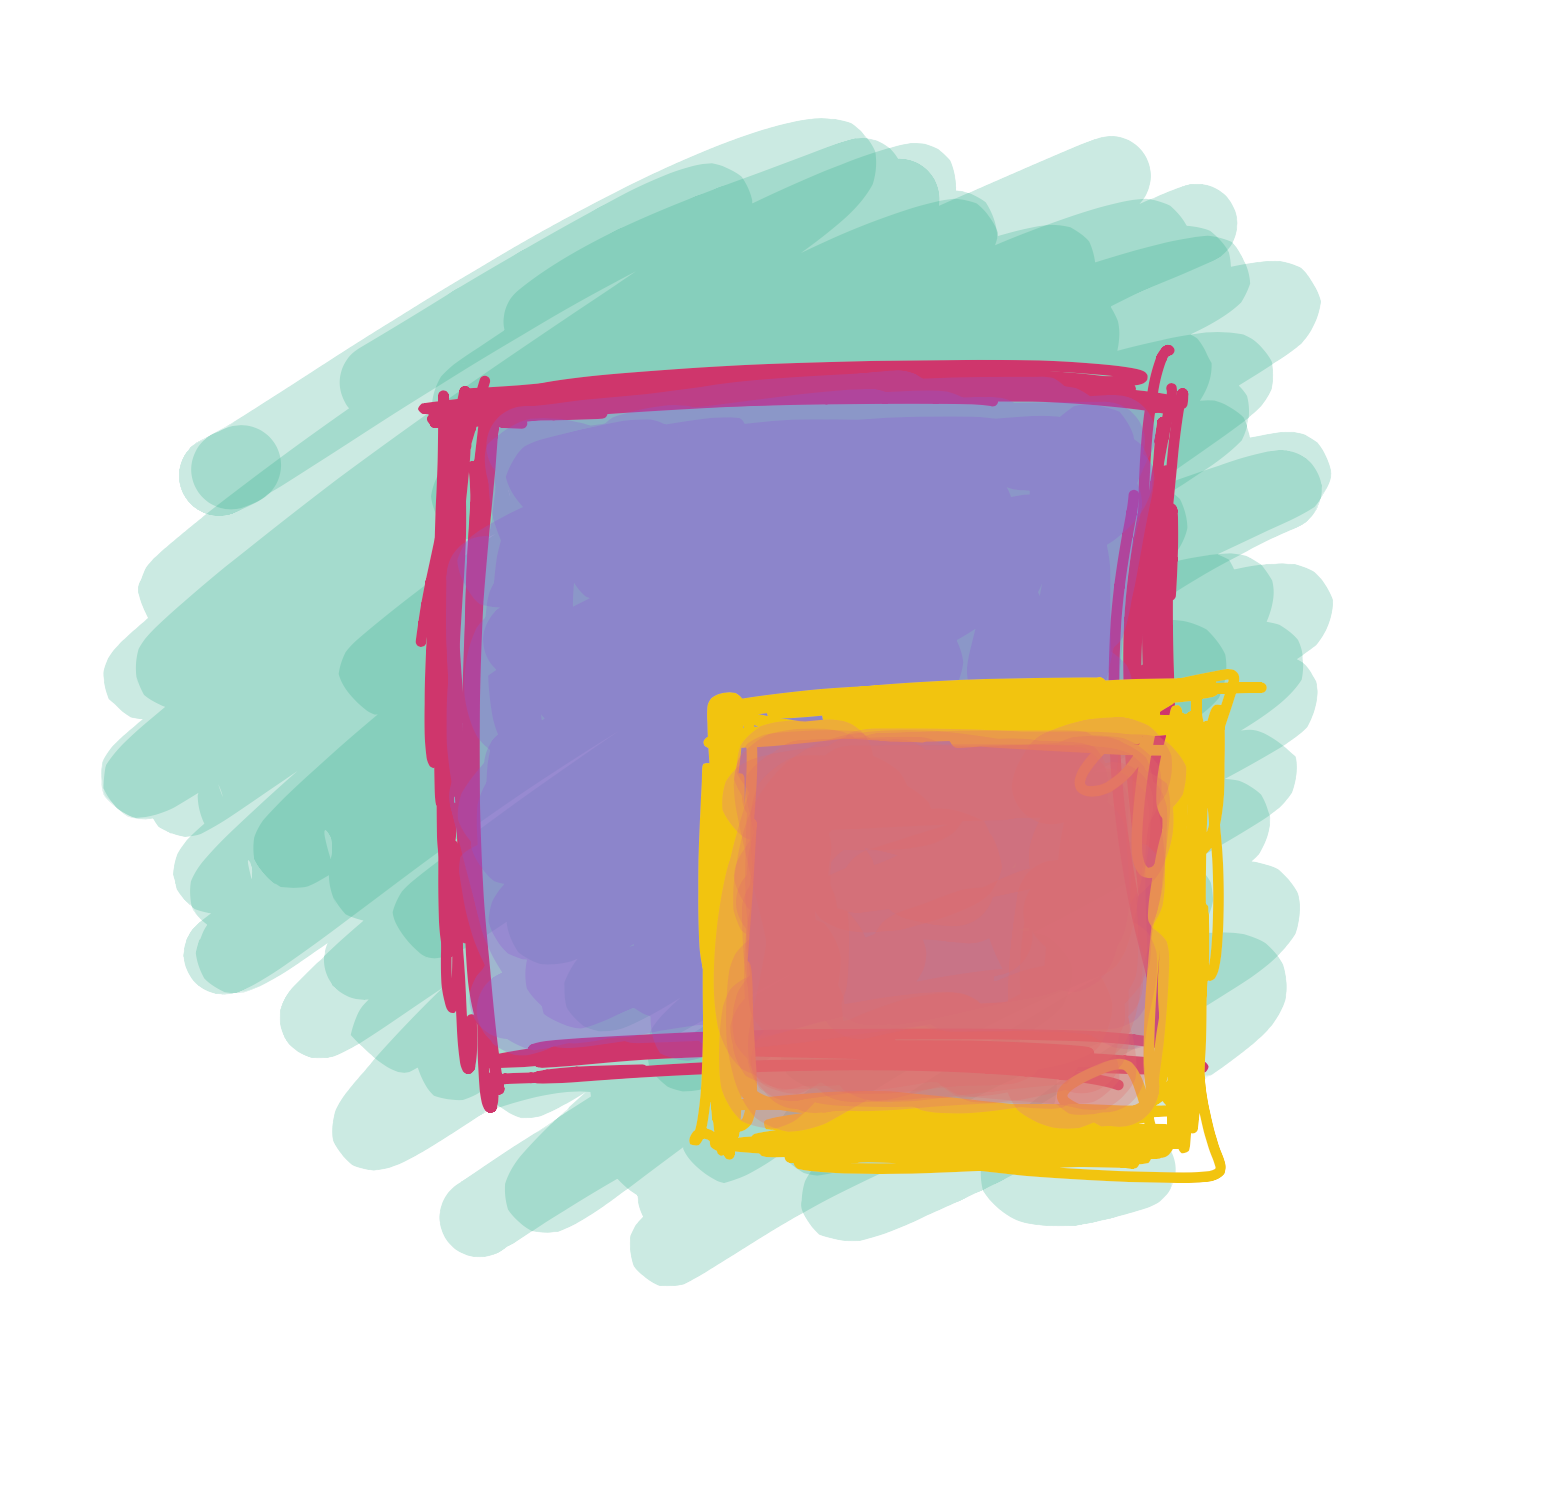
We can also use the same numbers to tell the computer how wide or tall to make something. So, for example, you could say “draw a rectangle that starts from the 3rd light on the left and the 5th light on the top, and make it 5 lights wide and 3 lights tall”.
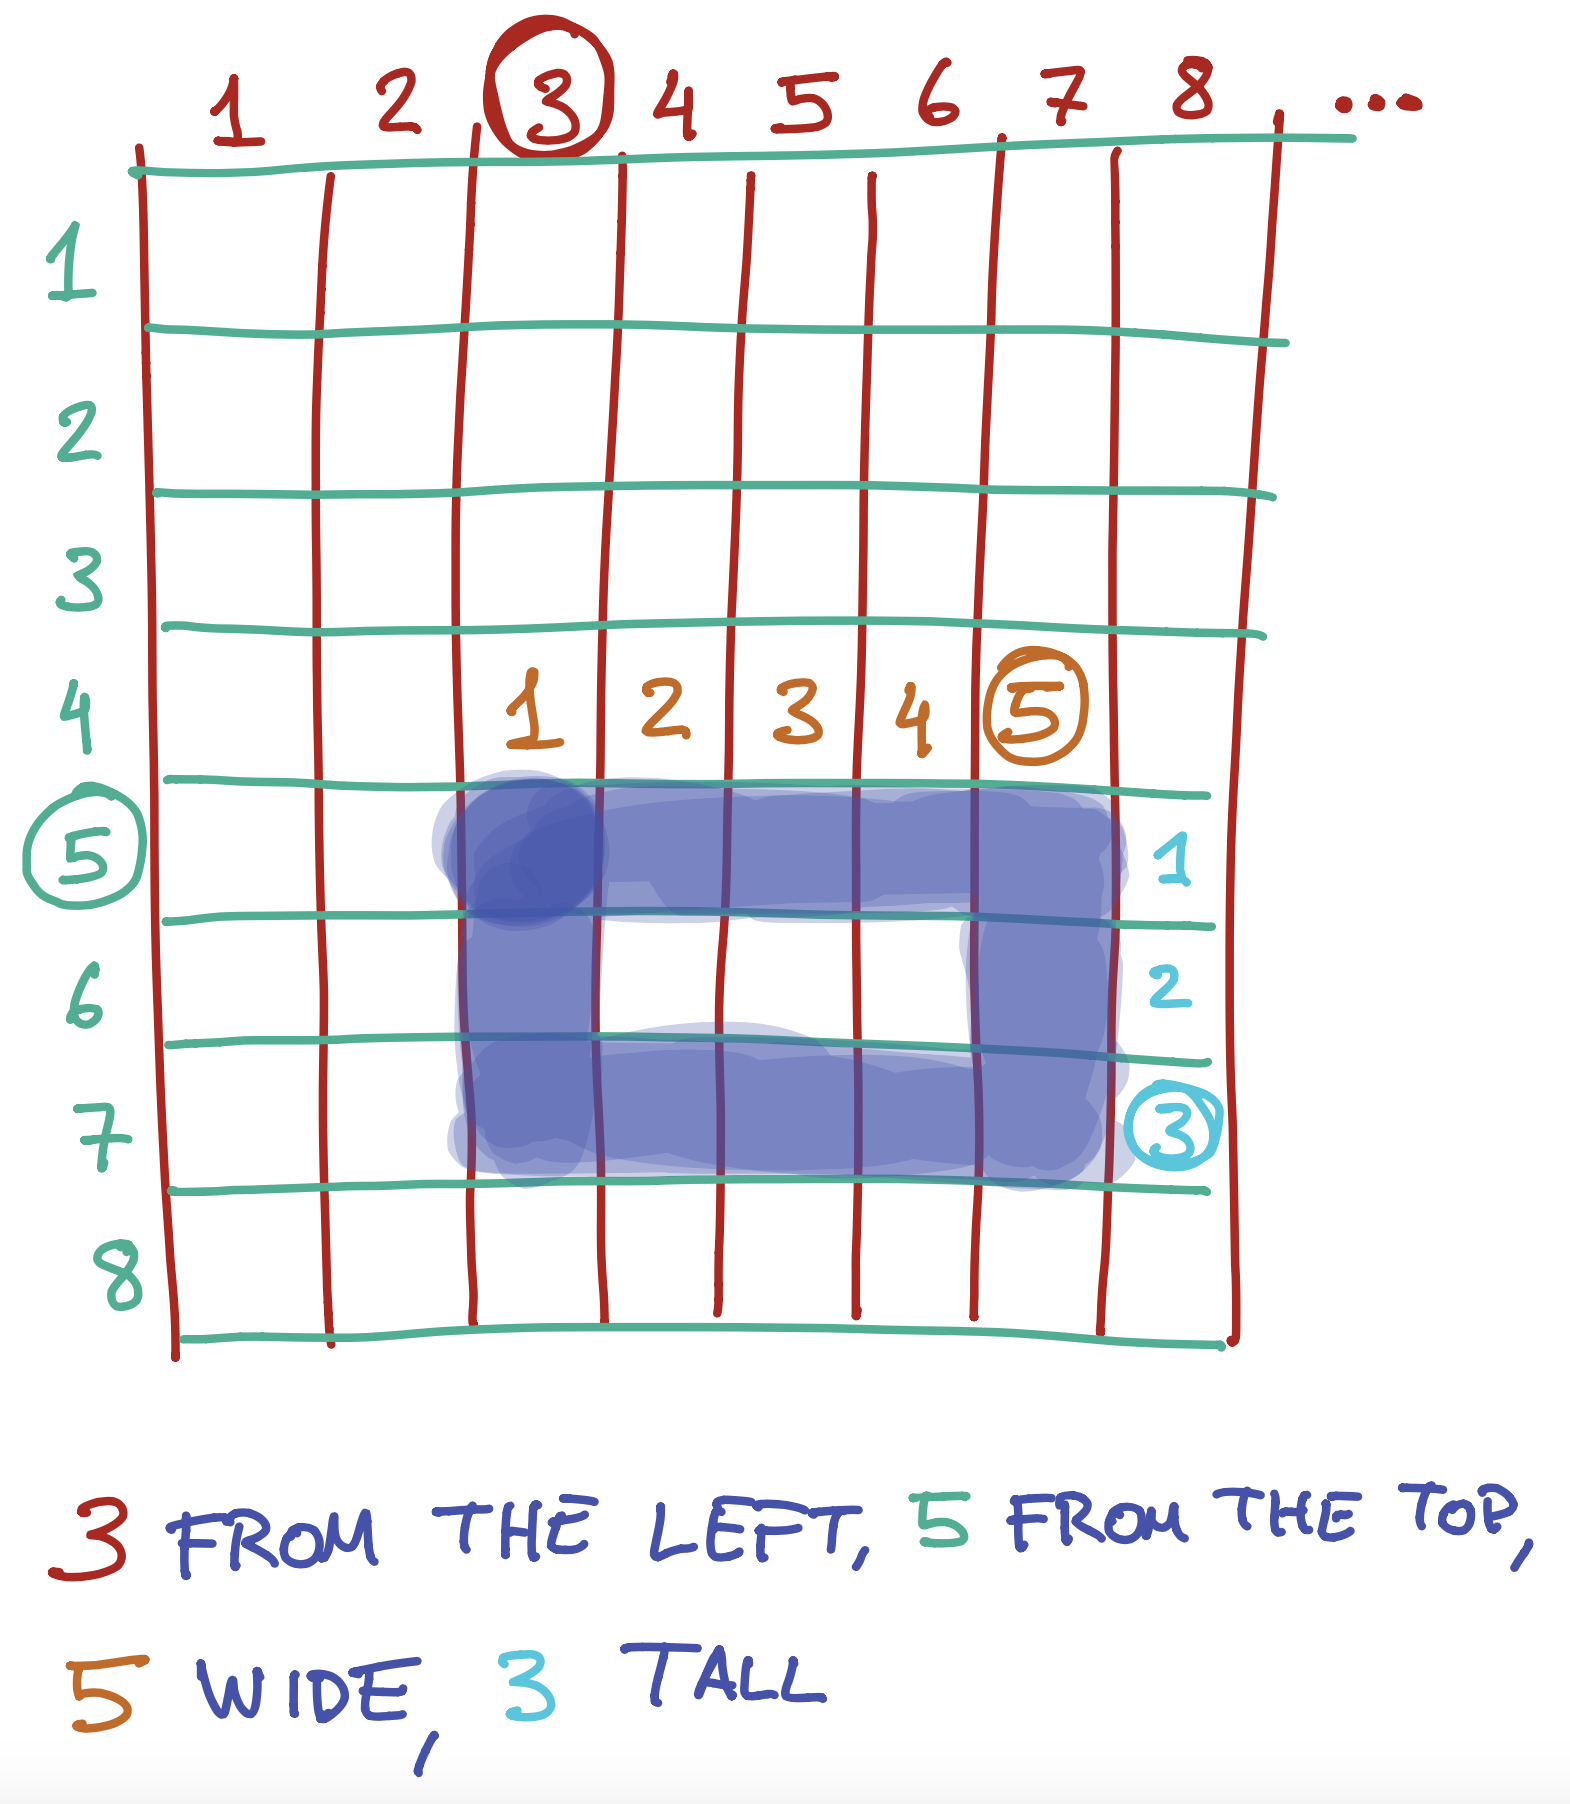
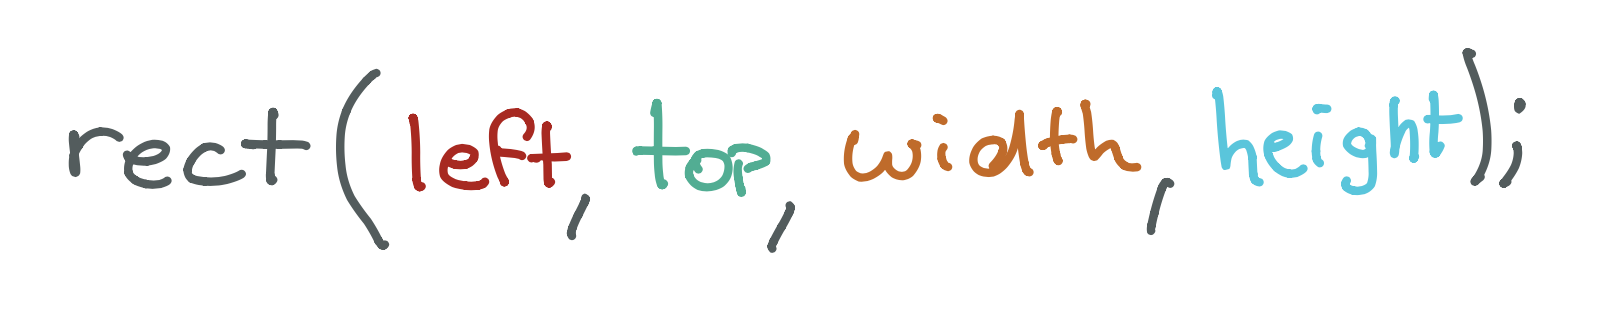
This is exactly what we do when we write the following instruction:
Code:
rect(3,5,5,3);
Preview:
The four arguments we give the rect function are instructions on where to start the rectangle on the left and top, and how wide and tall to make it:
What would the four (left, top, width, height) arguments for this rectangle be? 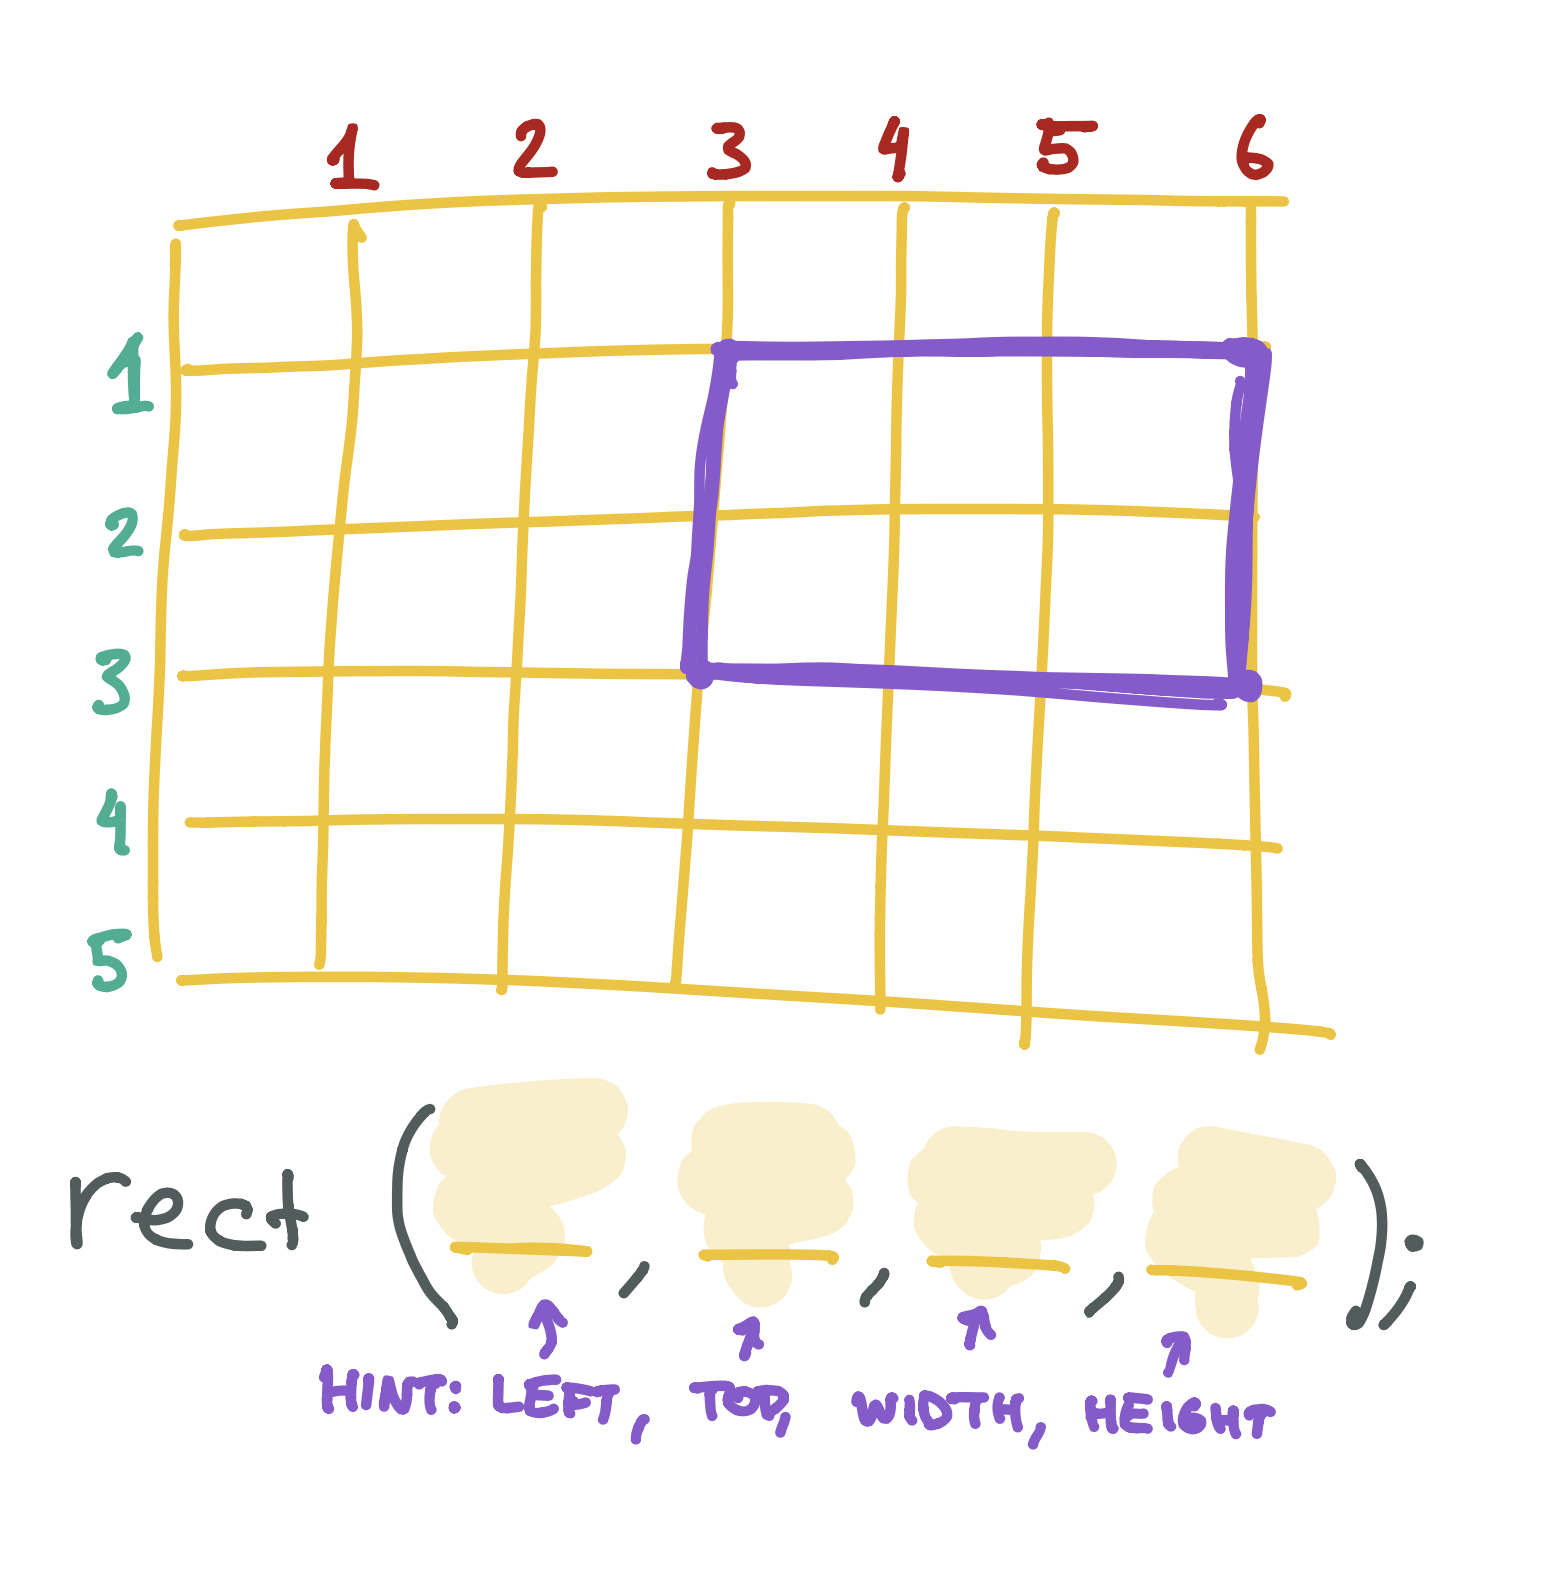
Draw your own rectangle on the graph paper below, then write the rect function that would create it. 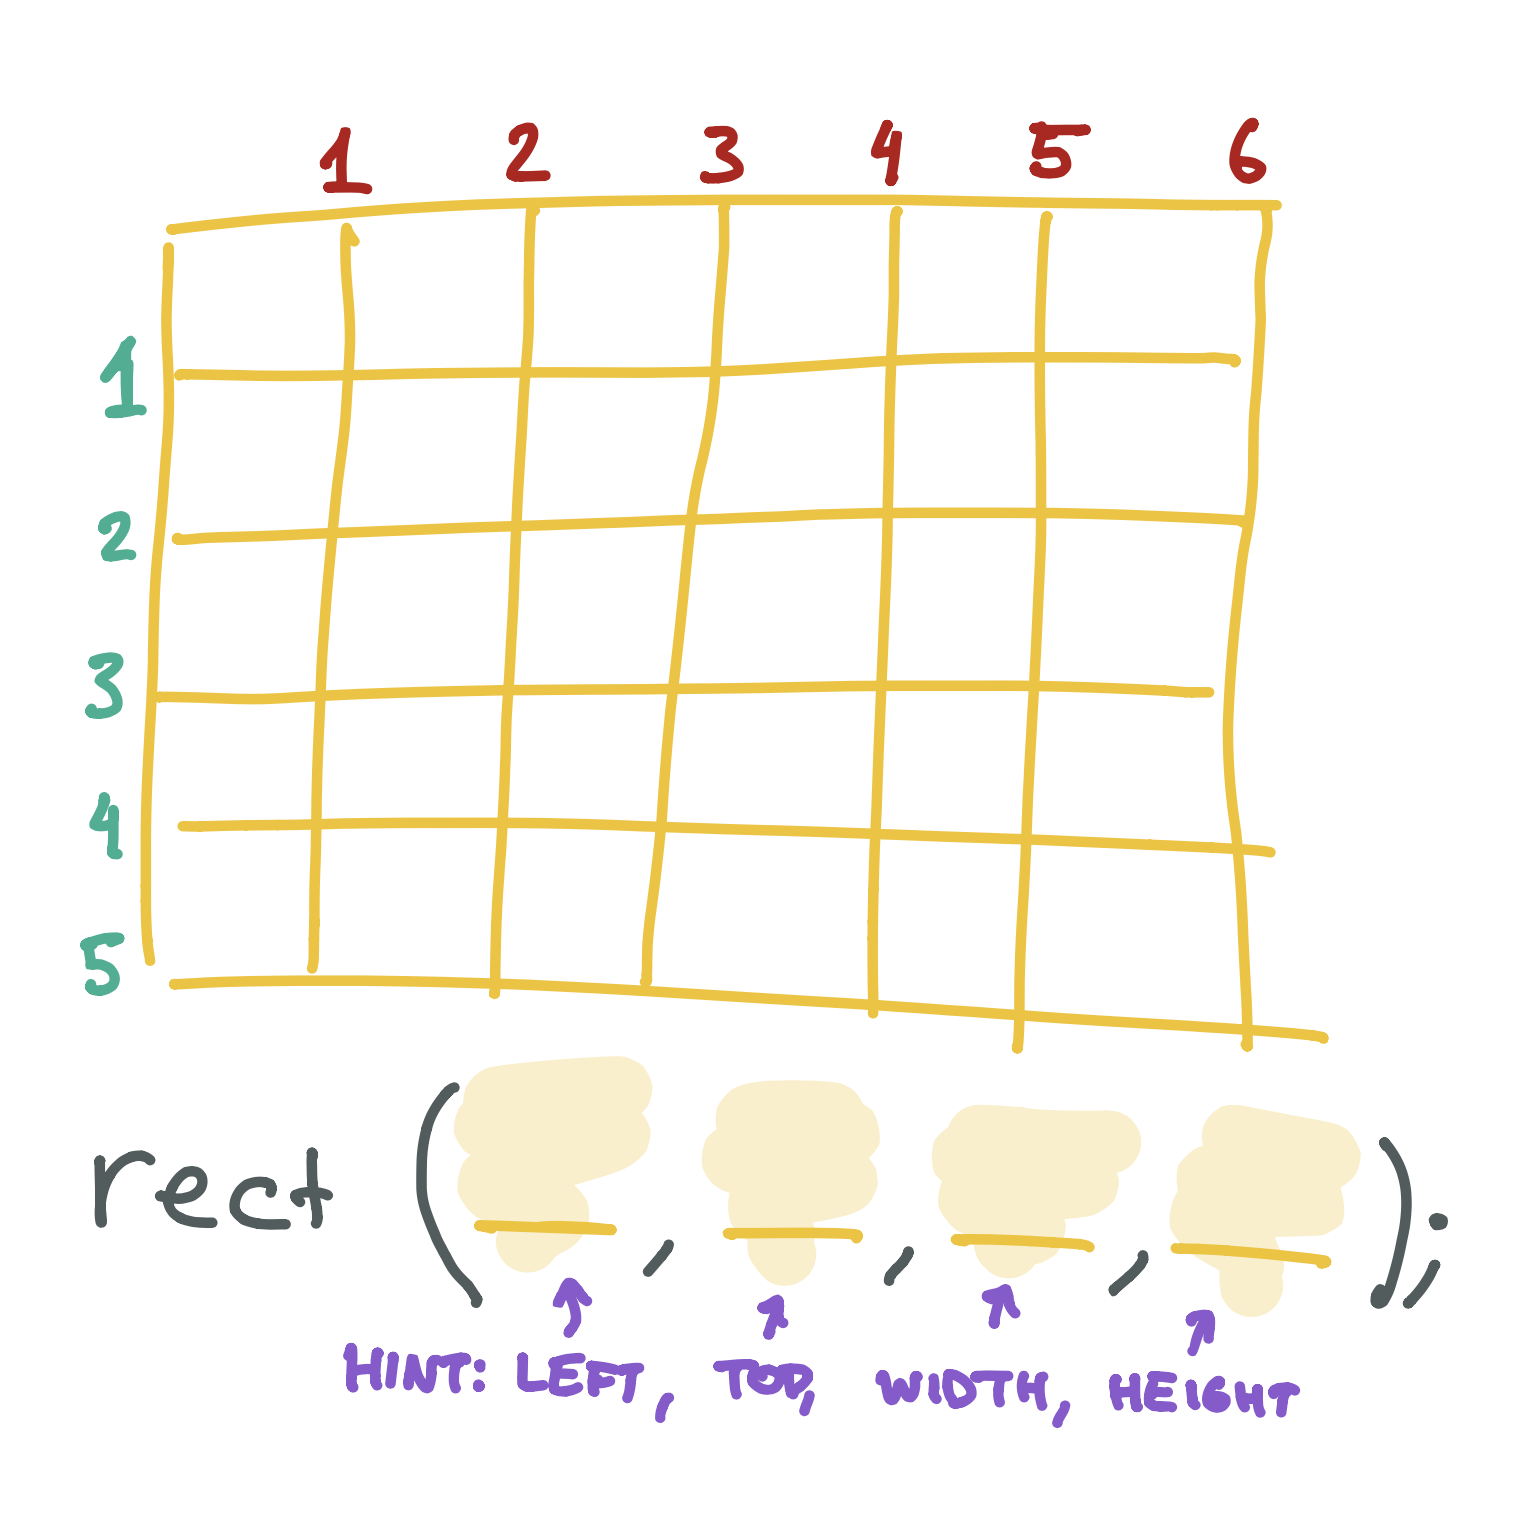
X & Y
We generally don’t use the words left and top when we are talking about where something is on the screen. Instead, we normally use the letter x to talk about the left-to-right part and y to talk about the top-to-bottom part:
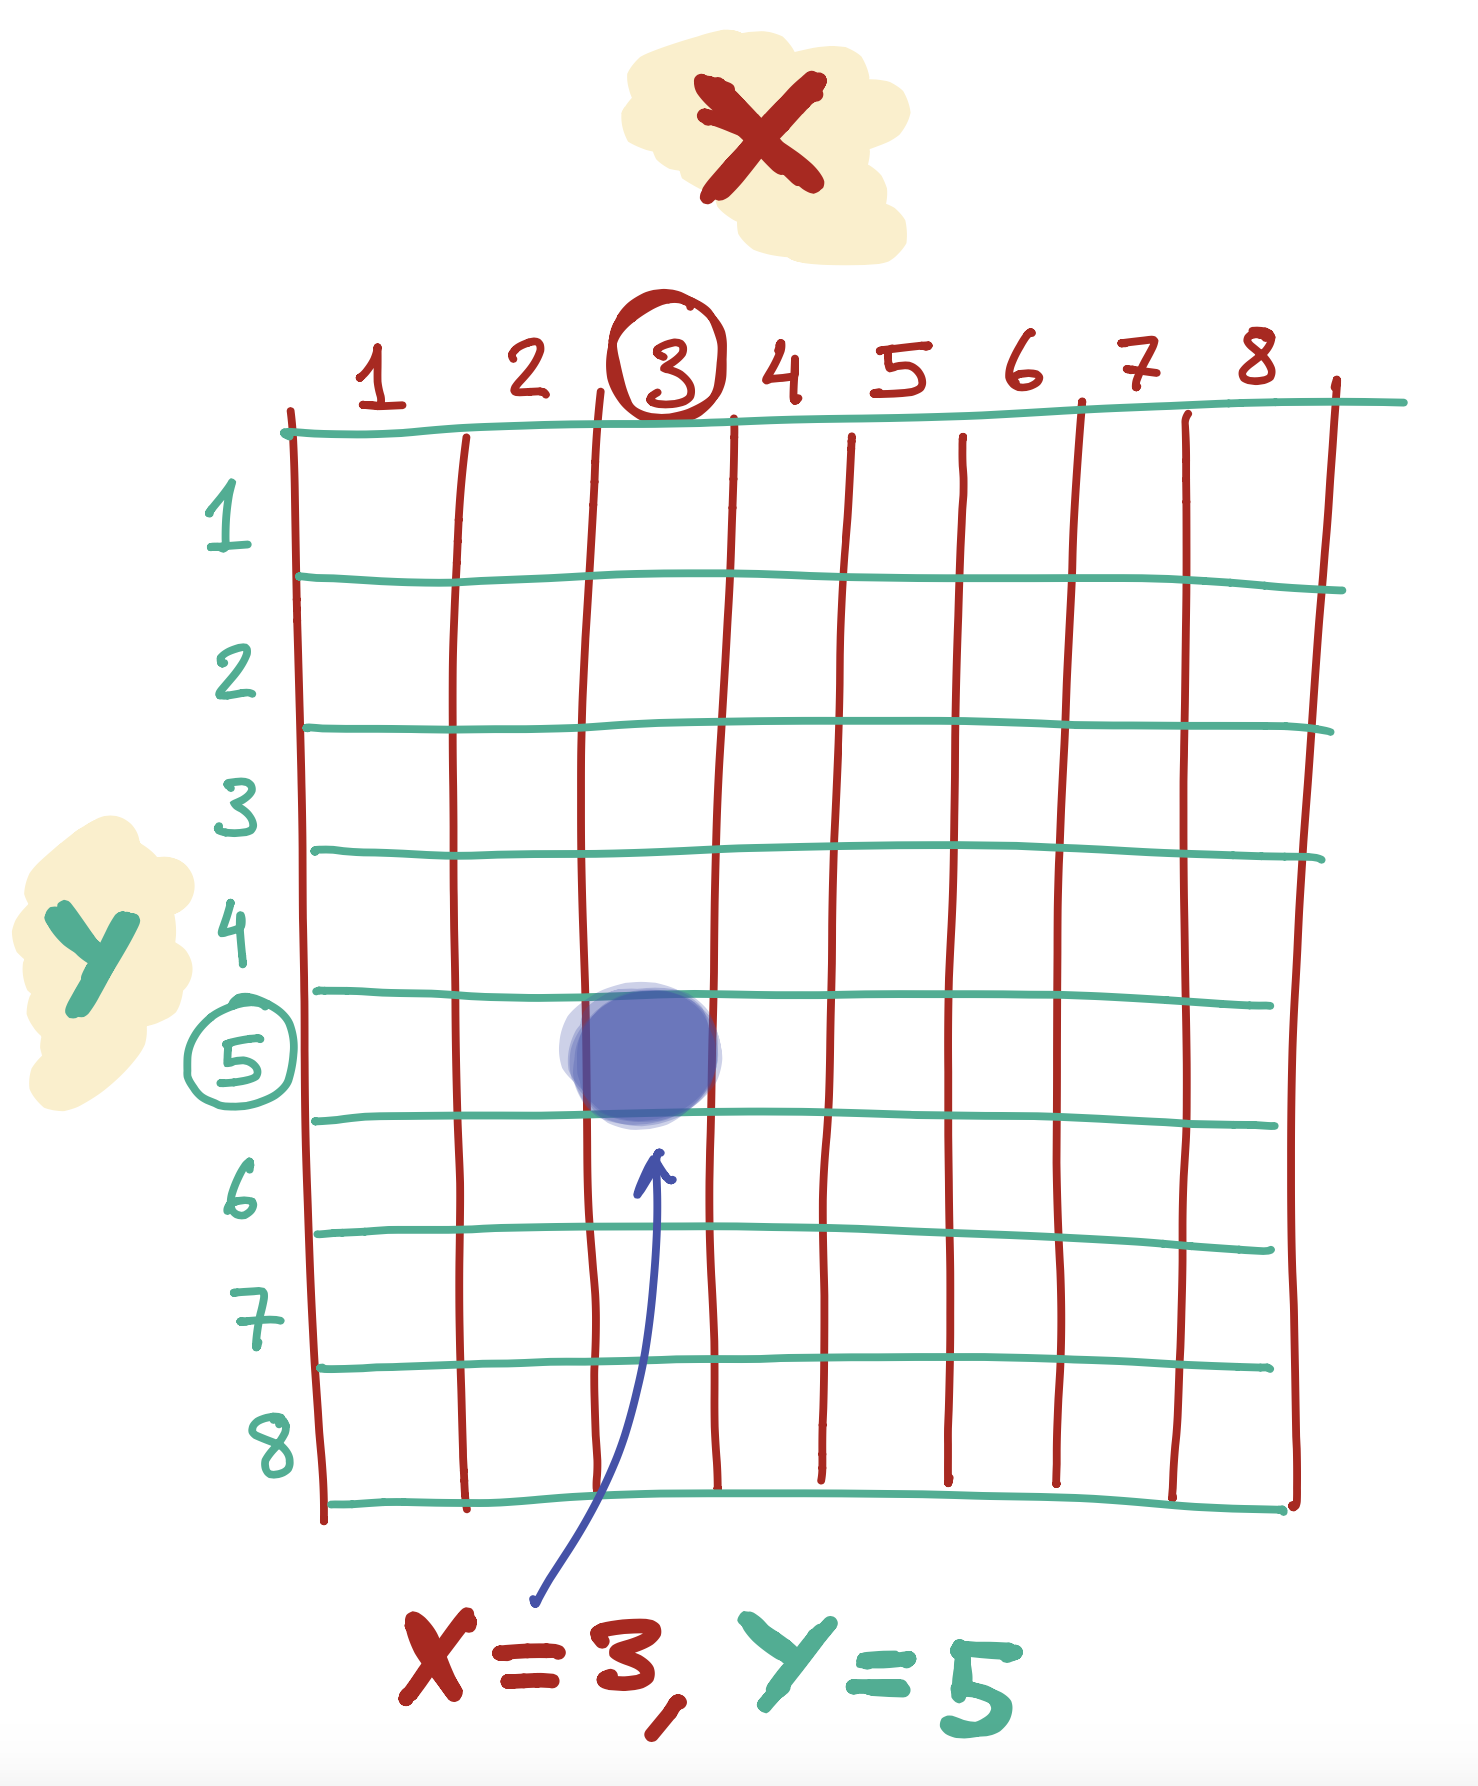
If you’ve done any math homework with shapes, you may have seen these letters before!
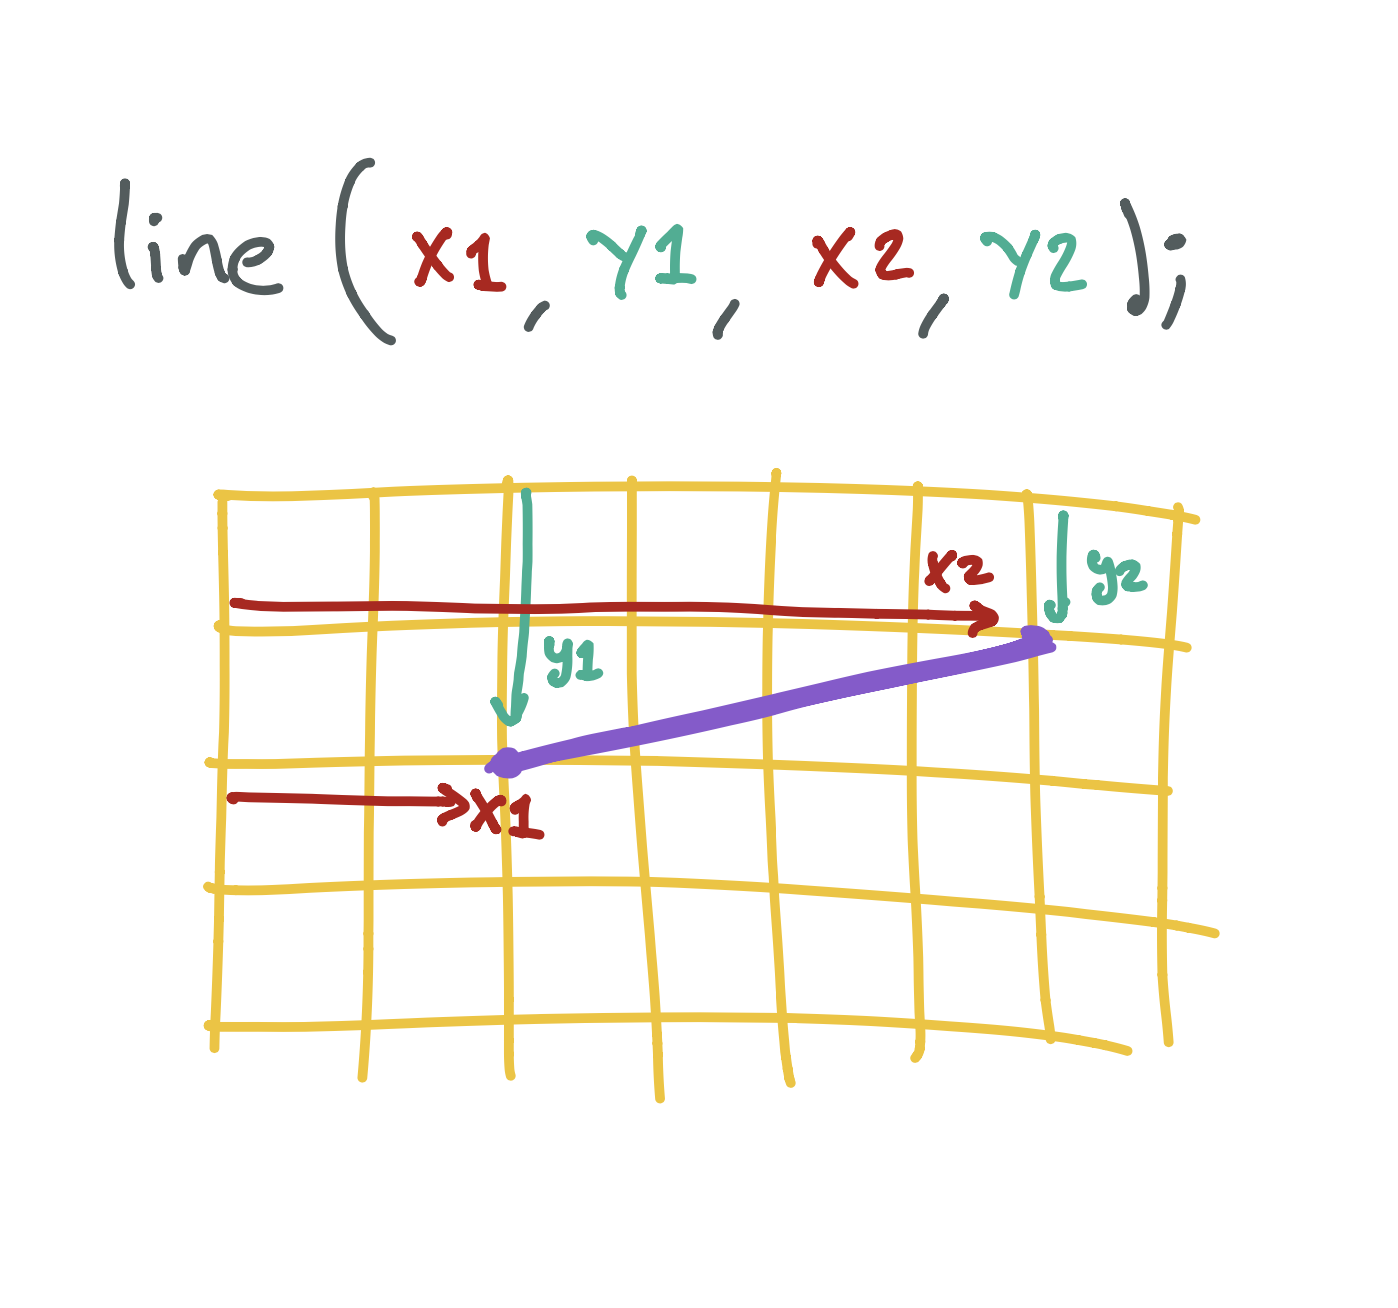
Placing a line on the screen
The line function is a little different from the rect function. To draw a line, we pick two points on the screen and tell the computer to make a line from one to the other.
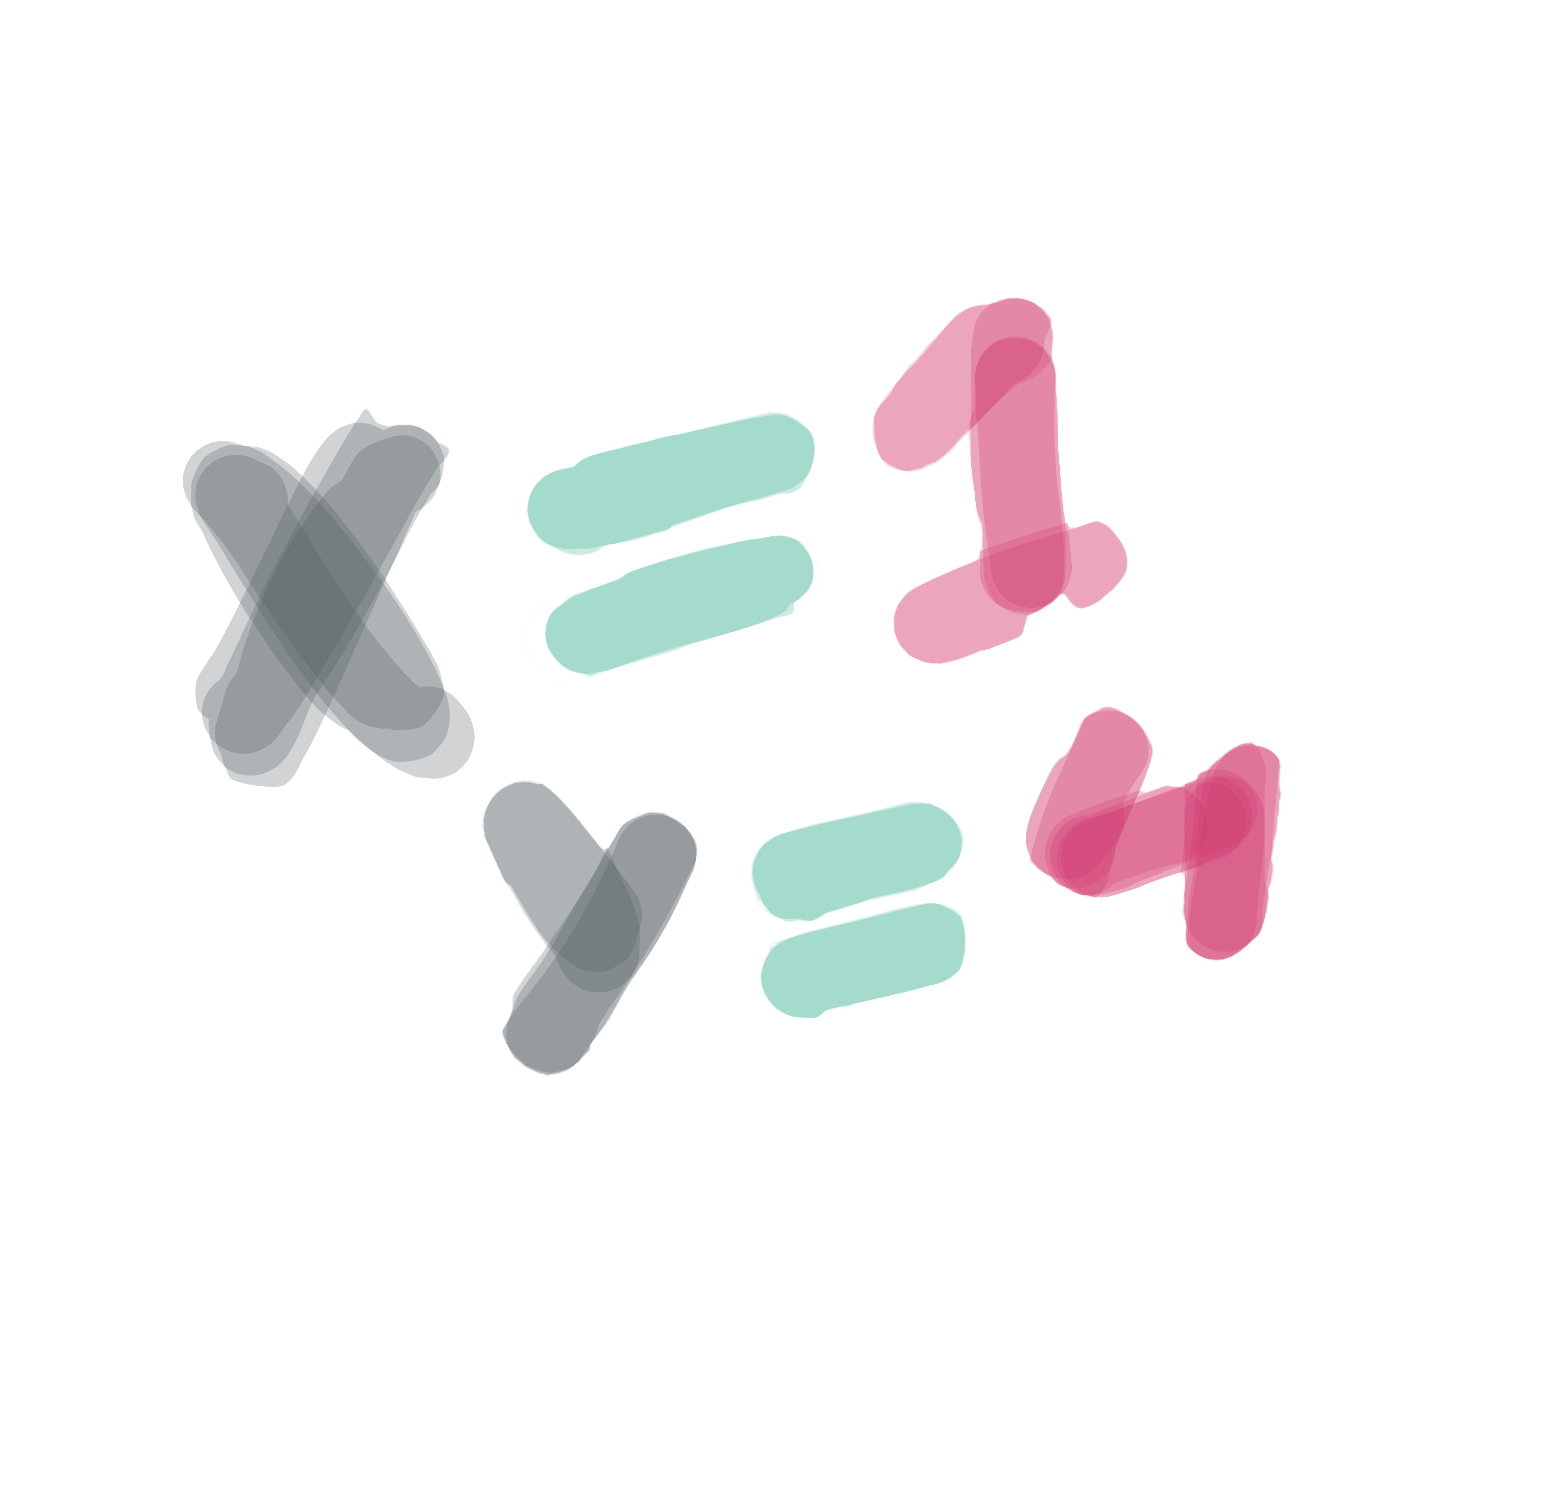
The first two arguments are the left & top values for the first point - we generally call this x1 and y1. The next two arguments are the left & top values for the second point - we generally call this x2 and y2:
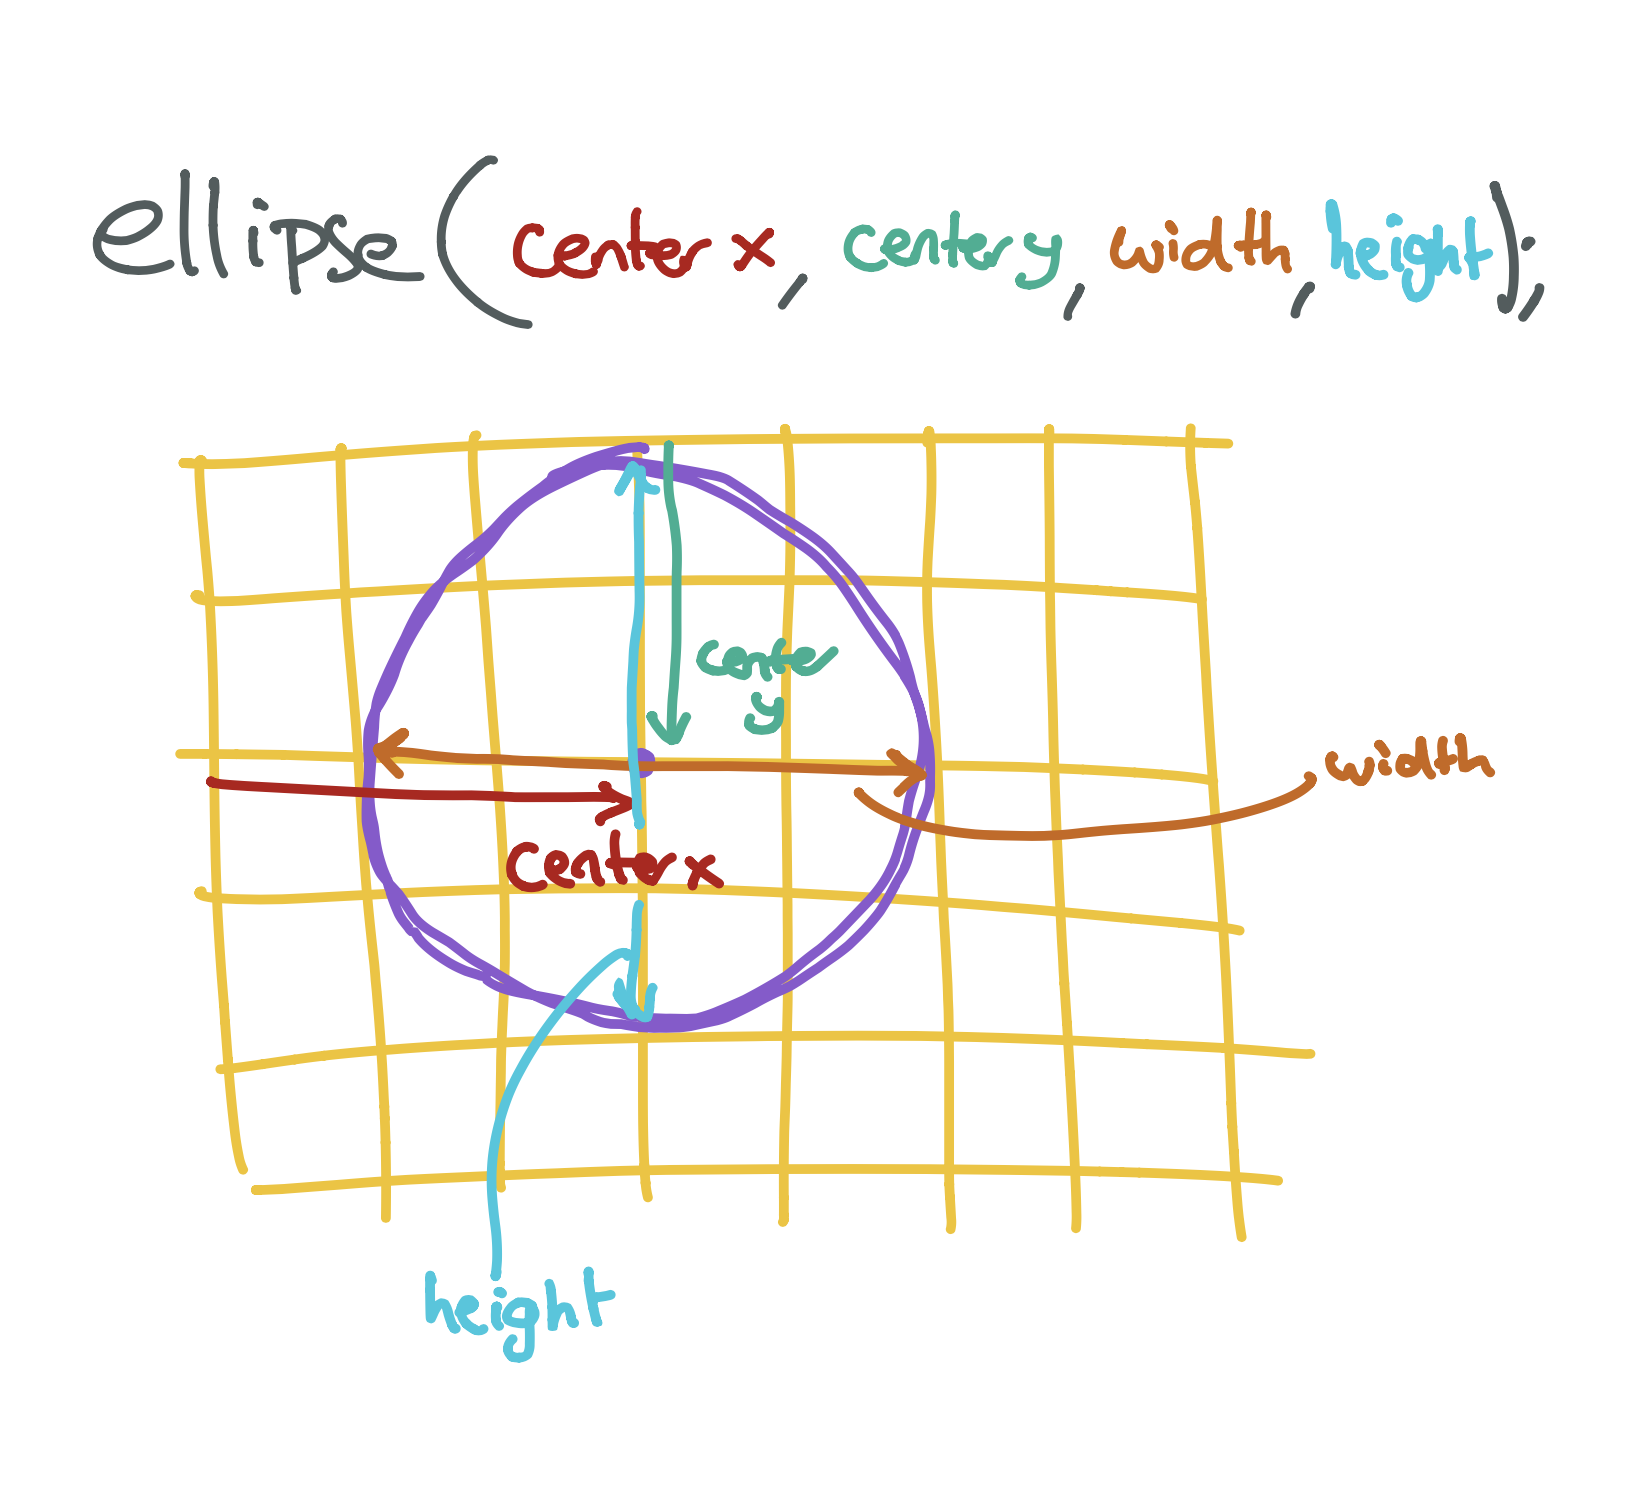
Placing an ellipse/circle on the screen
The ellipse function is a little different, because it doesn’t have a top and left point - circles don’t really have an edge we can use for this!
Instead, we tell the program where to put the middle of the circle from the left and top of the screen (we call this center x and center y), as well as how wide and tall to make it:
Placing a triangle on the screen
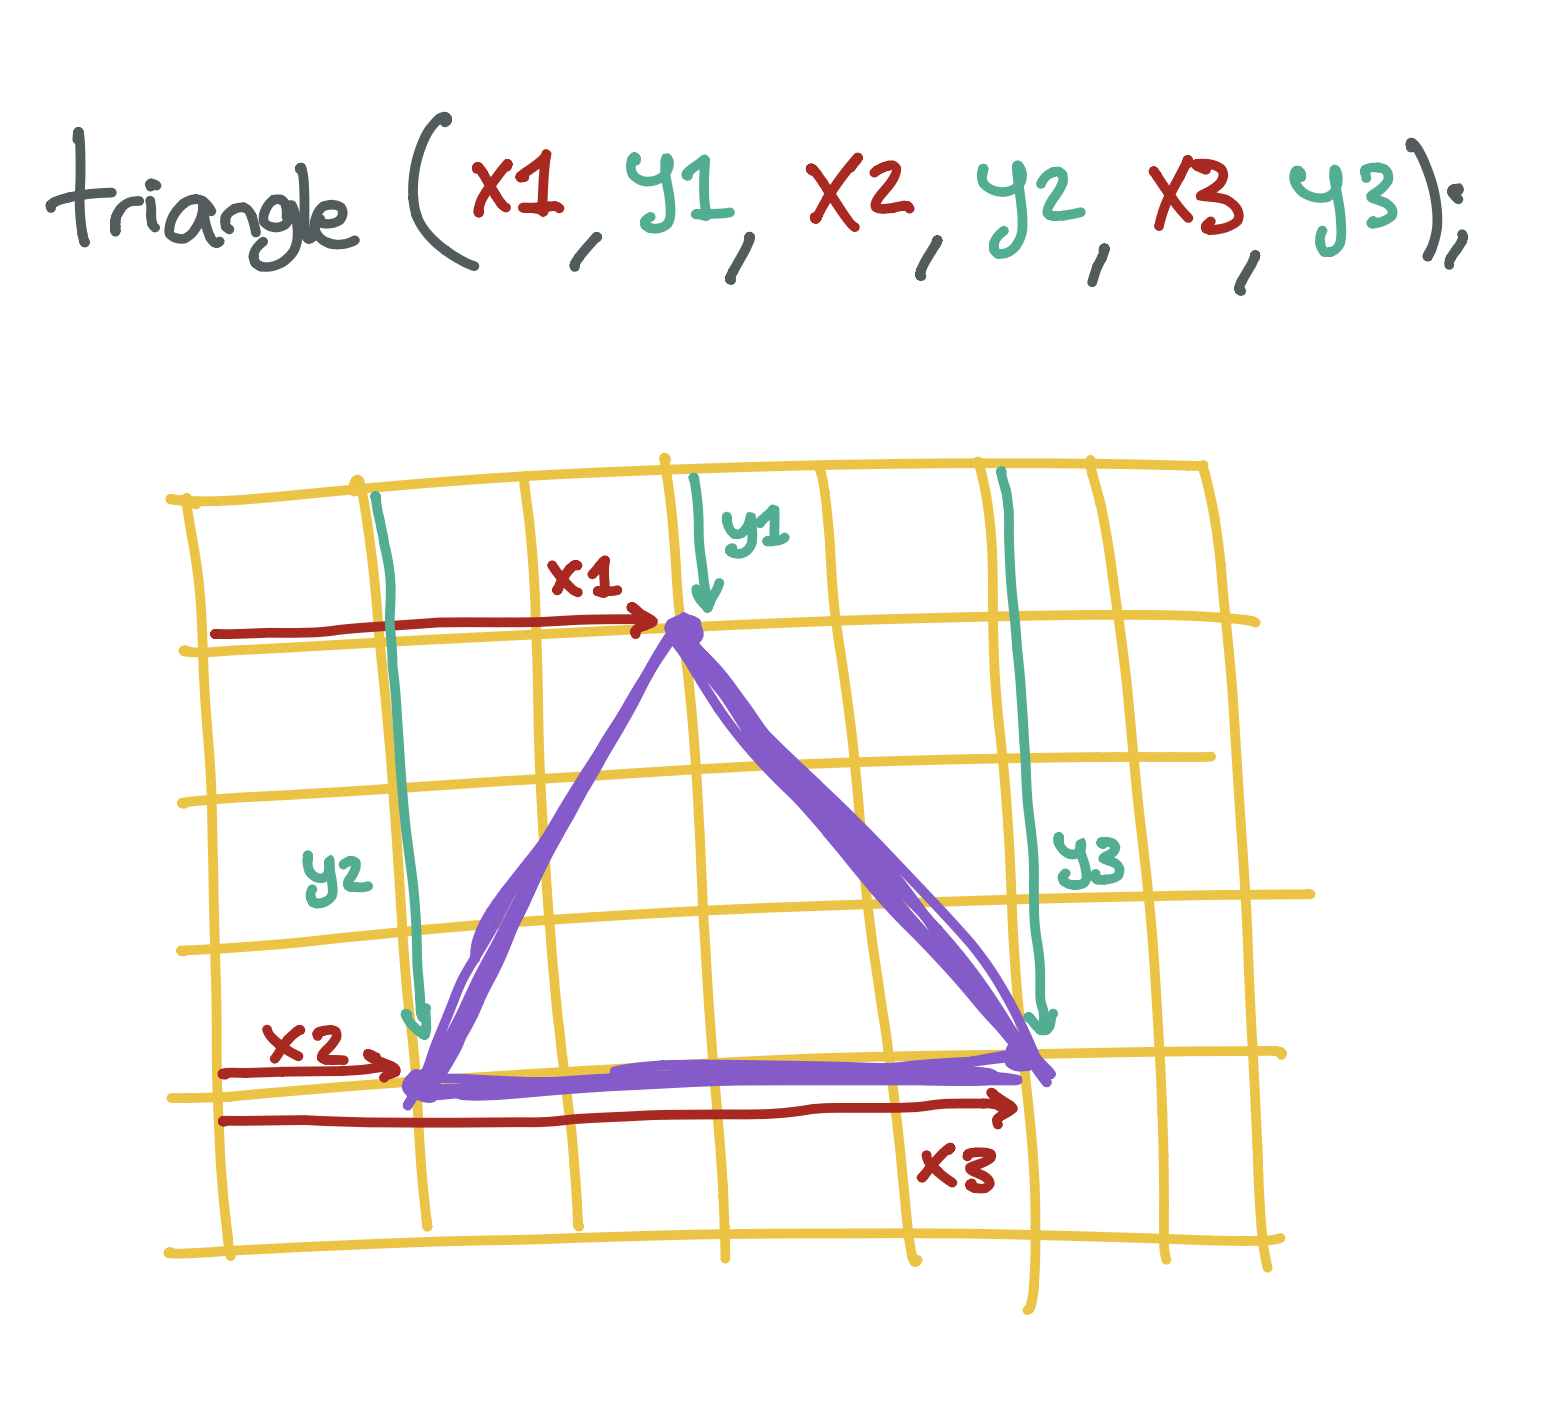
The triangle function is the weirdest! Triangles have three points, and so we need to tell the program where to put each of them.
The first two arguments tell the program where to put the first point from the left and top of the screen (we call this x1 and y1), the second two arguments tell us where to put the second point from the left and top of the screen (we call this x2 and y2), and the last two arguments tell us where to put the third point from the left and top of the screen (we call this x3 and y3):
Don’t worry if you are having a hard time figuring out which numbers to write down! A lot of programmers don’t know what they are doing when they type in the numbers. You can always try random numbers until you find something that looks like what you want. The more you play around, the more your brain will be able to guess what the numbers should be..
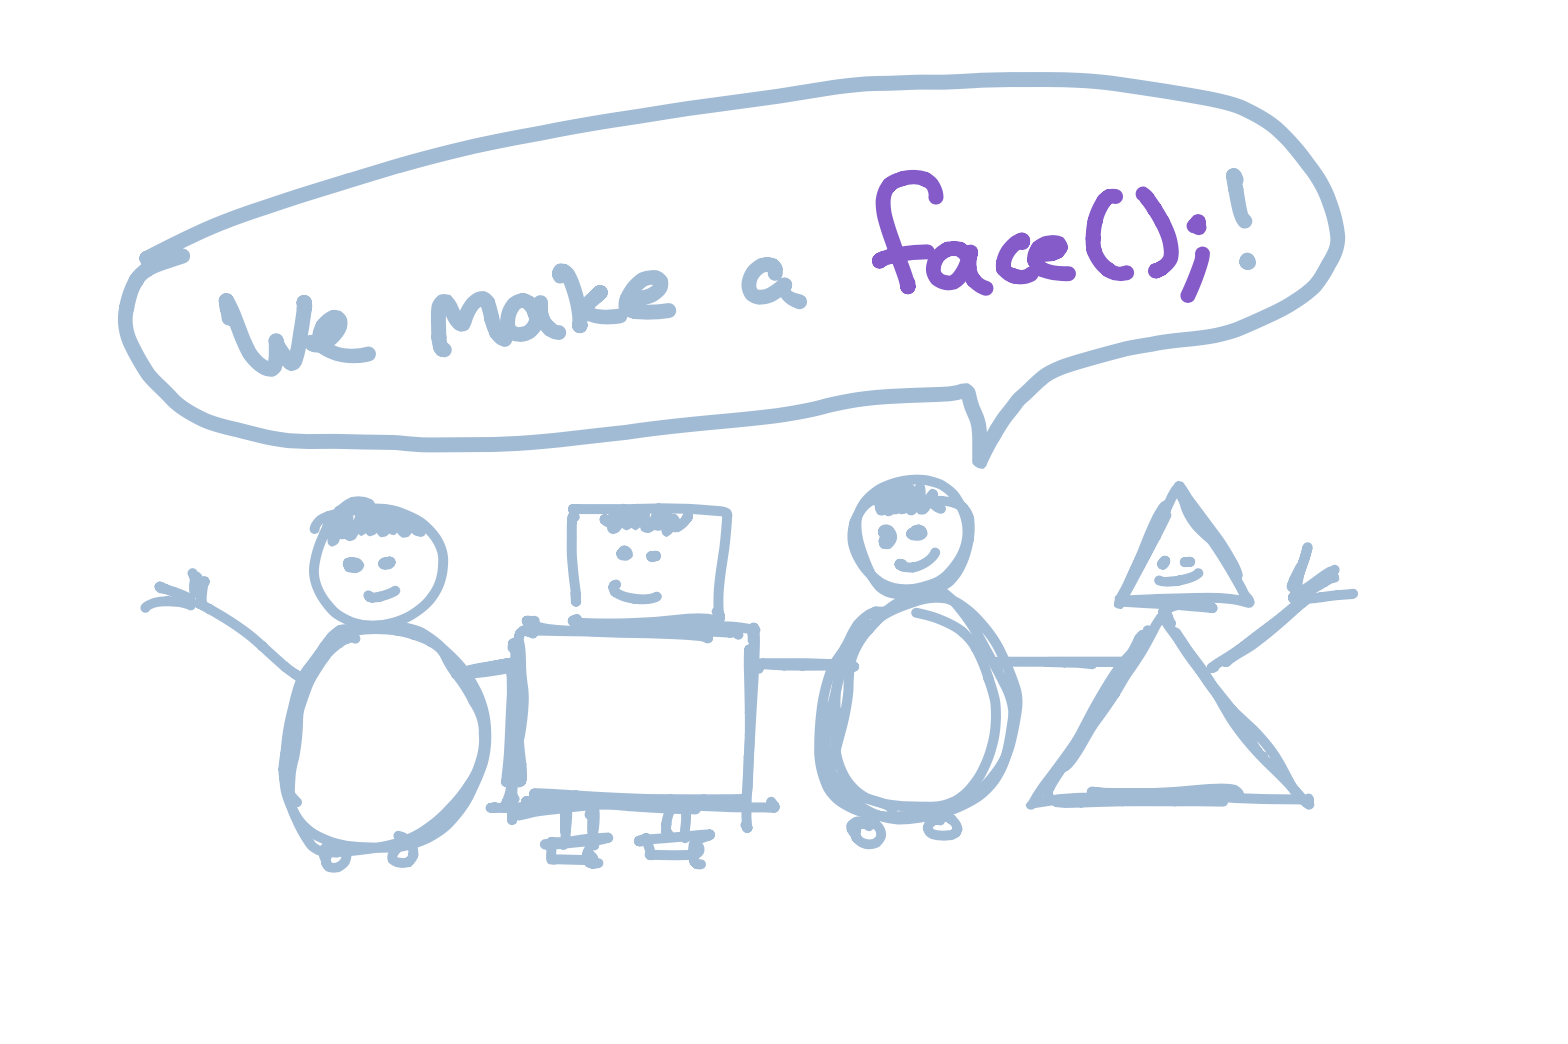
Create a program that draws a face on the screen. You will need to draw two circles - one for each eye - and a rectangle for the mouth. If you want, you can also draw a triangle for the nose!
Lesson 7
Black, White, and In Between
So far, all of our shapes have looked pretty boring. Let’s learn how we can add some color to them!
When we talk about colors, we use words like ‘red’ and ‘pink’, but computers don’t know what these words mean. Instead, we have to use numbers to tell the computer what color to use. We pass these numbers as attributes to the a new function called fill, which fills the middle of the shape with the color we give it.
Let’s take a look at how we do this. Type the following line at the top of your program:
We are telling the program to run the function fill with an attribute of 0.
If you just drew a face at the end of the previous lesson, your code might look a little bit like this:
Code:
fill(0);
ellipse(25,30,30,30);
ellipse(75,30,30,30);
rect(20,60,60,20);
Preview:
When we typed fill(0); at the top of the program, we told the computer to fill all of the shapes after it with a color of 0. The color 0 is black, so the eyes and mouth will now look black.
We have to tell the program which color to pick before we draw any shapes, kind of like how you need to pick a color before you draw something on a piece of paper. If your face’s color is still white, make sure that you put the fill function at the top of the program.
Colors are expressed as numbers from 0 to 255. The number 255 might sound like a strange one to pick (why not 100?), but it’s a quirk with how computers store numbers. You will see the number 255 quite a lot when you write programs!
The color 0 is black, and the color 255 is white. Every color between white and black has a number between 0 and 255. Here is what some of these numbers look like:
| Color | Number | Code |
|---|---|---|
| Black | 0 | fill(0); |
| Dim Gray | 105 | fill(105); |
| Gray | 128 | fill(128); |
| Dark Gray | 169 | fill(169); |
| Silver | 192 | fill(192); |
| Light Gray | 211 | fill(211); |
| Gainsboro | 220 | fill(220); |
| White Smoke | 245 | fill(245); |
| White | 255 | fill(255); |
Let’s try changing the program so that we have different colors for each part of the face:
Code:
fill(0);
ellipse(25,30,30,30);
fill(130);
ellipse(75,30,30,30);
fill(255);
rect(20,60,60,20);
Preview:
Change the color of the face you made in your last program. You can make it black, white, or anything in between.
Lesson 8
Color
We’ve looked at making things black and white, but that’s pretty boring. How do we make things actually look colorful?!
So far, we’ve been using the fill function with one attribute:
But fill can also take three attributes, with numbers between 0-255 for red, green, and blue:
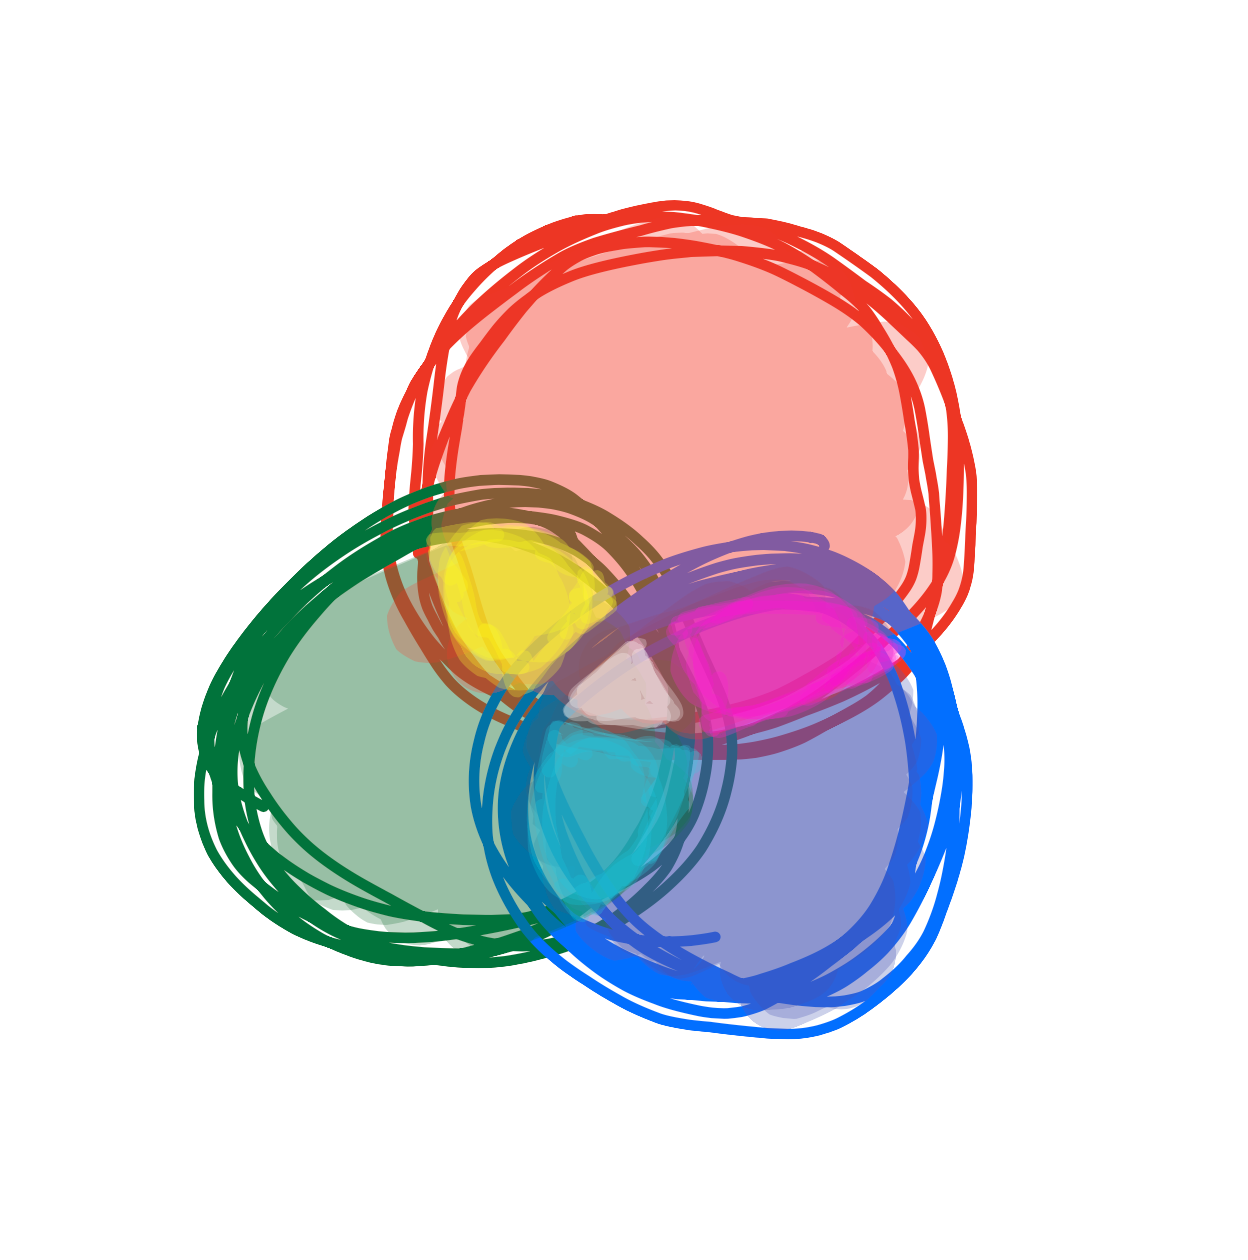
The way we make colors is by mixing red, green, and blue values.
If we wanted to make red, we would give it a (red, green, blue) value of (255,0,0). This tells the program to make the color as red as possible (255), and no green (0) and no blue (0).
To make green, we would give it a (red, green, blue) value of (0,255,0): no red, as much green as possible, and no blue.
To make blue, we would give it a (red, green, blue) value of (0,0,255): no red, no green, and as much blue as possible.
So to make red, green, and blue, we would type these lines:
| Color | Red | Green | Blue | Code |
|---|---|---|---|---|
| Red | 255 | 0 | 0 | fill(255,0,0); |
| Green | 0 | 255 | 0 | fill(0,255,0); |
| Blue | 0 | 0 | 255 | fill(0,0,255); |
Here’s what this might look like in a program
Code:
fill(255,0,0);
ellipse(25,30,30,30);
fill(0,255,0);
ellipse(75,30,30,30);
fill(0,0,255);
rect(20,60,60,20);
Preview:
Don’t worry if its hard to guess which attributes to type to get the color you want. Most programmers don’t know what numbers to type, and use a reference guide to tell them what to type in. You can also experiment by typing different numbers for each attribute until you get a color you like!
When you are painting, you can mix red, green, and blue together to make different colors. The same thing happens in programs too. Here are some common color mixtures:
| Color | Red | Green | Blue | Code |
|---|---|---|---|---|
| Yellow | 255 | 255 | 0 | fill(255,255,0); |
| Cyan | 0 | 255 | 255 | fill(0,255,255); |
| Fuchsia | 255 | 0 | 255 | fill(255,0,255); |
| Purple | 128 | 0 | 128 | fill(128,0,128); |
| Navy | 0 | 0 | 128 | fill(0,0,128); |
| Crimson | 220 | 20 | 60 | fill(220,20,60); |
| Gold | 255 | 215 | 0 | fill(255,215,0); |
| Deep Pink | 255 | 20 | 147 | fill(255,20,147); |
| Wheat | 245 | 222 | 179 | fill(245,222,179); |
| Steel Blue | 119 | 196 | 222 | fill(119,196,222); |
| Sea Green | 46 | 139 | 87 | fill(46,139,87); |
Change the color of your face so that it is your favorite color. You can use one of the colors from the table above, or try typing in different numbers until you find a brand new color you like!
Lesson 9
Fill, Stroke, and Background
We’ve been able to change the color of our shapes, but did you notice that they always have a black border around them? What if we want to change that?
Luckily, there’s another function that can help us with this. It’s called stroke, and it works a lot like fill; the only difference is that it changes the color of the border instead of the center:
So, if we wanted to make a face with red lines we might type something like this:
Code:
stroke(255,0,0);
ellipse(25,30,30,30);
ellipse(75,30,30,30);
rect(20,60,60,20);
Preview:
What if we want to change the background? Turns out there is another function for that as well, called background. It also works just like fill and stroke, but it changes the color of the entire background.
The background() function sets the color used for the background of the Processing window
Learn MoreSo, if we wanted to make a face with a purple background, we might type something like this:
Code:
background(255,0,255);
ellipse(25,30,30,30);
ellipse(75,30,30,30);
rect(20,60,60,20);
Preview:
Lesson 10
Variables
Until now, we have always typed the numbers for our attributes directly, like this:
But in most programs, we don’t do this. Instead, we usually use something called a variable. When you write a variable, you can think of it as the computer remembering a number for you. When you want, you can ask the program the write the number back. Here’s how the same program looks with a variable:
When we create a variable, we pick a name. We can give a variable any name we want, but it should only have letters - no numbers or spaces. Names are normally uncapitalized (e.g. age instead of Age), which might make your English teacher upset but makes programmers happy.
Not being able to use spaces is annoying, but there are a few ways we can deal with this. If we want to use a name with multiple words, such My Favorite Color, we either use Capital Letters to indicate the words: myShoeSize, or we use the underscore (_) letter: my_shoe_size. Either option works, so it comes down to which one you find prettier.
Here’s what some variables might look like:
Why do we need variables?
Variables are incredibly useful for a whole bunch of reasons, but for now we are going to focus on just one of them. Putting a number into a variable makes it really easy to change parts of your program quickly.
For example, let’s take a look at the face we drew before:
Code:
ellipse(25,30,30,30);
ellipse(75,30,30,30);
rect(20,60,60,20);
Preview:
If we wanted to make the eyes bigger - say from size 30 to 50 - we would need to change every spot where we typed 30:
Code:
ellipse(25,30,50,50);
ellipse(75,30,50,50);
rect(20,60,60,20);
Preview:
That’s a lot of typing! But if we create a variable to store our eye size, we only need to type the number once:
Code:
int eyeSize = 50;
ellipse(25,30,eyeSize,eyeSize);
ellipse(75,30,eyeSize,eyeSize);
rect(20,60,60,20);
Preview:
Now that we’ve done it this way, we only need to change one number and both eyes will look different. Let’s try changing the size from 50 to 10:
Code:
int eyeSize = 10;
ellipse(25,30,eyeSize,eyeSize);
ellipse(75,30,eyeSize,eyeSize);
rect(20,60,60,20);
Preview:
Calculating different numbers from our variables
We can also do math with our variables (eww, math!!) This means that we can write one number as a variable, and calculate a few numbers from it.
Let’s say we’re not sure how far our face should be from the left side of the screen. Rather than having to figure out where each eye and the mouth should be every time we want to make a change, we can create one variable called
…and calculate the left side of each eye and the mouth from it. So, the left-most eye would change from..
… to …
If we do the same thing for the other eye and the mouth, we get something that looks like this:
Code:
int eyeSize = 20;
int left = 20;
ellipse(left + 5,30,eyeSize,eyeSize);
ellipse(left + 50,30,eyeSize,eyeSize);
rect(left,60,60,20);
Preview:
Now let’s say we want to change the size of the eyes and the location of the face. We can do this by just changing the value of the two variables
Code:
int eyeSize = 50;
int left = 50;
ellipse(left + 5,30,eyeSize,eyeSize);
ellipse(left + 50,30,eyeSize,eyeSize);
rect(left,60,60,20);
Preview:
Create a new variable called top, which determines where the top of the face will start. Update each eye and the mouth so their top attribute uses a calculation based on the top variable.
Lesson 11
Making the Screen Bigger
So far, all of our drawings have been pretty small. When we create a new program, we only have 100 lights from the left and 100 lights from the top to work with. But what if we want a little more space to draw?
Luckily, there is another function called size that can help us. It takes two attributes - width and height:
size(width, height);
So if we wanted to make our program 500 lights wide and 300 lights tall, we could write:
size(500,300);
We can also tell our program to be as big as the entire screen with the fullScreen(); command.
Up till now, I’ve been using the word lights to describe the lights on your screen. In programming, however, we use the word pixels to describe these lights. From now on, I will use that word.
Lesson 12
Modifying Variables
So far, we’ve learned how to draw a face with the ellipse and the rect functions, and we’ve learned how to change the size of the eyes and how far from the left of the screen it should be with variables. The code we wrote to do this looks a little like this:
Code:
int eyeSize = 20;
int left = 20;
ellipse(left + 5,30,eyeSize,eyeSize);
ellipse(left + 50,30,eyeSize,eyeSize);
rect(left,60,60,20);
Preview:
What a good looking face, but it might be a little lonely. Let’s add another face so our character has a friend.
Luckily for us, this is pretty easy! We can just copy and paste the three lines of code we use to draw our face and it will draw it a second time. This will draw a second face over the first one, so we will need to change the x attributes for each shape so that they do not overlap
Code:
size(200,100);

int eyeSize = 20;
int left = 20;
ellipse(left + 5,30,eyeSize,eyeSize);
ellipse(left + 50,30,eyeSize,eyeSize);
rect(left,60,60,20);

ellipse(left + 105,30,eyeSize,eyeSize);
ellipse(left + 150,30,eyeSize,eyeSize);
rect(left + 100,60,60,20);
Preview:
Now that we are using variables, there’s actually an easier way to do this. Rather than changing each x attribute, we can change the value of our left variable after we draw the first face. To do this, we just need give the variable a new number, like this:
left = 120;
So now, our code might look like this:
Code:
size(200,100);

int eyeSize = 20;
int left = 20;
ellipse(left + 5,30,eyeSize,eyeSize);
ellipse(left + 50,30,eyeSize,eyeSize);
rect(left,60,60,20);

left = 120;

ellipse(left + 5,30,eyeSize,eyeSize);
ellipse(left + 50,30,eyeSize,eyeSize);
rect(left,60,60,20);
Preview:
This is a better way to draw two faces, since we don’t need to change each line when we copy and paste the code for the second face.
There’s another way we can change the value of a variable. Let’s say we don’t know exactly where we want our second face to be - we just want it to be 50 points left of the first face. We can instead set the variable to 50 more than it used to be:
left = left + 100
This way, if we draw three faces, we can copy the four lines again (I’ve made the program a little bigger so we can fit our three faces):
Code:
size(300,100);

int eyeSize = 20;
int left = 20;
ellipse(left + 5,30,eyeSize,eyeSize);
ellipse(left + 50,30,eyeSize,eyeSize);
rect(left,60,60,20);

left = left + 100;
ellipse(left + 5,30,eyeSize,eyeSize);
ellipse(left + 50,30,eyeSize,eyeSize);
rect(left,60,60,20);

left = left + 100;
ellipse(left + 5,30,eyeSize,eyeSize);
ellipse(left + 50,30,eyeSize,eyeSize);
rect(left,60,60,20);
Preview:
We can also set our variables to be the values of other variables. So we could make the width of our eyes bigger as we move from the left of the screen by typing this:
eyeSize = left / 4;
Code:
size(300,100);

int left = 20;
int eyeSize = left / 4;
ellipse(left + 5,30,eyeSize,eyeSize);
ellipse(left + 50,30,eyeSize,eyeSize);
rect(left,60,60,20);

left = left + 100;
eyeSize = left / 4;
ellipse(left + 5,30,eyeSize,eyeSize);
ellipse(left + 50,30,eyeSize,eyeSize);
rect(left,60,60,20);

left = left + 100;
eyeSize = left / 4;
ellipse(left + 5,30,eyeSize,eyeSize);
ellipse(left + 50,30,eyeSize,eyeSize);
rect(left,60,60,20);
Preview:
We haven’t seen something like ’/ 4’ part before. All this means is that the left variable will be divided by 4. We are only doing this because otherwise the eyes would be way too big (try writing this code without the division!)
Simplifying our code
If we are increasing or decreasing the value of a variable, typing this can be a little annoying:
left = left + 100;
Instead, we can type this:
left += 100;
And if we were subtracting a number, like this:
left = left - 20;
We could type this…
left -= 20;
There’s an even shorter version if we are just adding one to the variable. Instead of this:
left += 1;
We can just type this:
left++;
And if we were subtracting one, instead of this:
left -= 1;
We could type this:
left-—;
As you can see, programmers can be lazy sometimes. This can actually be a good thing! The less code we write, the less things can go wrong.
Lesson 13
Functions
By now, we’ve learned how to draw a face, and we’ve learned how to draw copies of it with the help of variables. Our code might look a little bit like this:
Code:
size(300,100);

int left = 20;
int eyeSize = left / 4;
ellipse(left + 5,30,eyeSize,eyeSize);
ellipse(left + 50,30,eyeSize,eyeSize);
rect(left,60,60,20);

left = left + 100;
eyeSize = left / 4;
ellipse(left + 5,30,eyeSize,eyeSize);
ellipse(left + 50,30,eyeSize,eyeSize);
rect(left,60,60,20);

left = left + 100;
eyeSize = left / 4;
ellipse(left + 5,30,eyeSize,eyeSize);
ellipse(left + 50,30,eyeSize,eyeSize);
rect(left,60,60,20);
Preview:
But what if we want to draw a lot of faces? Copying and pasting the four lines we use to draw a face over and over could get boring pretty quickly. Sometimes you might need to do it hundreds or even thousands of times! Imagine if you wanted to draw a field with hundreds of trees!
When we copy and paste, we also make it harder to make changes. Let’s say we decide to add a nose to our face:
Code:
size(300,100);

int left = 20;
int eyeSize = left / 4;
ellipse(left + 5,30,eyeSize,eyeSize);
ellipse(left + 50,30,eyeSize,eyeSize);
triangle(left + 30, 40, left + 25, 50, left + 35, 50);
rect(left,60,60,20);

left = left + 100;
eyeSize = left / 4;
ellipse(left + 5,30,eyeSize,eyeSize);
ellipse(left + 50,30,eyeSize,eyeSize);
rect(left,60,60,20);

left = left + 100;
eyeSize = left / 4;
ellipse(left + 5,30,eyeSize,eyeSize);
ellipse(left + 50,30,eyeSize,eyeSize);
rect(left,60,60,20);
Preview:
If we want to change each face, we will need to copy and paste the line of code that draws the face each time we have a face. This could be a nightmare if we had to do it hundreds of times:
Code:
size(300,100);

int left = 20;
int eyeSize = left / 4;
ellipse(left + 5,30,eyeSize,eyeSize);
ellipse(left + 50,30,eyeSize,eyeSize);
triangle(left + 30, 40, left + 25, 50, left + 35, 50);
rect(left,60,60,20);

left = left + 100;
eyeSize = left / 4;
ellipse(left + 5,30,eyeSize,eyeSize);
ellipse(left + 50,30,eyeSize,eyeSize);
triangle(left + 30, 40, left + 25, 50, left + 35, 50);
rect(left,60,60,20);

left = left + 100;
eyeSize = left / 4;
ellipse(left + 5,30,eyeSize,eyeSize);
ellipse(left + 50,30,eyeSize,eyeSize);
triangle(left + 30, 40, left + 25, 50, left + 35, 50);
rect(left,60,60,20);
Preview:
Luckily, programmers have found a way to make this easier by using something called functions. A function lets us group a bunch of code together, give it a name, and run it super easily.
Right now, the four functions that make up a face are independent and don’t know anything about each other. If you make a change to one face, the other faces won’t change.

When we write a custom function, we can group them together:

Before we can make a function, we need to think of a name for it. We need to use the same rules when we name a function as we do when we name a variable, so we can’t have spaces or numbers.
There is no rule for what we need to call our functions, so use whatever makes sense to you. For example, face, drawAFace, makeAHead, and roundThingAtTheTopOfYourBody would all be valid function names. In general, the best function names are short but descriptive.
Once we have a name, we create our function by typing this:
void *functionName*(*arguments*) {
}
There’s a lot going on here, so let’s go piece by piece:
We start by naming our function. To do this, we type void followed by the name of the function. So four our face function, we would type:
The next part is the list of arguments. Arguments are all the variables we use inside of our function. We use the int left and int eyeSize variables, so we have to write the following for the arguments: (int left, int eyeSize). Our code will now look like this:
Finally, we need a space to put the code that will be run inside the function. Remember - the job of a function is to let us group code together an run it easily, and to do that we need a place to put the code.
We do this by writing two letters, { and }. The code we want to run goes between these letters, like so:
So our face program would look a bit like this:
We’ve just created our first function! To run it, we would type this:
face(left, eyeSize);
… and we will draw a face
Code:
void setup() {
  size(300,100);

  int left = 20;
  int eyeSize = 20;

  face(left, eyeSize);
}

void face(int left, int eyeSize) {
    ellipse(left + 5,30,eyeSize,eyeSize);
    ellipse(left + 50,30,eyeSize,eyeSize);
    triangle(left + 30, 40, left + 25, 50, left + 35, 50);
    rect(left,60,60,20);
}
Preview:
Woah, this code looks super different! What is this void setup() { … thing?? When we start using functions, we need to put all of our code in functions. The setup() function is new, but don’t worry - we will talk about it very soon!
If we want to draw two faces, we would just type this:
Code:
void setup() {
  size(300,100);

  int left = 20;
  int eyeSize = 20;

  face(left, eyeSize);
  face(left + 100, eyeSize);
  face(left + 200, eyeSize - 10);
}

void face(int left, int eyeSize) {
    ellipse(left + 5,30,eyeSize,eyeSize);
    ellipse(left + 50,30,eyeSize,eyeSize);
    triangle(left + 30, 40, left + 25, 50, left + 35, 50);
    rect(left,60,60,20);
}
Preview:
Hold on a sec… we’ve been using functions like rect and ellipse for a while now. What’s different about these functions?
The answer is that they are the same! When we run a function like rect, we are using a built-in function. It is made the same way as our custom functions, but luckily for us we don’t need to worry about creating it - someone else has already done the hard work for us.
Lesson 14
Animations
Up till now, all of programs have been un-moving pictures. But the whole point of a program is being able to make something that can move and react to things. Let’s start bringing our programs to life!
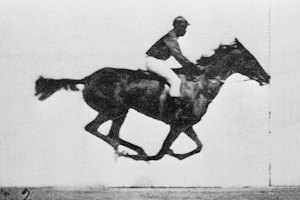
Let’s start by looking into how animations work. The first every animation was this short film:
The movie was actually a collection of 16 different pictures that were played one after the other, really quickly:
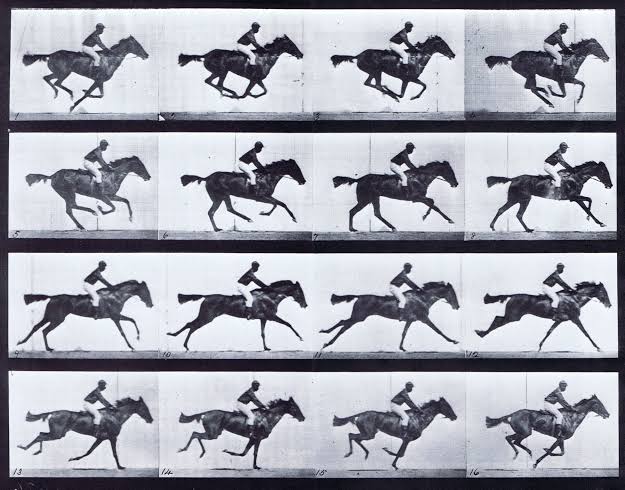
This is still how we animate things on screen - either for movies or when we are making a program. We draw different pictures really quickly, and our eyes turn them into animations.
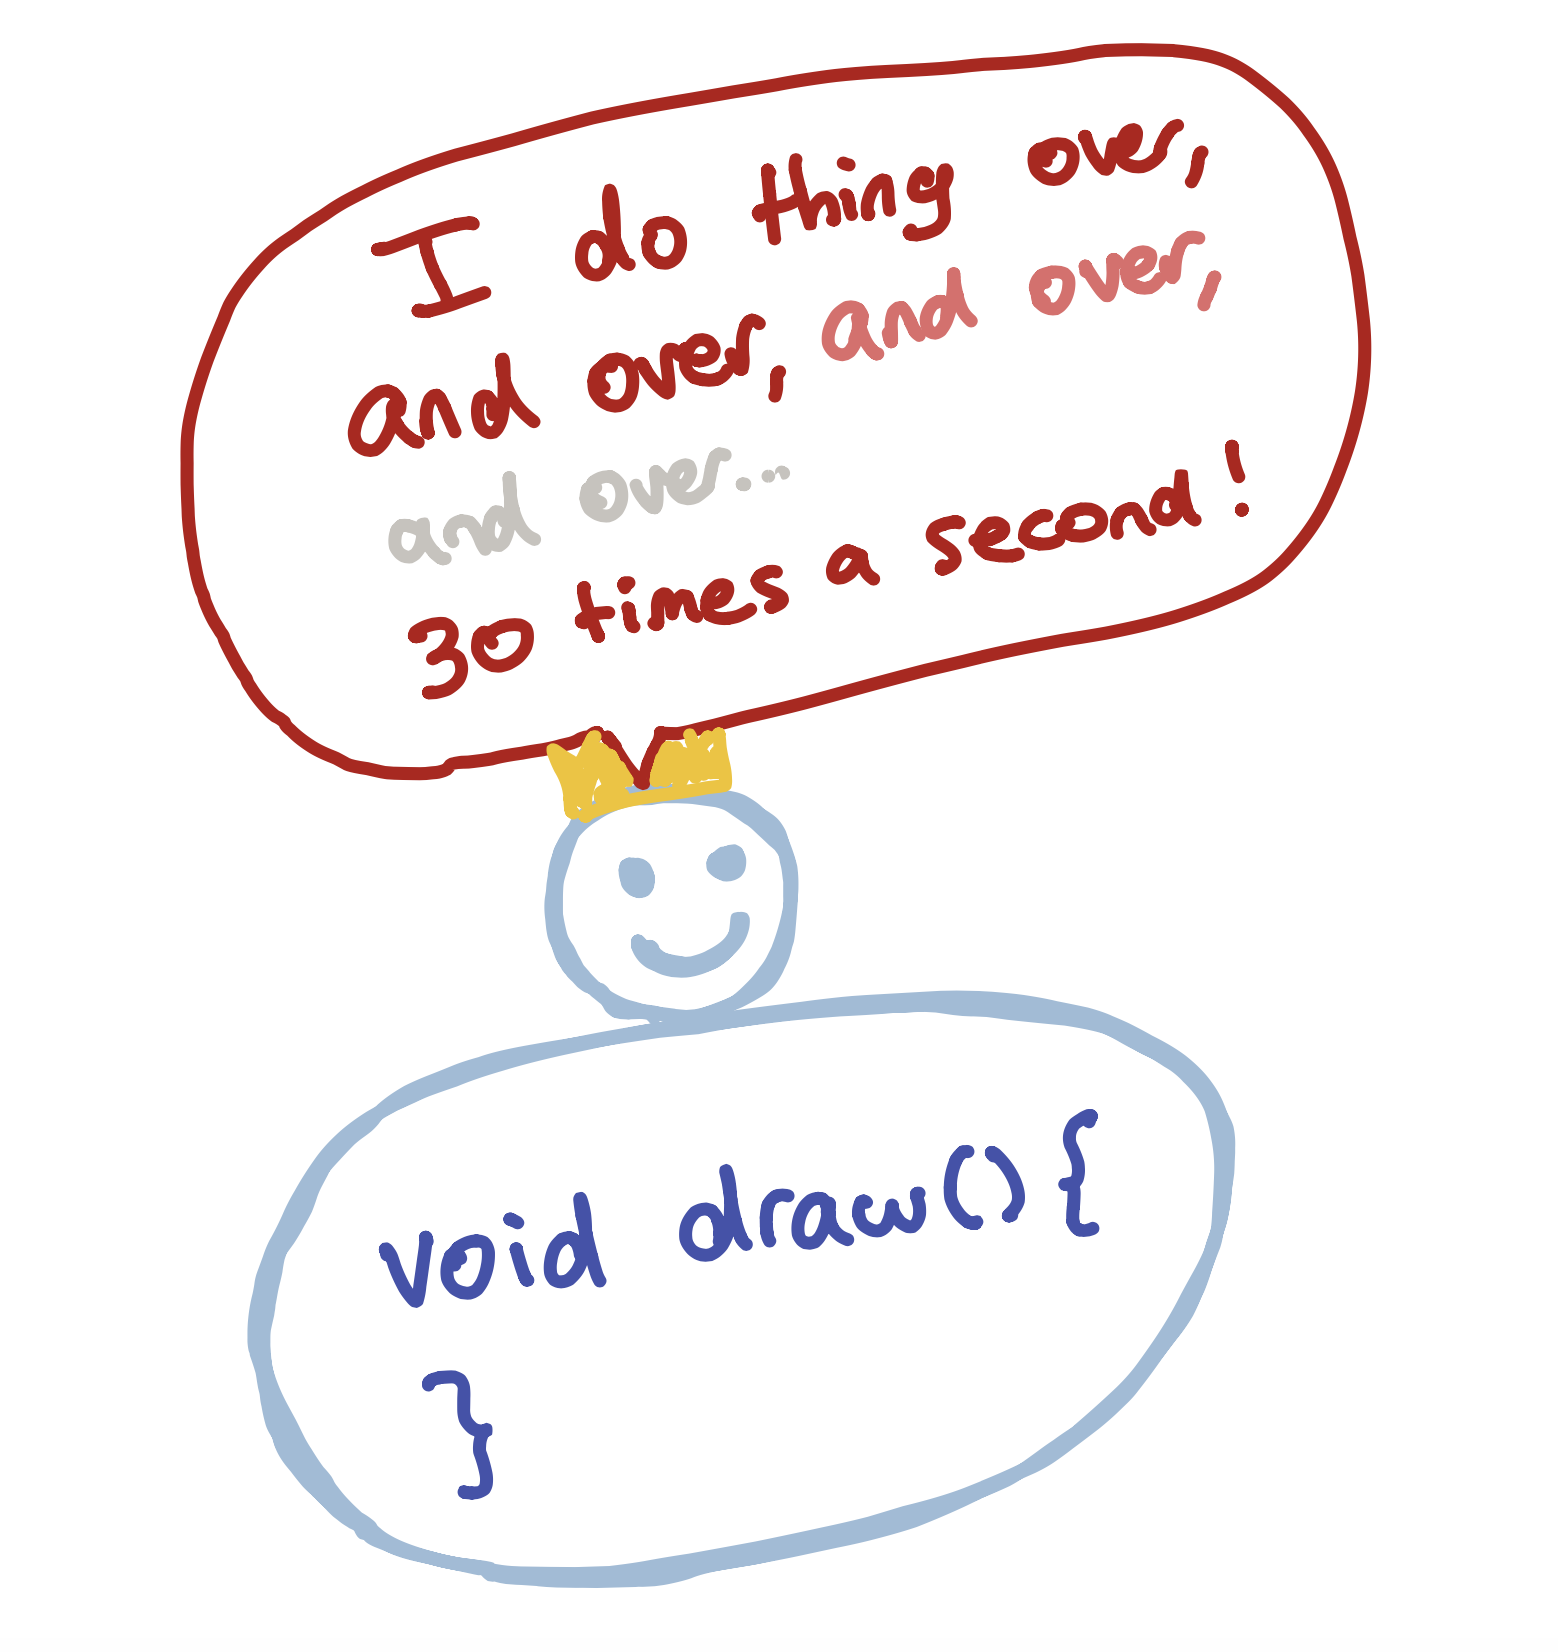
To animate things, we need to use two new functions. Let’s introduce ourselves to void setup() {} and void draw() {}:
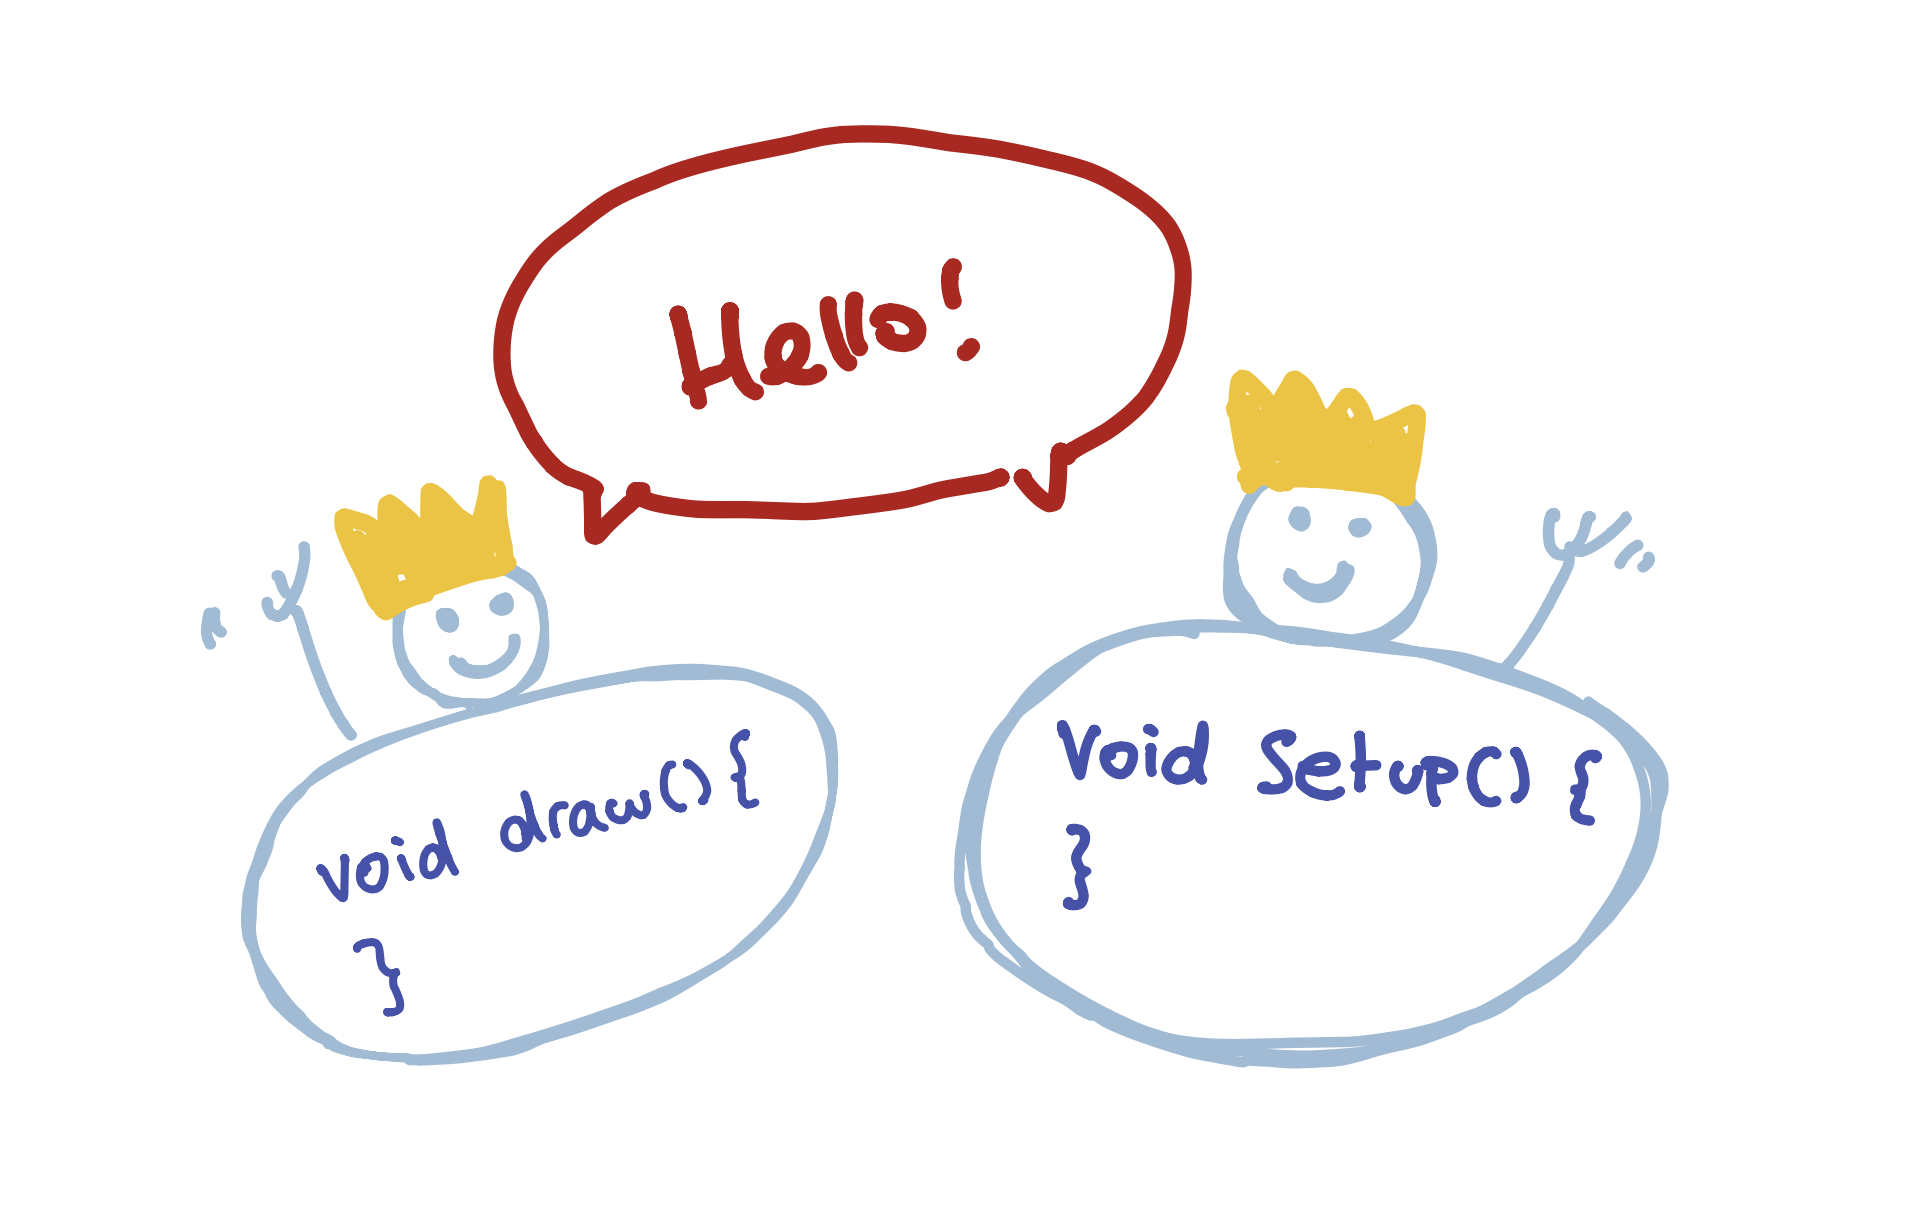
These are functions just like the other ones we’ve used (ellipse(), rect(), our custom face() function, and more…), but they’re slightly special (that’s why they have crowns on their head). These functions are special because they are called automatically be the program. They also act a little differently.
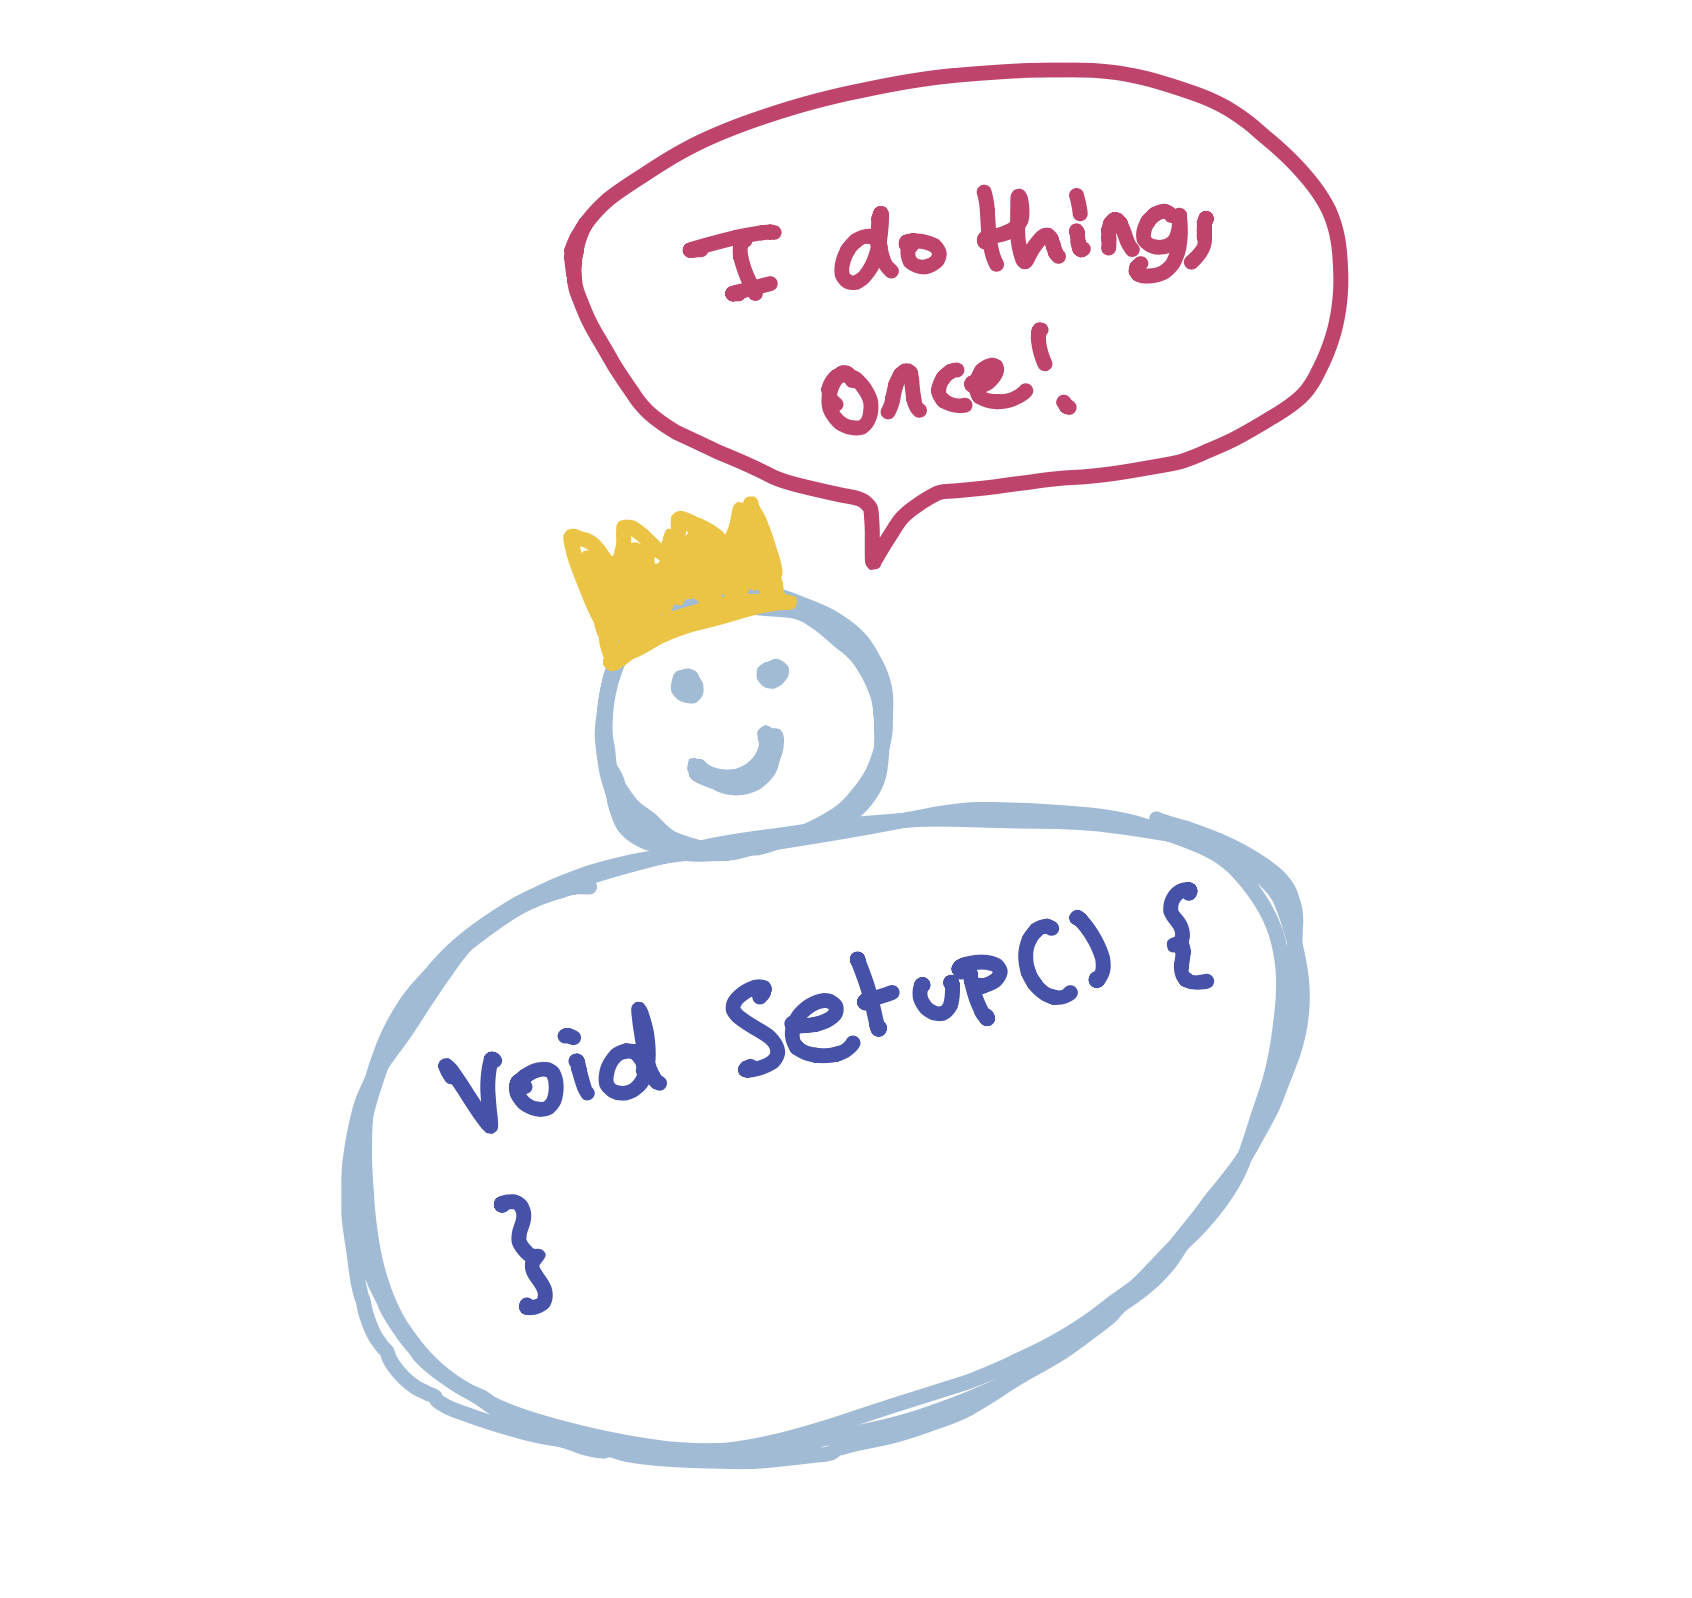
The void setup() {} function is called once, at the very start of the program. If we need to do anything once, this is where that code will go:
The void draw() {} function is called 30 times a second. This is where all of our animation code will go:
Let’s take our face function…
Code:
void setup() {
  size(300,100);

  int left = 20;
  int eyeSize = 20;

  face(left, eyeSize);
}

void face(int left, int eyeSize) {
    ellipse(left + 5,30,eyeSize,eyeSize);
    ellipse(left + 50,30,eyeSize,eyeSize);
    triangle(left + 30, 40, left + 25, 50, left + 35, 50);
    rect(left,60,60,20);
}
Preview:
… and convert it into our first animated program:
Code:
void draw() {
    int left = 20;
    int eyeSize = 20;
    face(left, eyeSize);
}

void setup() {
    size(300,100);
}

void face(int left, int eyeSize) {
    ellipse(left + 5,30,eyeSize,eyeSize);
    ellipse(left + 50,30,eyeSize,eyeSize);
    triangle(left + 30, 40, left + 25, 50, left + 35, 50);
    rect(left,60,60,20);
}
Preview:
Pretty underwhelming, huh? A lot changed, but the program doesn’t look any different. So what did we just do?
The first thing we did is that we changed the void setup() {} function to void draw() {}. This means that the code inside gets run 30 times a second instead of once.
Next, we created a new void setup() {} function and moved the size(300,100); function into that. We have to move the size function into setup(), because Processing does not let us resize the screen; this function can only be called once at the start of the program.
The reason the program isn’t animating is because nothing is changing each time the draw() function is called. We are actually drawing a new face over and over, but it’s always in the same place and so it doesn’t look any different.
If we want to change what is shown on screen, we need to start changing some variables. But we need to think a little bit about how we do this. If we were to just add a left += 1; line to our draw() function, nothing would change:
Code:
void draw() {
    int left = 20;
    int eyeSize = 20;
    left += 1;
    face(left, eyeSize);
}

void setup() {
    size(300,100);
}

void face(int left, int eyeSize) {
    ellipse(left + 5,30,eyeSize,eyeSize);
    ellipse(left + 50,30,eyeSize,eyeSize);
    triangle(left + 30, 40, left + 25, 50, left + 35, 50);
    rect(left,60,60,20);
}
Preview:
This is because we re-create the left variable each time the draw() function is called. We first create it with a value of 20, then we add 1, then we draw the face, then we re-create it with a value of 20, add 1, draw the face, etc. etc.
So if we want to change the value of left each time draw() is called, we have to create the variable once - outside of the draw function:
Code:
int left = 20;
int eyeSize = 20;

void draw() {
    left += 1;
    face(left, eyeSize);
}

void setup() {
    size(300,100);
}

void face(int left, int eyeSize) {
    ellipse(left + 5,30,eyeSize,eyeSize);
    ellipse(left + 50,30,eyeSize,eyeSize);
    triangle(left + 30, 40, left + 25, 50, left + 35, 50);
    rect(left,60,60,20);
}
Preview:
We don’t put the left and eyeSize variables in the setup() function because variables that are created inside a function can only be seen in that function. If we want to create a variable that is used in different functions, we have to create it outside.
Our animation is cool, but why is there a trail to the left of our face? This is because every time draw() is called, it draws new things on top of whatever was on the screen before. If we want to clean the screen before we redraw the face, we need to tell the computer to do so. This is actually really easy to do, and you’ve already used the function to do it. All we need to do is tell the computer to set a new background color before redrawing anything, like this:
So our final animation will look something like this:
Code:
int left = 20;
int eyeSize = 20;

void draw() {
    background(180);
    left += 1;
    face(left, eyeSize);
}

void setup() {
    size(300,100);
}

void face(int left, int eyeSize) {
    ellipse(left + 5,30,eyeSize,eyeSize);
    ellipse(left + 50,30,eyeSize,eyeSize);
    triangle(left + 30, 40, left + 25, 50, left + 35, 50);
    rect(left,60,60,20);
}
Preview:
Lesson 15
Let's make a game

Today we are going to learn how to make this game:
Making a circle
void setup() {
  ellipse(50, 50, 50, 50);
}
void draw() {
}
Now press the Play button. You should see this on your screen:
Making the canvas bigger
void setup() {
    size(640, 360);
    ellipse(50, 50, 50, 50);
}
void draw() {
}
Now press the Play button. You should see this on your screen:
Making more circles
void setup() {
    size(640, 360);
    ellipse(50, 50, 50, 50);
    ellipse(10, 10, 30, 30);
    ellipse(100, 100, 200, 200);
}
void draw() {
}
Now press the Play button. You should see this on your screen:
Color
void setup() {
    size(640, 360);
    ellipse(50, 50, 50, 50);
    fill(200, 120, 250);
    ellipse(10, 10, 30, 30);
    fill(255, 200, 200);
    ellipse(100, 100, 200, 200);
}
void draw() {
}
Now press the Play button. You should see this on your screen:
Moving circle with mouse
void setup() {
    size(640, 360);
}
void draw() {
    fill(0,100,0);
    ellipse(mouseX, mouseY, 50, 50);
}
Now press the Play button. You should see this on your screen:
Erasing the screen each time
void setup() {
    size(640, 360);
}
void draw() {
    background(255);
    fill(0,100,0);
    ellipse(mouseX, mouseY, 50, 50);
}
Now press the Play button. You should see this on your screen:
Reacting to mouse press
void setup() {
    size(640, 360);
}
void draw() {
    background(255);
    ellipse(mouseX, mouseY, 50, 50);
}
void mousePressed() {
    fill(100,0,0);
}
void mouseReleased() {
    fill(0,100,0);
}
Now press the Play button. You should see this on your screen:
Counting number of clicks
int clicks = 0;

void setup() {
    size(640, 360);
}
void draw() {
    background(255);
    ellipse(mouseX, mouseY, 50, 50);
    text("Clicks: " + clicks, 100, 100, 100, 100);
}
void mousePressed() {
    clicks += 1;
    fill(100,0,0);
}
void mouseReleased() {
    fill(0,100,0);
}
Now press the Play button. You should see this on your screen:
Adding a target
int clicks = 0;

int targetX = 100;
int targetY = 200;
int targetSize = 50;

void setup() {
    size(640, 360);
}
void draw() {
    background(255);
    ellipse(mouseX, mouseY, 50);
    text("Clicks: " + clicks, 100, 100, 100, 100);
    ellipse(targetX, targetY, targetSize);
}
void mousePressed() {
    clicks += 1;
    fill(100,0,0);
}
void mouseReleased() {
    fill(0,100,0);
}
Now press the Play button. You should see this on your screen:
Checking if we clicked target
int clicks = 0;

int targetX = 100;
int targetY = 200;
int targetSize = 50;

void setup() {
    size(640, 360);
}
void draw() {
    background(255);
    ellipse(mouseX, mouseY, 50, 50);
    text("Clicks: " + clicks, 100, 100, 100, 100);
    ellipse(targetX, targetY, targetSize, targetSize);
}
void mousePressed() {
    int targetRadius = targetSize / 2;
    int targetLeft = targetX - targetRadius;
    int targetRight = targetX + targetRadius;
    int targetTop = targetY - targetRadius;
    int targetBottom = targetY + targetRadius;

    if(mouseX > targetLeft && mouseX < targetRight && mouseY > targetTop && mouseY < targetBottom) {
        clicks += 1;
    }

    fill(100,0,0);
}
void mouseReleased() {
    fill(0,100,0);
}
Now press the Play button. You should see this on your screen:
Moving target when clicked
int clicks = 0;
int targetX = 100;
int targetY = 200;
int targetSize = 50;

void setup() {
    size(640, 360);
}
void draw() {
    background(255);
    ellipse(mouseX, mouseY, 50, 50);
    text("Clicks: " + clicks, 100, 100, 100, 100);
    ellipse(targetX, targetY, targetSize, targetSize);
}
void mousePressed() {
    int targetRadius = targetSize / 2;
    int targetLeft = targetX - targetRadius;
    int targetRight = targetX + targetRadius;
    int targetTop = targetY - targetRadius;
    int targetBottom = targetY + targetRadius;
    if(mouseX > targetLeft && mouseX < targetRight && mouseY > targetTop && mouseY < targetBottom) {
        clicks += 1;
        targetX = int(random(600));
        targetY = int(random(300));
    }
    fill(100,0,0);
}
void mouseReleased() {
    fill(0,100,0);
}
Now press the Play button. You should see this on your screen:
Adding a timer
int clicks = 0;
int targetX = 100;
int targetY = 200;
int targetSize = 50;
int time = 100;

void setup() {
    size(640, 360);
}
void draw() {
    background(255);
    ellipse(mouseX, mouseY, 50, 50);
    text("Clicks: " + clicks, 100, 100, 100, 100);
    text("Time: " + time, 100, 130, 100, 100);
    time -= 1;
    if(time <= 0) {
        time = 100;
        clicks = 0;
    }
    ellipse(targetX, targetY, targetSize, targetSize);
}
void mousePressed() {
    int targetRadius = targetSize / 2;
    int targetLeft = targetX - targetRadius;
    int targetRight = targetX + targetRadius;
    int targetTop = targetY - targetRadius;
    int targetBottom = targetY + targetRadius;

    if(mouseX > targetLeft && mouseX < targetRight && mouseY > targetTop && mouseY < targetBottom) {
        clicks += 1;
        time = 100;
        targetX = int(random(600));
        targetY = int(random(300));
    }
    fill(100,0,0);
}
void mouseReleased() {
    fill(0,100,0);
}
Now press the Play button. You should see this on your screen:
Adding a high score
int clicks = 0;
int highScore = 0;
int targetX = 100;
int targetY = 200;
int targetSize = 50;
int time = 100;
void setup() {
    size(640, 360);
}
void draw() {
    background(255);
    ellipse(mouseX, mouseY, 50, 50);
    text("High Score: " + highScore, 100, 70, 100, 100);
    text("Clicks: " + clicks, 100, 100, 100, 100);
    text("Time: " + time, 100, 130, 100, 100);
    time -= 1;
    if(time <= 0) {
        time = 100;
        clicks = 0;
    }
    ellipse(targetX, targetY, targetSize, targetSize);
}
void mousePressed() {
    int targetRadius = targetSize / 2;
    int targetLeft = targetX - targetRadius;
    int targetRight = targetX + targetRadius;
    int targetTop = targetY - targetRadius;
    int targetBottom = targetY + targetRadius;
    if(mouseX > targetLeft && mouseX < targetRight && mouseY > targetTop && mouseY < targetBottom) {
        clicks += 1;

        if(clicks > highScore) {
            highScore = clicks;
        }

        time = 100;

        targetX = int(random(600));
        targetY = int(random(300));

    }
    fill(100,0,0);
}
void mouseReleased() {
    fill(0,100,0);
}
Now press the Play button. You should see this on your screen: